Feeds:
Posts
Comments

Archive for February, 2015

Delightful Address What if letters or packages sent to people used complimentary adjectives in lieu of proper titles? For example, a letter to Mrs. Abigail Jones, might be addressed to “Lovely Abigail Jones.” A package I received in the mail the other day made me think about this concept. The package was addressed to “Delightful Linnell.” It made me smile, and if I was not in a delightful mood a moment earlier, I was surely in one after reading the label. The takeaway from all of this is: as you go about your daily interactions with family, friends, and other people, try paying them sincere and heartfelt compliments. By making them feel good, they may, in turn, be kinder to someone else and you will have triggered a ripple of smiles.

#1 – One Compliment
How to Give a Compliment Would you be able to pay one compliment to every person you spoke with during the day? In A Life-Changing Challenge: Add One Compliment, Joshua Becker writes about how including “one compliment in every conversation” began, and in doing so how his life changed. In addition, he suggests ways to make paying compliments easier.

#2 – Paws on the Bus
Bus Riding Dog If you live in the Seattle area and ride the bus system, you may be surprised one day to see a dog sitting next to you. When Eclipse, a black Labrador Retriever, wants to go to the dog park, she hops on a bus with or without her owner and heads over there. As the bus moves along, she looks out the window and knows exactly which bus stop to get off at. Read more about Eclipse here.

#3 – Stone Art
Stone Art When discussing stone work for the home or garden, the average person probably thinks it refers to either installing granite counter tops or a garden pathway. Andreas Kunert and Naomi Zittl, owners of the Ancient Art of Stone, design and install unique works of stone art that add textural and natural beauty to homes and gardens. Andreas says of his work, “I am deeply passionate about creating something intimately powerful for my clients, something I feel is a channeled reflection of their soul . . . I am a conduit giving shape in stone to the visions and dreams that assist us to remember our greater purpose and connection to the whole.”

#4 – Improve Your Vocabulary
Improve Your Vocabulary 
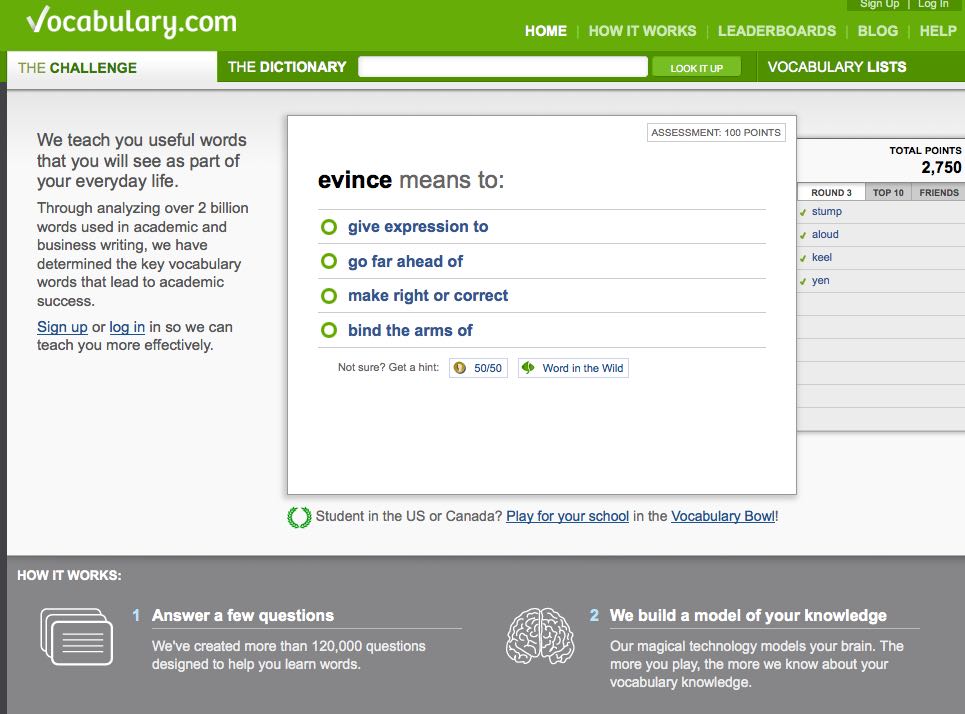
It might make it easier for you to pay compliments, if you built up your vocabulary. The website for Vocabulary.com states, “Regardless of your education level or age, Vocabulary.com will help you to master the words that are essential to academic and business success.” Windows pop up on your computer screen with specific words and ask you to choose the best definition. The words become increasingly difficult. I found it to be fun and challenging.

#5 – Sincere Compliments
“Sincere compliments cost nothing and can accomplish so much. In ANY relationship, they are the applause that refreshes.”
Steve Goodier

Now go and spread joy!

Read Full Post »

Chinese Steamed Pork Turnovers My Yin Yin, my father’s mother, calls out my name in Chinese and I drop what I am doing and run to the kitchen. I know that a fresh batch of homemade Fun Guaw, savory Chinese turnovers, have finished steaming and are waiting for me. My grandmother picks up one with a pair of chopsticks and holds it up in the air. With light coming in from behind her, I can see little bits of pork, mushroom, and water chestnut through the remarkably thin and translucent “skin.” And like a little bird waiting for a mama bird to feed her, I open my mouth. Plop! My grandmother drops a warm Fun Guaw into my mouth, and I gently bite through the tender outer layer to release its delicious contents. Fifty-two years later, I still remember how my grandmother made and fed me these delicacies. So, as an ode to her and a nod to Chinese New Year, I decided to make these wonderful little turnovers with my daughter. When the first batch came out of the steamer, I anxiously tasted one to see if it was as good as I remembered. It wasn’t as good as my Yin Yin’s, but how could it possibly compete with a childhood memory? Like Marcel Proust, though, I reveled in a moment of remembering things past.

Steamed Pork Turnovers (Fun Guaw)
Adapted from Dim Sum by Rhoda Yee

INGREDIENTS
Wheat Starch Dough
1 cup wheat starch
2/3 cup tapioca starch
1/2 tsp salt
2 tsp oil
1 cup and 2 tbsp boiling water

Pork Filling
1 lb minced fresh pork butt
12 water chestnuts, minced
1 tbsp minced salted turnips (choan choy)
4 dried shiitake mushrooms
1 tbsp sugar
3/4 tsp salt
1/4 tsp white pepper
1 stalk minced green onion

Sauce Mixture
1 tbsp cornstarch
2 tsp light soy sauce
2 tbsp sherry
1 tbsp sugar

2 tsp oil for stir-frying

DIRECTIONS
To Make Dough:
Wheat Starch Dough
1. Mix together the first 4 ingredients in the order given.

2. Bring water to a rolling boil and stir into dry ingredients with chopsticks until dry ingredients adhere.

3. Cover and let it cool for 15 minutes.

4. Lightly oil kneading surface and knead dough for several minutes, until dough is well mixed and smooth. Now it is ready for wrapping.

5. Dough can be kept at room temperature for 1 day, if you wrap it in plastic wrap.

To Make Filling:
Pork Filling
1. Soak dried mushrooms for 1 hour or until soft. Discard stems and mince mushroom caps finely.

2. Mix sauce ingredients together in a bowl and set aside.

3. In a wok or skillet, heat 2 tsp oil and then stir-fry the pork, water chestnuts, salted turnips and mushrooms for a few minutes. Stir in seasonings (sugar, salt, and white pepper).

4. Add sauce mixture and stir into meat mixture well. (Sauce mixture is very thick.)

5. Add green onions last.

6. Let meat mixture cool before wrapping in dough.

Assembling Turnovers:
1. Divide the dough into 3 parts. Roll each part into 3/4 inch wide rolls.
Dough Rolls

2. Cut each roll into 3/4 inch wide segments.
Cutting Dough

3. Roll each segment into 4 inch rounds.

4. Place 1 tbsp of filling in the center of round and bring opposite sides together and pinch to seal. Turnovers will resemble half moons.

Steaming:
1. If using a bamboo steamer or aluminum steamer, fill the bottom layer with water and line the steam rack with a piece of parchment paper (prevents sticking).

2. If you don’t have a bamboo or aluminum steamer, set up a steamer in a large pot by putting water in the bottom and using a steamer stand or inverted heat-safe bowl. Oil a cake or pie pan to prevent turnovers from sticking.

3. Bring the water to a boil.

4. Place the turnovers in a single layer either on their sides or standing with their seam sides up in the steamer. Do not let them touch or they will stick together.

4. Steam for approximately 15 minutes. Skin should be somewhat translucent.

5. Let cool for 2 to 3 minutes before handling.

6. Serve with light soy sauce for dip.

Do Ahead Notes:
These turnovers can be kept for several days in the refrigerator or 2 to 3 weeks in the freezer. In either case, keep them well-wrapped to prevent discoloration. Reheat by steaming, 10 minutes from refrigerator or 20 minutes from freezer.

Yields about 3 dozen

LINNELL’S NOTES
1. Wheat starch, tapioca starch, dried mushrooms, and salted turnip can be purchased at most Asian markets.
se Ingredients

2. I prefer rough minced pork over ground pork. That being said, I buy a piece of pork butt and mince it in my food processor.

3. Instead of 12 water chestnuts, I chopped one 8-oz can of water chestnuts.

4. My family thought the filling was a bit too salty, so I cut back on the salt in the filling by about 1/4 tsp.

5. My daughter and I had trouble rolling the balls of dough into 4 inch rounds, as the skin became too thin and difficult to work with. Ours were closer to 3 inches in diameter. Because of the size differential, we used less filling per turnover. Having a tortilla press would have been helpful.

6. My family always served these turnovers with oyster sauce instead of soy sauce.

Chinese Steamed Pork Turnovers

Enjoy!

Read Full Post »

February 20, 2015 Edition Why do socks never stay on a baby’s feet? Here are a few of my observations. Being super flexible, babies can bring their feet all the way up to their faces. They then can pull off their socks and feast on their tasty little piggies, all the while giggling with delight. Remember when you could do that? Babies also squirm and kick and writhe and stretch a lot, so with no shoes to hold them in place, socks work their way down and eventually fall off completely. Another reason socks don’t stay on tiny baby feet is an anatomical one. My adorable infant granddaughter has “cankles.” For those of you who don’t know what cankles are, they are the areas where chubby calves abruptly converge with chubby ankles. The straight cut of most socks refuse to cooperate with the triangular shape of cankles. Why is any of this information important? None of it is. But I bet some part of it made you smile.

#1 – Your Inner Child
3 things Kids Can Do that Can Lead to Self-Love and Happiness Think back to the days when you were a child. Do those memories bring a smile to your face? What feelings do you have when you think of your childhood and when did those feelings change, if they did? Somewhere along the way, most of us lose our inner child, the part of of us that is joyful, open, and inquisitive. In her article 3 Things Kids Do That Can Lead to Self-Love & Happiness, life coach Theresa Ho reminds us of ways we can nurture our inner child and develop more self-love. I particularly like the Jean Shinoda Bolen quote in the introduction: “When you recover or discover something that nourishes your soul and brings joy, care enough about yourself to make room for it in your life.”

#2 – It’s A(Door)Able
A(Door)Able Game Here’s a mini game for you to play on your computer. Use the arrow keys on your keypad to pick up a key and stick it in a door on your screen. Sounds easy, right? Not so! To play this A(Door)Able “minute-long” game, you must have nimble fingers and act quickly. My husband got through the game and was able to see the cute surprise ending. Have fun playing!

#3 – Flower Power
Three Dimensional Photo Just in time for spring, here’s a clever way to capture the spirit of the moment and frame a photo. The vibe for Flower Embellished Photo Art is so happy and carefree. Think of all the different materials you could use alternatively to get the feel you want.

#4 – Paying It Forward
Looking for another way to pay it forward? Look at the thoughtful example that Rosa’s Fresh Pizza parlor in Philadelphia started. Other businesses should take note.

#5 – There’s No Outgrowing It
“A baby is born with a need to be loved – and never outgrows it.”
Frank A. Clark

Now go and spread joy!

Read Full Post »

Orange and Rosemary Pork Tenderloin What makes a recipe one that you’ll keep and want to try again? When ease of preparation combines with incredible results, that recipe earns a permanent spot in my repertoire. Being lean and versatile, pork tenderloins are popular mealtime choices. I’ve tried many pork tenderloin recipes, but few have earned an encore in my kitchen. That is until now. Now I have a pork tenderloin recipe that meets all my requirements: quick and easy to prepare, delicious and appealing enough to serve to company, and a snap to clean up.

Orange and Rosemary Pork Tenderloin
Recipe adapted from Diva di Cucina Blog

INGREDIENTS
1 package of pork tenderloins (2–2.5 lbs), there should be two small tenderloins in the package
6 garlic cloves, sliced in half lengthwise
1/4 cup soy sauce
2 tbsp Dijon mustard
4 tbsp honey
2 tbsp orange juice
1 tbsp fresh rosemary, chopped
1 tsp pepper
3 tbsp olive oil

DIRECTIONS
1. Preheat oven to 350° F.

2. Either spray a large baking pan with cooking spray or line it with foil.

3. Use a sharp knife to slash six 1-inch deep holes, spaced across the top of each tenderloin.

4. Press a sliver of garlic into each hole, close the hole the best you can, and place the tenderloins in the baking pan.

5. In a small bowl whisk together the soy sauce, mustard, honey, juice, rosemary, pepper, and olive oil.

6. Pour the marinade over the tenderloins.

7. Bake uncovered for 45 minutes basting every 7–10 minutes. This gives the tenderloins a delicious glaze over the top. If checking with an instant-read thermometer, the internal temperature should reach 145 degrees F.

8. Transfer the tenderloins to a large cutting board and allow them to rest for 10 minutes before slicing.

9. Slice the tenderloins and transfer to a serving dish or individual plates.

10. Drizzle the cooked marinade from the pan over the sliced pork medallions.

LINNELL’S NOTES
1.  I purchased a 4-pack of pork tenderloins at Costco, so I doubled the quantity of marinade.

2. Don’t overcook the tenderloins or else they will become dry. Pork can be eaten pink as stated by the USDA: Can Safely Cooked Pork Be Pink?
“Cooked muscle meats can be pink even when the meat has reached a safe internal temperature. If fresh pork has reached 145° F throughout, even though it may still be pink in the center, it should be safe. The pink color can be due to the cooking method or added ingredients.”

Enjoy!

Read Full Post »

Friday's Fresh Five! Oh, we’re going to a hukilau
A huki, huki, huki, huki, hukilau
Ev’rybody loves a hukilau
Where the laulau is the kau kau at the big luau

Oh, we’ll throw our nets out into the sea
And all the ama ama come a-swimming to me
Oh, we’re going to a hukilau
A huki, huki, huki, huki, hukilau

Words and music by Jack Owens

The Hukilau Song can be heard throughout my home, as my husband and I practice playing our new ukuleles together. It all started when my husband asked for a ukulele for Christmas, so that he could sing to our granddaughter. He began taking classes at a local music shop and started spending a lot of time searching for instructional videos on the internet. I felt left out, but being already overextended, I had no intention of learning how to play a new musical instrument. Seeing the joy it brought him, however, I itched to get my hands on a ukulele and try playing its happy music. A few weeks ago, he surprised me with an early Valentine’s Day gift – my very own ukulele. Our mastery of chords and strumming patterns is progressing well, but our singing definitely needs work. Besides learning a new skill together, filling our home with music, and having a ton of fun, we’ve also discovered that it is a great stress reliever. The moral of the story is: the couple that strums together, hums together!

#1 – The Nimble Brain
Ways to Exercise Your Brain Whether you are learning how to play a new musical instrument or learning a new language, your brain thanks you for keeping it nimble. Want to learn more ways to exercise your brain? From mental_floss comes this list of 11 Ingenious Ways to Exercise Your Brain When You’re Stuck Inside.

#2 – Love Is All Around
Hearts In Nature When looking for love, it’s a matter of perspective. See if you can find the hearts in the captivating Hearts In Nature photo series.

#3 – Repurposing Photos
30 Creative Ways to Repurpose Photos If you have boxes of photos taking up space in your home, you might want to repurpose them. I like to use them to make photo mosaics, but so many other clever ideas exist on the internet. To get started, check out Brit + Co’s 30 Creative Ways to Repurpose Photos.

#4 – Rules For Being
12 Rules for Being a Beautiful Human Being “This moment is a gift” is rule number 11 of the 12 Rules For Being a Beautiful Human. They are good reminders for all of us, as we journey through life.

#5 – Making Your Own Music
“Play with your heart, sing with your soul.”
Unknown

Now go and spread joy!


Read Full Post »

Baked donuts With Chocolate Glaze “Can I have a doughnut with my sprinkles, please?” To anyone who drools over doughnuts in bakery cases, there is no denying that sprinkles put the happy in these circular wonders. This past Christmas I received a doughnut pan as a gift. The friend who gave it to me explained how easy it is to make doughnuts with the special pan, how cake doughnuts don’t require deep-frying, and how incredibly nice it is to bake fresh doughnuts for breakfast. She was right on all counts.

Baked Cake Doughnuts With Chocolate Glaze
Doughnut recipe from Epicurious
Chocolate Glaze recipe from Sally’s Baking Addiction

INGREDIENTS

Doughnuts
3/4 cup plus 1 tablespoon (120 grams) all-purpose flour
1/4 cup (30 grams) whole wheat pastry flour
1 teaspoon baking powder
1/3 cup (75 grams) superfine sugar
1/2 teaspoon freshly grated nutmeg
1/2 teaspoon salt
2 tablespoons (1 ounce) unsalted butter or vegetable shortening
1/4 cup whole milk, scalded
1/4 cup plain yogurt
1 teaspoon vanilla extract
1 egg, beaten

Chocolate Glaze
1/2 cup (90g) semi-sweet chocolate chips
2 tablespoons (30g) unsalted butter
2 teaspoons light corn syrup
2 teaspoons water

Decorations
Assortment of sprinkles

DIRECTIONS

For the Doughnuts:
1. Preheat the oven to 350°F. Lightly grease a doughnut pan.

2. Sift the flours and baking powder together into a large bowl or the bowl of a mixer.

2. Whisk in the sugar, nutmeg, and salt.

3. Add the butter and use your fingers to rub it into the dry ingredients as you would in making a pastry crust, until evenly distributed.

4. Add the milk, yogurt, vanilla, and egg and stir until just combined. Do not overmix or your doughnuts may be rubbery.

5. Use a piping bag or a spoon to fill each doughnut cup about three-quarters full, making sure the center post is clear. Bake until doughnuts are a light golden brown and spring back when touched, 6 to 10 minutes. Let cool slightly before removing from pan.

6. Glaze as desired.

YIELD: Makes 6 to 12 doughnuts

For the Chocolate Glaze:
1. Put the chocolate chips, butter, corn syrup, and water into a microwave-safe bowl.

2. Place bowl in the microwave oven and cook on high for 20 seconds. Stir the chocolate mixture and microwave for another 20 seconds, if needed. Stir again and microwave in 5 second increments (if necessary), until the chocolate has melted and the mixture is smooth.

3. Dip the tops of the doughnuts into the chocolate glaze.

4. Holding a doughnut over a bowl, shake sprinkles over the melted chocolate mixture.

LINNELL’S NOTES
1. I used a vegetable oil spray to grease the doughnut pan.

2. Freshly grated nutmeg really adds flavor, but if you don’t have whole nutmeg, use ground nutmeg.

3. I used a pastry cutter in step 3.

4. Step 4 requires milk to be scalded. If you need a refresher course on scalding milk, click on the link to view a brief video lesson on scalding milk. The milk needs time to cool down, so scald the milk after you sift the flours and baking soda together.

5. Instead of using a piping bag to fill the doughnut pan, I put the batter into a plastic zip-type bag. After sealing the bag, I cut off a bottom corner and squeezed the batter into the doughnut molds.

6. I found it easier to shake the sprinkles onto the doughnut, rather than dipping the chocolate side of the doughnut into a bowl of sprinkles. When doing the latter, chocolate gets all over the sprinkles in the bowl, lessening chances of reusing any leftovers.

7. This recipe made exactly 6 doughnuts for my size doughnut pan.
Baking Donuts in a Donut Pan

Enjoy!

Read Full Post »

Steller's Jay

Calls of “shaack shaack shaack!” interrupt the peace and quiet of the creek area behind my house. My eyes follow the sound and see blue-feathered birds swoop elegantly from tree branch to tree branch. Behaving as if they own the area, these noisy birds parade on my deck like beauty queens and scare off smaller birds from feeders. Teasing me with their frequent appearances, I go inside to get my camera. Ironically, the moment I step back outside, they are nowhere to be found. “Just one good photo of a Steller’s Jay, that’s all I want,” I think to myself. After waiting patiently for that one shot and then viewing the image on my computer, I know that a single photo of these striking birds will not be enough for me.

#1 – Is it Blue or Cerulean?
Color Thesaurus What color is the bird in the lead photo above? If your answer is like mine and you said blue, you may want to check out a color chart that young adult writer and illustrator Ingrid Sundberg created. Her Color Thesaurus gives specific names to shades and hues of colors. So, instead of describing the bird as just being blue, we can now say that it is a deep cerulean blue-colored bird with touches of cobalt and aegean.

#2 – Photos for Perfectionists
The Perfect Snowball Imagine a snowball that’s perfectly round. If you are a bit of a perfectionist, you will appreciate the shape of this snowball and the other 34 Photos That Will Satisfy All Perfectionists.

#3 – Growing Onions in a Plastic Bottle
Growing Onions Vertically Because I hate putting plastic products in the garbage and because I hate cleaning out my refrigerator and throwing away limp produce, the idea of growing green onions vertically in plastic bottles appeals to me. Having fresh green onions available at a moment’s notice and re-purposing a plastic bottle at the same time sounds like a win-win situation. Click here if you would like to learn more about this subject.

#4 – Mysteries of the Unseen World
In this TED Talk filmmaker Louie Schwartzberg provides us with glimpses of the incredible unseen world around us.

#5 – Do You Really See?
“The more often we see the things around us – even the beautiful and wonderful things – the more they become invisible to us. That is why we often take for granted the beauty of this world: the flowers, the trees, the birds, the clouds – even those we love. Because we see things so often, we see them less and less.”
Joseph B. Wirthlin

Now go and spread joy!

Read Full Post »

Raspberry Port Trifle The choices are endless when it comes to choosing a dessert for Valentine’s Day. But choosing the perfect dessert depends on exactly who your special Valentine is. Like my Valentine, a trifle is never boring, very versatile, and always indulgent. Come February 14th, my Valentine will be served a trifle that is composed of layers of fresh raspberries, vanilla cake, good tawny port, raspberry jam, and homemade crème anglaise. Make one large trifle or several individual ones. Make a haphazardly messy trifle like mine or a structurally engineered one, but any dessert as rich as a trifle deserves to be topped off with fresh whipped cream! Happy Valentine’s Day!

Raspberry Port Trifle
The Grand Central Baking Book

INGREDIENTS
Crème Anglaise
2 cups (16 fluid ounces) whole milk
4 egg yolks
1/3 cup granulated sugar
1 teaspoon vanilla extract
1/4 teaspoon salt

Layers
2 pounds leftover plain cake
3/4 cup port
1 cup raspberry jam
2 pints (4 cups) fresh raspberries

Whipped Cream
2 cups (16 fluid ounces) heavy whipping cream
2 tablespoons granulated or confectioner’s sugar
1 teaspoon vanilla extract

Garnish
Fresh raspberries, for garnish (optional)
Lightly toasted almonds or fresh fruit, for garnish (optional)

DIRECTIONS
Make the crème anglaise:
1. Heat the milk in a heavy saucepan over medium heat until a skin forms on its surface, just before it comes to a simmer.

2. Meanwhile, whisk the egg yolks with the sugar, vanilla, and salt until well blended and slightly thickened.

3. While whisking continuously, slowly pour about 1 cup pf the hot milk into the egg yolk mixture. Then, still whisking continuously, slowly pour the egg yolk mixture back into the saucepan with the remaining hot milk.

4. Cook the custard over medium-low heat, stirring constantly with a wooden spoon or heatproof spatula until it thickens slightly and coats the back of the spoon; this will take about 10 minutes. (If you run your finger down the spoon, the custard shouldn’t run into the track.)

5. Immediately remove the custard from the heat and pour it through a fine-mesh sieve into a 2-qt bowl. Cover with plastic wrap, placing it directly on the surface so the custard doesn’t form a skin. Let the custard cool to room temperature.

Assemble the trifle:
1. Slice the cake into 1/2- to 3/4-inch thick pieces. Arrange one-third of the slices on the bottom of the trifle bowl, pressing the cake to fill the bottom.

2. Pour 1/4 cup of the port evenly over the cake, then spread 1/3 cup of the jam over the cake.

3. Cover with a layer of raspberries, using about 1-1/3 cups, then pour 3/4 cup of custard over the berries.

4. Repeat the entire process two more times.

5. Cover the surface of the trifle with plastic wrap and refrigerate for at least 24 hours and up to two days.

Make the whipped cream, garnish, and serve:
1. Well in advance of serving, put the whipping cream in a bowl in the refrigerator, along with a whisk.

2. When you’re ready to serve, whip the cream with the sugar and vanilla until it holds soft peaks, 5 to 7 minutes.

3. Pile the whipped cream atop the trifle and garnish with the fresh fruit and toasted nuts.

Serves 10 to 12 generously

LINNELL’S NOTES
1. For the cake, I bought a box of Trader Joe’s Vanilla Cake & Baking Mix and baked it the day before assembling the trifle.

2. Also, to make it easier, I purchased Trader Joe’s Sliced Honey Roasted Almonds. These are ready to use, no toasting involved. Plus, they will be great in my Homemade Granola Bars.

3. As seen in the photo, you can make one large trifle or several individual ones. I used brandy snifters for the small trifles.

4. Keep in mind that trifles need to sit for awhile. This trifle can be made up to 2 days ahead.

Enjoy!

Read Full Post »