Feeds:
Posts
Comments

Archive for the ‘Recipes’ Category

Kale and Avocado Salad Bits of dark leafy kale combine with chunks of creamy avocado for a super nutritious salad. But wait, there’s more! Toss this salad with a fresh homemade citrus dressing and top it with a generous scoop of nutty-flavored hemp seeds. This lovely green salad proves that eating healthy can be simple and delicious.

Kale and Avocado Salad
Recipe found in Saveur: The New Classics Cookbook

INGREDIENTS
1/2 cup fresh orange juice
3 tbsp. fresh lemon juice
2 tsp. soy sauce
1 clove garlic, smashed and chopped into a paste
4 tbsp. extra-virgin olive oil
3 avocados, pitted and peeled
2 tbsp. raw hemp seeds (optional)
1 bunch kale, stemmed and finely chopped
Kosher salt and freshly ground black pepper, to taste

DIRECTIONS
1. Whisk together orange and lemon juices, soy sauce, and garlic in a bowl. Slowly whisk in oil; set dressing aside.

2. Cut 2 avocados into 1/2″ cubes and thinly slice the remaining avocado.

3. Put cubed avocados, half of the hemp seeds (if using), and kale into a serving bowl.

4. Toss kale mixture with dressing and season generously with salt and pepper.

5. Divide salad among plates and garnish with sliced avocado and remaining hemp seeds.

Serves 4 to 6

LINNELL’S NOTES
1. When tossing the salad, do not pour in all of the dressing in at one time. Pour a little bit in at a time and toss until the greens are lightly coated. You will have leftover dressing.

Enjoy!

Read Full Post »

Homemade Bubble soultion and Bubble Wands Yipee! Charlotte’s coming over and we’re going to have some bubble fun. I’ve got everything all set: homemade bubble solution that creates super-duper large bubbles, homemade bubble-making devices, and some gadgets from my kitchen with which to experiment. Who do you think is going to have more fun playing with bubbles, little Charlotte or me?

Basic Bubble Solution
Recipe from the Unbelievable Bubble Book by John Cassidy

INGREDIENTS
Bubble Solution
1 clean container/pail
1 cup Joy or Dawn dish detergent (no substitutions)
3 to 4 tablespoons glycerin (can be purchased at a drugstore)
10 cups clean, cold water (up to 50% more on dry days)

DIRECTIONS
1. Measure 10 cups of water into the pail.

2. Add 1 cup Joy or Dawn dish soap.

3. Add glycerin. In most atmospheres, it makes the bubbles more durable by reducing evaporation.

4. Stir, but not too much. You don’t want froth on the top because it tends to break the bubbles. If you get any, skim it off with your hand.

5. Gather or make any wand materials.

6. Pour bubble solution into non-breakable shallow containers such as pie pans, baking pans, dish pans, depending on the size of your bubble wands.

7. Select a wand, dip it in solution, and let excess solution drip off.

Possible Bubble Wands
Homemade Bubble Wands
1. Straws and String: thread a string through two straws and tie a knot at the ends. Move the knot until it is hidden inside one of the straws.

2. Water Bottle and Sock: cut the bottom of the bottle off. Place a sock over the cut edge and secure with a rubber band.

3. Assorted Cans: cut the tops and bottoms cut off. Make sure there are no sharp edges. If there are, you can either tape the edges with duct tape or file/sand them off.

3. 2-liter Soda Bottles: cut bottom cut off and tape bottom edge if there are any sharp jagged edges.

4. Wire Coat Hangers: bend them and form them into different shapes. I bent the handle up at a 90 degree angle to make it easier to dip.

5. Pipe Cleaners: bend them into different shapes. These are a little messy to use, since the fibers pickup a lot of excess solution.

6. Kitchen Colanders and Sieves

7. Strawberry Baskets

8. Hula Hoop: for BIG-time fun, fill a wading pool with an inch or two of solution and use a hula hoop as a wand. An alternative to this is to have the child carefully step into the pool in the middle of the hula hoop. Very slowly lift the hula hoop up from the solution, until the child is in the middle of the bubble.

LINNELL’S NOTES
1. Safety first: bubble activities should always be supervised. Bubble solution is slick and slippery. If any bubble solution gets on the floor, make sure that it does not become a slipping hazard.

2. Make sure that any solution is rinsed off of children’s hands before they touch their face, particularly their eyes.

3. Check for any sharp edges on any homemade wands or kitchen gadgets.

4. The sky’s the limit when it comes to bubble fun. Use your imagination.

Homemade Bubble soultion and Bubble Wands

Have fun!

Read Full Post »

Baked Croissant Cinnamon French Toast Croissants should never go to waste. Not ever. Not even when they are stale. Turning stale croissants into delicious French toast or bread pudding is the ultimate in food upcycling. In this recipe, chunks of croissants soak in an egg-milk-yogurt mixture and then are covered with a cinnamon streusel. After one bite of this moist French toast and its crunchy topping, you’ll find yourself buying croissants just so they can go stale.

Baked Croissant Cinnamon French Toast
Recipe adapted by Pinch of Yum from The Pioneer Woman

INGREDIENTS
Bread Pudding
3 large or 6 small stale croissants
3 eggs
¾ cup milk
3 tablespoons Greek yogurt
¼ cup sugar
½ tablespoon vanilla extract

Streusel Topping
3 tablespoons flour
¼ cup brown sugar
1 teaspoon cinnamon
Pinch of salt
3 tablespoons cold butter, cut into small pieces

DIRECTIONS
1. Grease a small baking pan with butter. Tear the croissants into small pieces and place in the dish.

2. Whisk the eggs, milk, yogurt, sugar, and vanilla. Pour evenly over bread. Cover and refrigerate overnight in the fridge (or for a few hours if you are short on time).

3. For the topping, mix flour, brown sugar, cinnamon, and salt. Cut the cold butter in with a food processor, a pastry cutter, or your fingers until the mixture resembles small crumbs.

4. An hour before serving, preheat oven to 350°F. Sprinkle crumb mixture over the top of the croissant/egg mixture in the pan. Bake for 30 to 45 minutes depending on how soft/crispy you want it to be. Make sure the French toast is fully cooked before you remove it from the oven – usually the top looks done before the inside is really done.

5. Top with butter and drizzle with maple syrup.

Serves approximately 6

LINNELL’S NOTES
1. I used 6 small croissants that I had on hand.

2. I also used lowfat milk and no-fat Greek yogurt with delicious results.

3. For some reason, the consistency of my streusel was a bit off, not as crumbly as I wanted. I added a touch more flour to the mixture to make it more crumbly.

4. French toast and bread pudding are very similar, so this recipe could be served as a dessert too.

Enjoy!

Read Full Post »

Peach-Oatmeal Cookies Luscious sweet summer peaches won’t be around forever, so try to serve them in as many ways as possible. For me, that means peach cookies! To assuage my guilt for craving cookies, I decided to try this recipe; it contains rolled oats, two types of fruit, less fat, and less sugar than an average cookie recipe. One bite of these cookies and everything will be just “peachy.”

Peach-Oatmeal Cookies
Martha Stewart Living Magazine, July/August 1996

INGREDIENTS
3 large peaches, or 1¼ pounds frozen peaches, thawed and drained
1 T fresh lemon juice
3 T unsalted butter, at room temperature
1/2 cup dark-brown sugar, packed
6 T granulated sugar
1 large egg
1 T pure vanilla extract
1½ cups plus 1 T rolled oats
1¼ cups all-purpose flour
1 tsp baking soda
1/2 tsp cinnamon
1/2 tsp salt
3/4 cup sun-dried cherries, chopped

DIRECTIONS
1. Heat oven to 350°F. Line 2 baking sheets with parchment paper.

2. Pit, peel, and dice two of the peaches. (If using frozen peaches, set aside 3/4 cup). Place diced peaches in a saucepan; add lemon juice. Cook over medium-low heat, stirring, until the peaches are broken down, about 20 minutes. Using a whisk, mash peaches; let cool.

3. Meanwhile, dice the remaining peach or reserved frozen peaches and set aside.

4. With an electric mixer, beat butter and sugars on high until well combined, about 2 minutes. Add egg and vanilla; beat until combined. Beat in mashed peaches. Add diced peaches; stir in by hand.

5. In a bowl, mix oats, flour, baking soda, cinnamon, salt, and cherries. Stir into the peach mixture by hand until well combined.

6. Drop a heaping tablespoonful onto prepared sheet; dampen finger (with water) and gently flatten. Repeat, spacing 2 inches apart.

7. Bake until very golden brown and crisp around the edges, 20 to 25 minutes. Cool cookies on wire racks.

Makes about 3 dozen

LINNELL’S NOTES
1. Most recipes call for 1 tsp of vanilla extract, so make note that the 1 T of vanilla extract specified is not a typo.

2. Because of the peach juice, this is not a thick batter.

3. One recipe yielded 42 medium-sized cookies for me.

4. The introduction to the recipe states,”If you want these cookies crisp, leave them overnight uncovered; for moist cookies, wrap them well once they’ve cooled.”

Enjoy!

Read Full Post »

August 14, 2015 Edition Resembling a drunk, my granddaughter Charlotte teeters back and forth on unsteady legs as she walks towards me. Deciding to carry the largest and heaviest toy in the room, she makes frequent balance adjustments as she plows her way through a minefield of toys on the floor. I smile at the scrunched-up-nose grin on her face; that happy grin appears during moments when she is most proud of herself. “Slow down little one,” I say to her, not wanting her to fall, but, in a grander sense, not wanting her to grow up too fast. Although she’s not quite a year old, it’s hard for me to remember what life was like before this precious bundle of joy blessed it.

#1 – Stop Complaining!
How to Complain Less Some days I watch Charlotte for 15 hours straight, but I’m not complaining. I consider myself lucky that I’m physically able to do it and that my son and daughter-in-law trust me enough to care for their child. The act of complaining zaps the joy out of life, so stop complaining or at least do it less frequently. Read What It’s Like To Go Without Complaining For a Month and learn a few tips on how to complain less.

#2 – Coloring Stress Away
25 Free Coloring Pages Back in the “good ol’ days” before the invention of televisions, computers, and cell phones, kids would entertain themselves by coloring in their favorite coloring books. Remember the happy feeling you had after buying a new box of crayons and a new coloring book? Regain that happy and carefree feeling of being lost in art as you color away your day’s stress. Check out The Country Chic Cottage’s list of free coloring pages. Coloring is not just for kids!

#3 – Salads in a Jar
20 Recipes for Salads in a Jar Vacations are over. It’s back to school or back to work we go. And that usually means back to routines. Break the monotony of bag lunches by taking out unappetizing sandwiches and substituting tantalizing salads. Better yet, make the salads ahead of time in a jar and the next morning grab a jar and go. These 20 Mason Jar Salads to Pack for Lunch will give you a few recipe ideas for next week.

#4 – Admiring Glass
#0 Most Amazing Glass Artists Alive Today One would think that glass is a cold and lifeless medium, but not in the hands of these 30 Most Amazing Glass Artists Alive Today. In their hands molten glass solidifies to become expressions of emotions and beauty. Ikuta Niyoko, one of the artists featured in the article, says this of her work, “My motifs are derived from feelings of gentleness and harshness, fear, limitless expansion experienced through contact with nature, images from music, ethnic conflict, the heart affected by joy and anger, and prayer.”

#5 – Be Surprised
“We get a limited number of milestones in life, but we never run out of opportunities to be surprised by joy.”
Connie Schultz

Now go and spread joy!

Read Full Post »

IMG_5080 (1) Chocolate-Rum Cheesecake - T Together rum and chocolate create a creamy flavor sensation. More chocolate than rum, this luxurious cheesecake requires no baking (other than the crust), so it’s a perfect dessert for summer. Wait a minute! A combination of rum and chocolate makes a perfect dessert any day of the year!

Rum-Chocolate Cheesecake
The Sugar Mill Caribbean Cookbook

INGREDIENTS

Chocolate-Almond Crust
1½ cups chocolate cookie crumbs
6 tablespoons melted butter
1/2 cup finely chopped almonds
2 tablespoons sugar

Filling
8 ounces cream cheese
1½ cups sour cream
6 tablespoons sugar
1 teaspoon vanilla extract
1/4 cup rum
1 package unflavored gelatin
8 ounces semisweet chocolate chips, melted

Garnish
Chocolate leaves or grated chocolate

DIRECTIONS
1. Preheat the oven to 350°F.

2. Blend together all the crust ingredients. Press the mixture on the bottom and one inch up the sides of a 10-inch springform pan. Bake the crust 8 minutes, then let it cool.

3. Beat together the cream cheese, sour cream, sugar and vanilla.

4. Put the rum into the top of a double boiler or into a heat-proof bowl, sprinkle on the gelatin, and let it soften 10 minutes.

5. Stir the gelatin over simmering water until the gelatin dissolves, then beat the solution into the cream cheese mixture.

6. Beat in the melted chocolate.

7. Pour the mixture into the prepared crust, refrigerate the cake until the filling is firm.

8. Before serving, remove the metal ring, and decorate the cake with chocolate leaves or grated chocolate.

Makes one 10-inch cheesecake

LINNELL’S NOTES
1. I used Nabisco’s Famous Chocolate Wafers for the crust.

2. I chopped the almonds in my food processor to get an even fine chop.

3. I used Myers’s Original Dark Rum.

4. This is not a tall cheesecake. At first, I thought the springform pan was too large for the amount of filling. After cutting the first slice and tasting its sweet richness, I decided a little bit goes a long way.

5. Although, it’s not shown in the photo, I topped slices of the cake with mocha whipped cream. While whipping the cream, I added a little confectioner’s sugar and a little bit of espresso powder.

Enjoy!

Read Full Post »

July 31, 2015 Edition Shapes, curves, and lines make up our world, but we often don’t notice or acknowledge them. Going through life on autopilot or in a state of distraction causes many of us to miss out on seeing some of the truth of what’s in front of our eyes. For example, this echeveria plant has an interesting ruffled appearance and a nice medium green color. But when using the power of black and white photography, the elements of the plant are stripped down to their essence. The dramatic shapes, curves, and lines of the plant now stand out and beg our eyes to take note. So, the next time you’re out and about, stop and look at something around you. In your mind, imagine what that item would look like if it were in black and white. You may discover that you appreciate it in a different way.

#1 – The Power of Black and White

100+ Awe-Inspiring Black & White Photographs

Berenger

The dramatic power of black and photography can be seen 100 times over in 100+ Awe Inspiring Black & White Photographs. Which photo is your favorite?

#2 – Display Those Photos
Creative Ways to Display Photos Taking photographs is one thing, but displaying them is another. If you store photographs in shoe boxes like me (bad, bad, bad idea!), get them out and and try using one of the creative ideas from Buzzfeed’s 27 Unique Photo Display Ideas That Will Bring Your Memories To Life.

#3 – Architectural Winners
The Coolest Buildings on the Planet, According to Architecture Fans Architects play with lines, shapes, and forms for structural and interesting effects. To see some incredible award-winning architectural designs from around the world check out, The Coolest New Buildings On The Planet, According to Architecture Fans.

#4 – Sweet Black and White
Chocolate Icebox Cakes Not everything in the world of black and white is austere. Take this icebox cake for instance. Layers of chocolate wafers and whipped cream, make for one sweet treat. Click here for the recipe.

#5 – Clothes or Souls?
“When you photograph people in color, you photograph their clothes. But when you photograph people in black and white, you photograph their souls!”
Ted Grant

Now go and spread joy!


Read Full Post »

Nectarine Gelato Nectarines often take a back seat to the king of summer fruit, the peach. But according to the University of Rhode Island Landscape and Horticultural Program, Fresh peaches provide respectable amounts of the antioxidant Vitamins A and C in addition to potassium and fiber. Nectarines provide twice the Vitamin A, slightly more Vitamin C, and much more potassium than peaches. And, if that’s not enough, a vendor at a farmers market recently suggested to my husband that he use nectarines instead of peaches to make “peach” gelato. He said, “Nectarines taste more ‘peachy’ and have more fragrance.” Step aside fuzzy peaches, a new king has been anointed!

Nectarine Gelato
Adapted from a recipe found on MangiaBenePasta

INGREDIENTS
1½ cups heavy cream
1½ cups whole milk
1 cup sugar
1 vanilla bean, split lengthwise
1 to 1-1/3 cups of nectarine purée

DIRECTIONS
1. In a medium saucepan, combine the cream, milk, and sugar. Cook over medium heat until the mixture comes to a simmer.

2. Remove from heat.

3. Scrape the vanilla seeds into the milk, add the bean, and let sit for 30 minutes. Strain into a clean bowl discarding the vanilla bean.

4. Stir in the nectarine purée.

5. Cover and refrigerate for at least 2 hours or overnight.

6. Transfer to an ice cream maker and freeze according to manufacturer’s directions.

Makes a little over one quart

LINNELL’S NOTES
1. My husband tripled the recipe, so that we could give away some of the gelato as gifts. To do that, he used 3 to 4 cups of nectarine purée.

2. To that tripled recipe, my husband added 1/2 cup sugar and juice of half a lemon to the nectarine purée. These amounts are dependent on the sweetness of the fruit.

Enjoy!

Read Full Post »

IMG_4339 (1) 
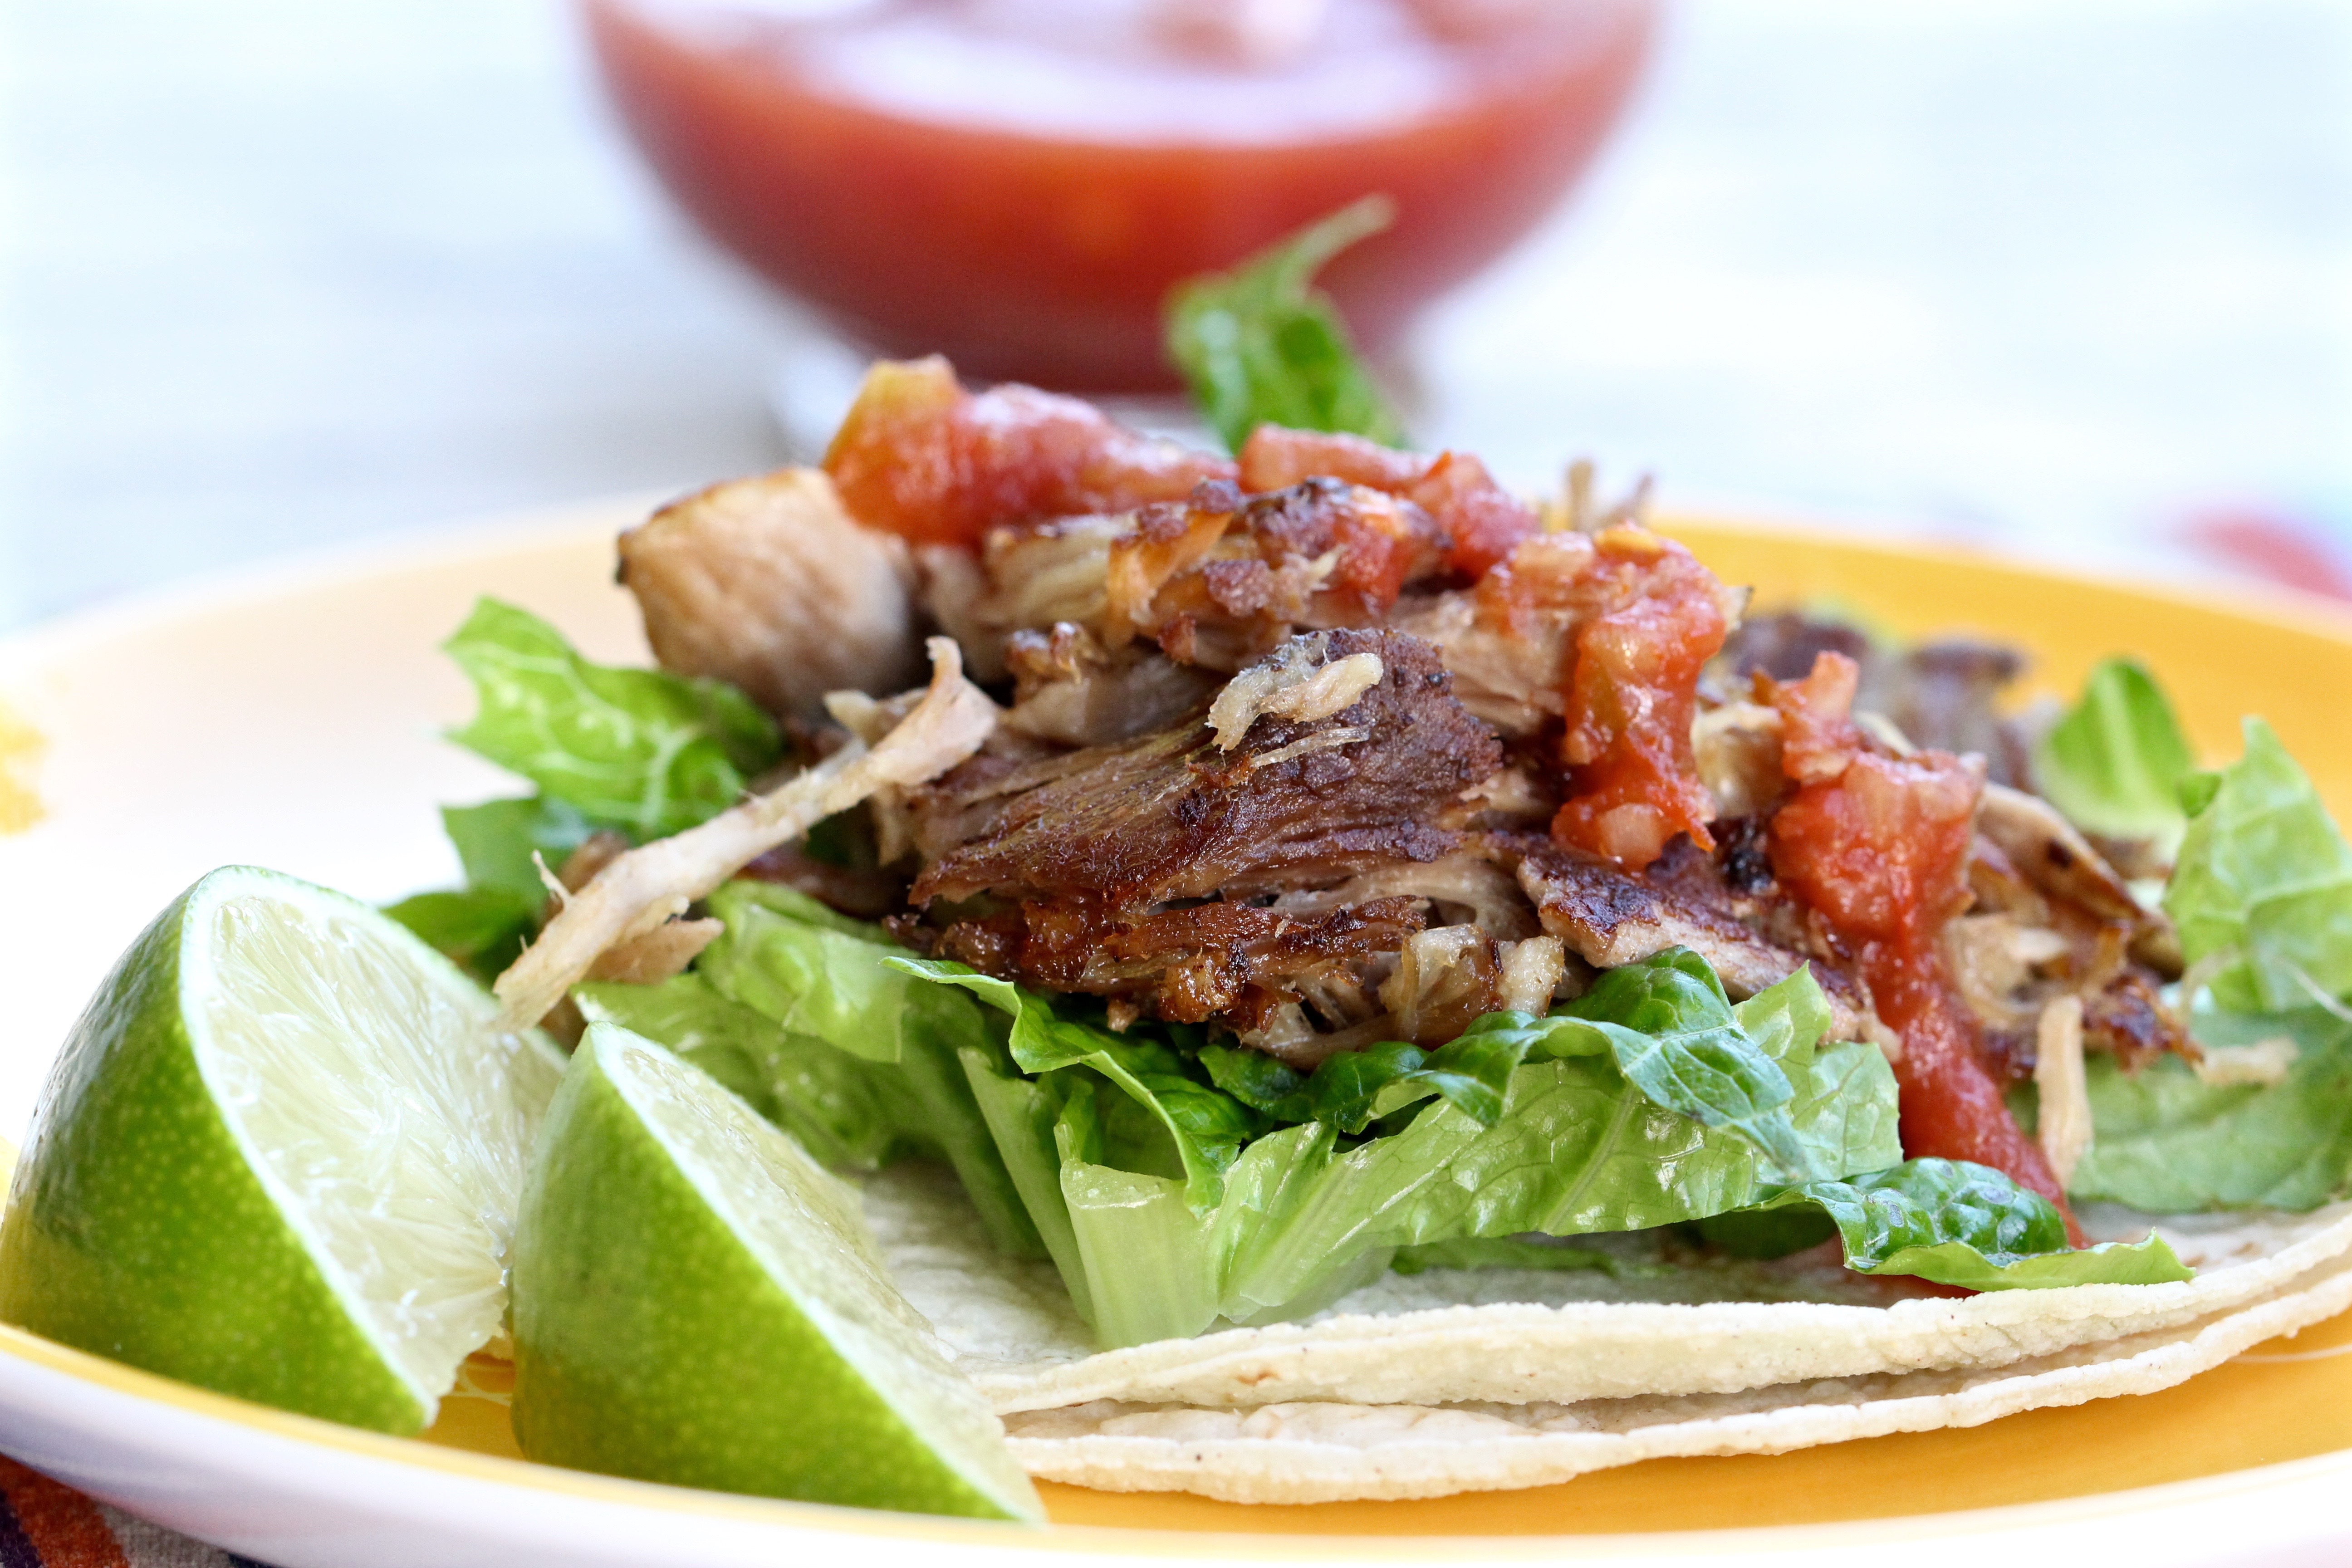
With its flavorful crispy-browned bits and moist tender strands, what’s not to like about pork carnitas? Better yet, what’s not to like about a recipe that makes preparing pork carnitas easy? When life gets hectic or if you’re cooking for a crowd, just place a pork shoulder into a crock pot and let it slowly cook in aromatics and seasonings of fresh orange juice, jalapeño pepper, onion, garlic, salt, and pepper. You can freeze the cooked meat for a later date or go ahead and crisp it up in a frying pan for immediate serving.

Pork Carnitas (Mexican Slow Cooker Pulled Pork)
Recipe from RecipeTin Eats

INGREDIENTS
5 lb/2.5 kg pork shoulder, skinless, bone-in (4lb/2kg without bone) (Cook’s Note 3)
1 onion, coarsely chopped
1 jalapeño, seeded and ribs removed, chopped
1¼ tbsp table salt OR 2 tbsp kosher salt or sea salt flakes (Cook’s Note 4)
1 tsp black pepper
4 cloves garlic, minced
2 oranges, juice only

For Rub
1 tbsp dried oregano
2 tsp ground cumin
1 tbsp olive oil

DIRECTIONS
1. Rinse and dry the pork shoulder, rub in salt and pepper.

2. Combine the rub ingredients and then rub it all over the pork.

3. Place the pork in a slow cooker (fat cap up).  Top with the onion, jalapeño, minced garlic (don’t worry about spreading it) and squeeze over the juice of the orange.

4. Cook on low for 8 to 10 hours or on high for 6 hours.

5. The meat should be tender and falling off the bone. Remove from the slow cooker and let cool slightly. Shred the pork using two forks.

6. Skim off the fat from the juices remaining in the slow cooker and discard the fat. If you are left with a lot more than 1½ to 2 cups of juice, reduce it (either in the slow cooker on the sauté setting with the lid off or in a saucepan). Set aside.

To Freeze
Pour the juices over the pulled pork and store in Ziploc bags or airtight containers. Freeze in small batches for convenience. To use, defrost completely before following the next steps to brown.

To Serve
1. Heat 1 tbsp of oil in a large nonstick pan over high heat. Place shredded pork into the pan and press down and cook until the bottom side is golden brown and crusty.

2. Pour over the juices and serve immediately (if you are using defrosted carnitas, this is not applicable as the juices are already on the meat).

3. If you are reheating the carnitas, then flip and cook the other side briefly just to warm through. I really recommend only making one side crusty and leaving the other side juicy and moist.

Serves 10 – 12

Cook’s Notes
1. If you are using a piece of pork that is more than 1 lb/0.5 kg larger or smaller than the prescribed size, ensure you adjust the other ingredients accordingly.

2. To make this in the oven, add 1 cup of water to the braising liquid. Place in 325F°/160C° oven for 2 hours, covered, then roast for a further 1 to 1.5 hours uncovered. Add more water if the liquid dries out too much. You should end up with 1½ to 2 cups of liquid when it finishes cooking. If you make this recipe in the oven, you could skip the pan frying step because you will get a nice brown crust on your pork.

3. Use pork with the skin removed but leaving some of the fat cap on. The fat adds juiciness to the carnitas!

4. SALT – a few readers have commented that 2 tbsp of salt made it too salty. I made this again a couple of days again and paid careful attention to the salt. Then I instantly realized – I use sea salt flakes (it’s like kosher salt) and 2 tbsp of sea salt = around 1¼ tbsp of table salt. I have updated the recipe to be very specific about this. Ordinary table salt are the fine granules that you use in salt shakers. Kosher and sea salt flakes are larger, lighter pieces, “flake” like. So when measuring out tablespoons or salt, you need more kosher/sea salt flakes for the same level of saltiness as ordinary table salt.

LINNELL’S NOTES
1. I serve the carnitas with warm soft corn tortillas, shredded lettuce, diced tomatoes, lime slices, chopped onions, cilantro leaves, and Mexican crema.

2. Pork carnitas can also be used as an ingredient in quesadillas, enchiladas, tamales, tortas, and burritos.

3. If you like your carnitas more crispy, shred it more finely before frying.

Enjoy!

Read Full Post »

July 17, 2015 Edition Under silhouettes of tree canopies and a summer sky sprinkled with shooting stars, I swim laps in the dark tranquil water of my pool. My strokes, while unrefined, transport me back and forth, during what I call my hour of peace. House lights, patio lights, and even pool lights are flicked off. Only the stars, the moon, and surrounding ambient light illuminate my way. But for the faint strains of favorite music playing in the background, the quiet rippling of water soothes the tension of busy days. Every night while I float serenely on my back and admire the view above, I thank my lucky stars for having lived another day.

#1 – Stargazing
Star Gazing Calendar Decades ago, when I moved into my current home and when ambient light from auto malls, shopping centers, and the like did not exist, my husband, my children, and I would take advantage of our steep driveway and place sleeping bags on it to stargaze. Our driveway became our amphitheater to the sky. If you enjoy stargazing, don’t miss out on exciting upcoming celestial events. Here are 3 sites that will keep you informed. For a quick preview, click on the photo above to learn about events in July and August:

Astronomy Calendar of Celestial Events
Skywatching in 2015: 9 Must-See Stargazing Events
Weekly Stargazing Tips

#2 – Wet Workouts
Although swimming under the stars is one of my favorite things to do, I also use my swimming pool to get additional exercise. Below are two great videos that show a variety of exercises you can do in a pool.
Calorie-Burning Pool Moves:

Tighten Your Abs in the Pool:

#3 – Playing With Food
Carl Warner's Incredible Foodscapes What if the water in your swimming pool were really blue jello and the trees providing you that lovely little bit of shade were made of parsley and ginger root? Carl Warner, a London-based photographer creates incredible landscapes using food. In his world, loaves of bread create mountains, celery stalks form a verdant forest, and romanesco becomes undersea coral. The ingredients in these detailed “foodscapes” don’t go to waste either. He or his crew take the food home and eat it or they donate it to a homeless shelter.

#4 – Naturally-Flavored Water
10 Natural Flavored Waters Why drink plain water when you can sip refreshing naturally-flavored water? Check out the tantalizing combinations in 10 Natural Flavored Water Recipes.

#5 – Lose to Find
Swimming Inspiration

Now go and spread joy!

Read Full Post »

Older Posts »