Feeds:
Posts
Comments

Archive for the ‘Gift Ideas’ Category

Homemade Bubble soultion and Bubble Wands 
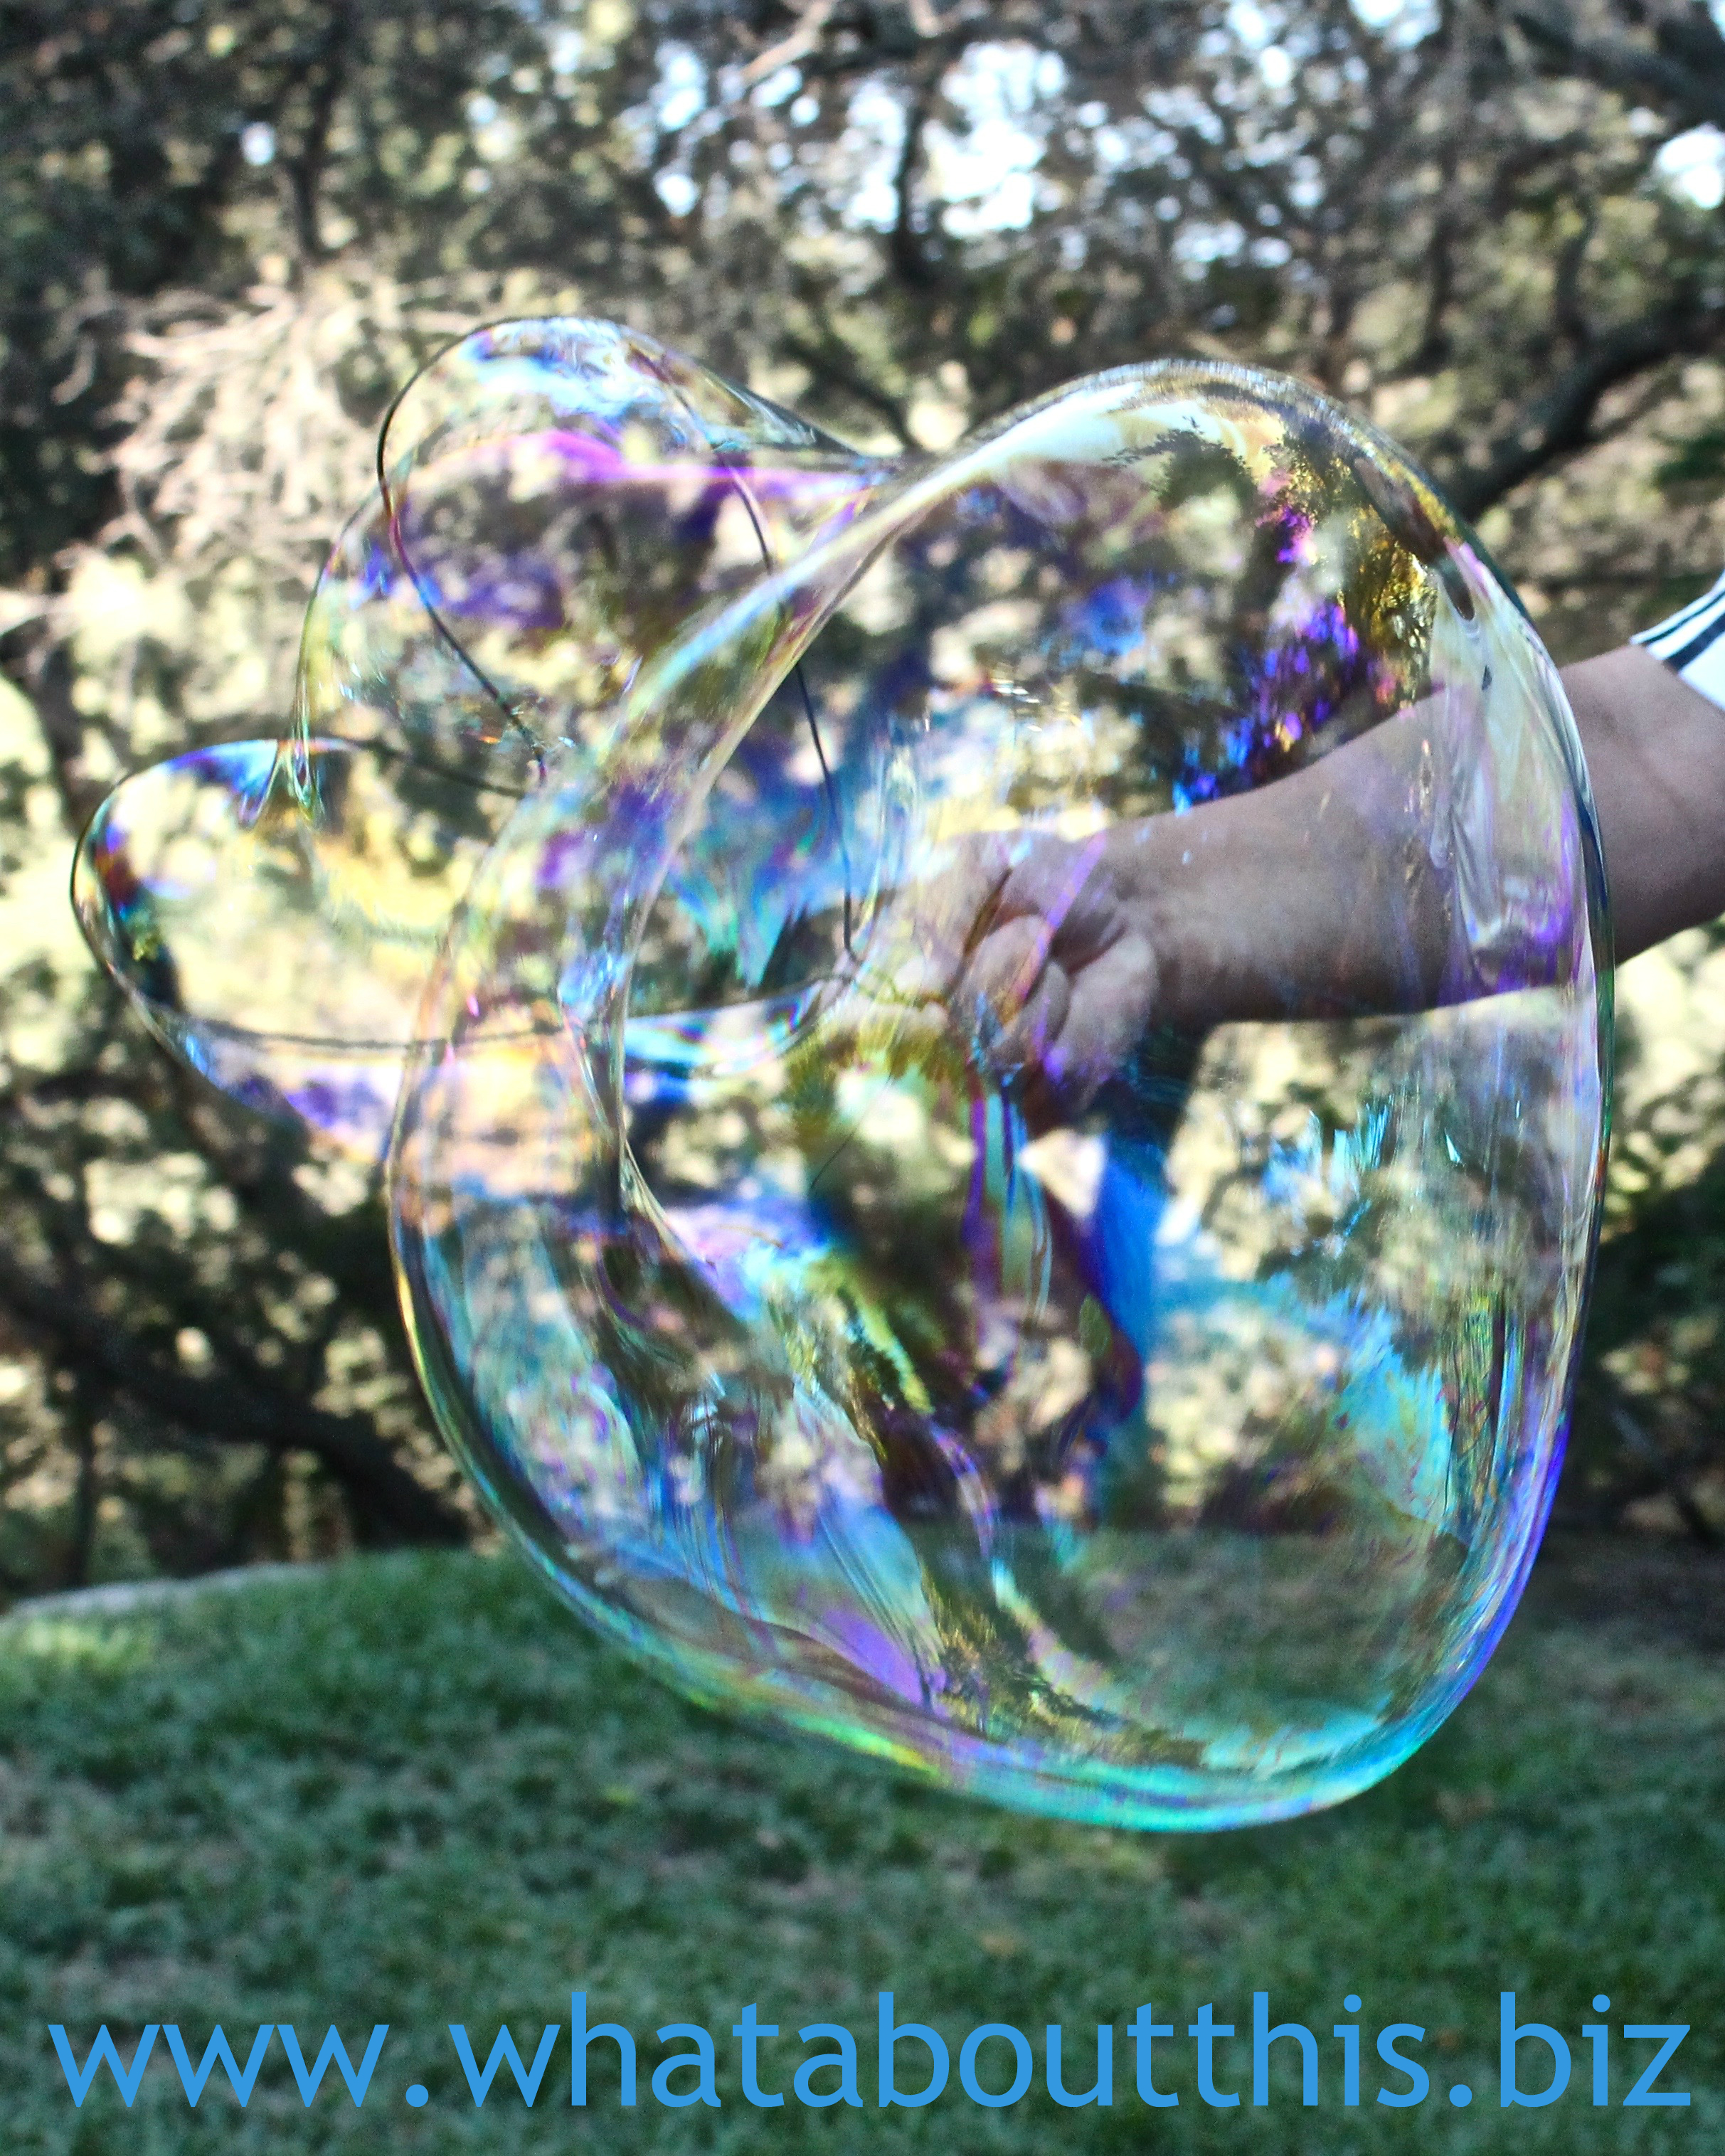
Yipee! Charlotte’s coming over and we’re going to have some bubble fun. I’ve got everything all set: homemade bubble solution that creates super-duper large bubbles, homemade bubble-making devices, and some gadgets from my kitchen with which to experiment. Who do you think is going to have more fun playing with bubbles, little Charlotte or me?

Basic Bubble Solution
Recipe from the Unbelievable Bubble Book by John Cassidy

INGREDIENTS
Bubble Solution
1 clean container/pail
1 cup Joy or Dawn dish detergent (no substitutions)
3 to 4 tablespoons glycerin (can be purchased at a drugstore)
10 cups clean, cold water (up to 50% more on dry days)

DIRECTIONS
1. Measure 10 cups of water into the pail.

2. Add 1 cup Joy or Dawn dish soap.

3. Add glycerin. In most atmospheres, it makes the bubbles more durable by reducing evaporation.

4. Stir, but not too much. You don’t want froth on the top because it tends to break the bubbles. If you get any, skim it off with your hand.

5. Gather or make any wand materials.

6. Pour bubble solution into non-breakable shallow containers such as pie pans, baking pans, dish pans, depending on the size of your bubble wands.

7. Select a wand, dip it in solution, and let excess solution drip off.

Possible Bubble Wands
Homemade Bubble Wands
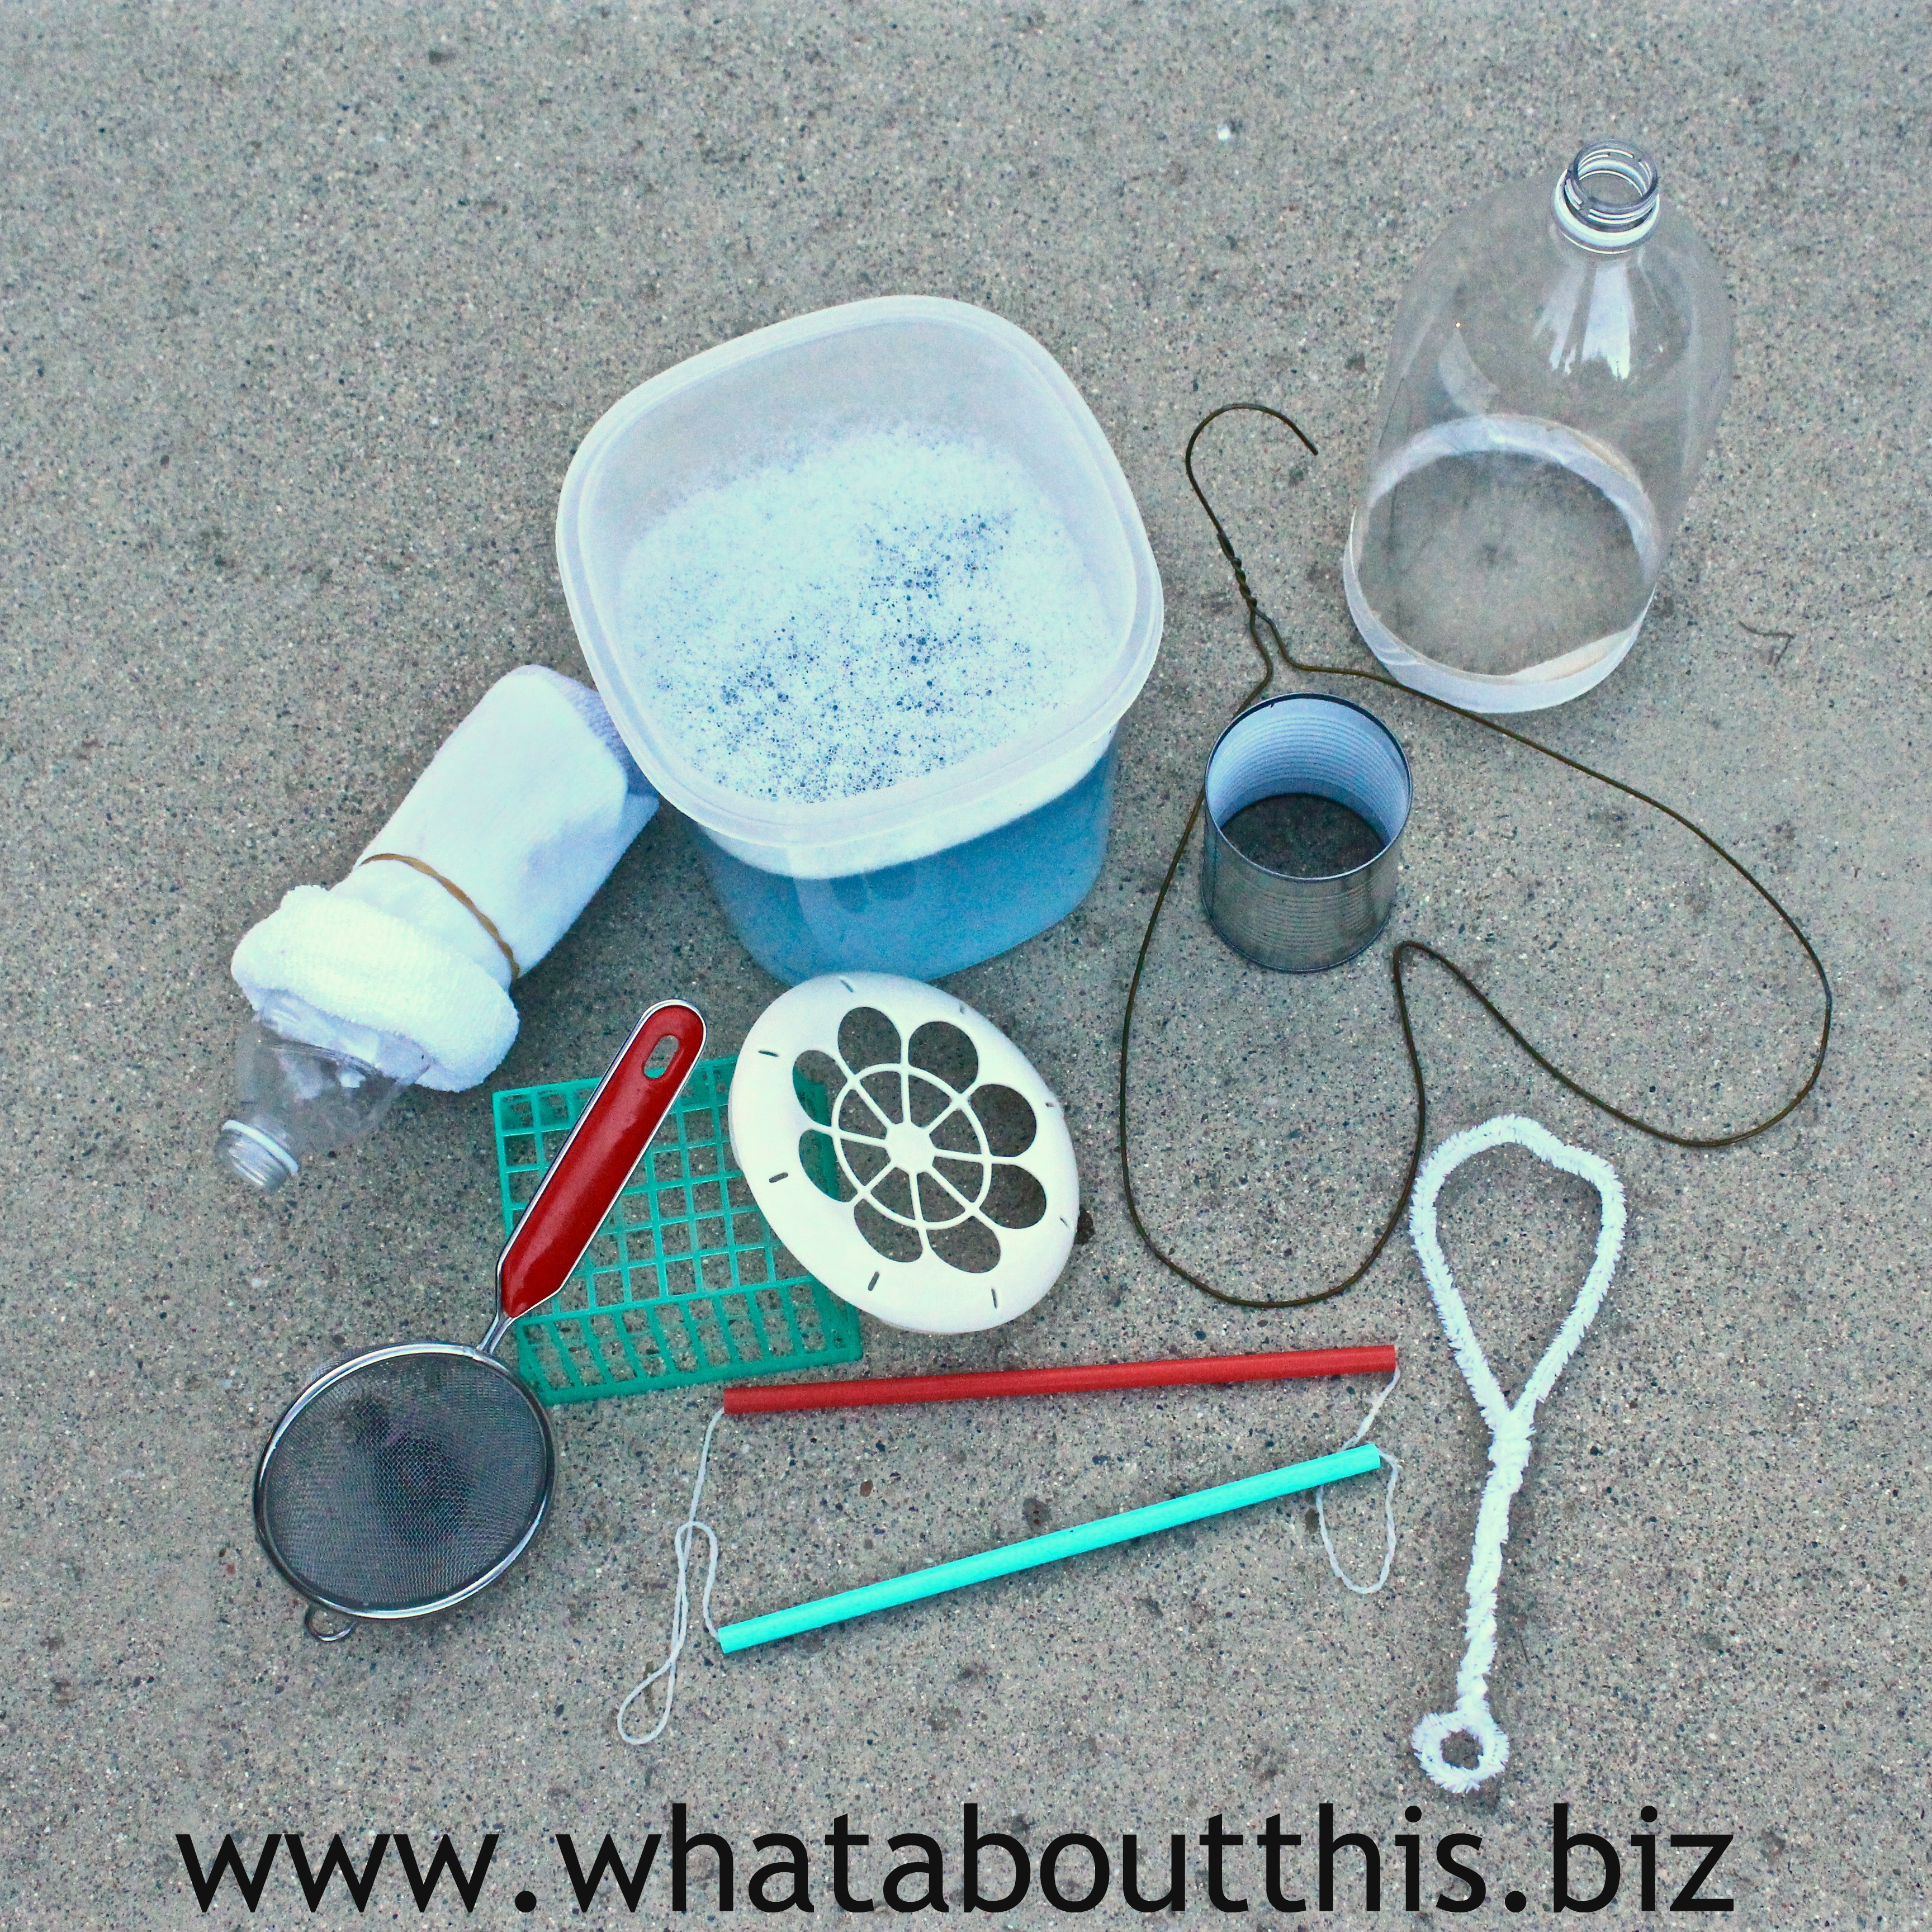
1. Straws and String: thread a string through two straws and tie a knot at the ends. Move the knot until it is hidden inside one of the straws.

2. Water Bottle and Sock: cut the bottom of the bottle off. Place a sock over the cut edge and secure with a rubber band.

3. Assorted Cans: cut the tops and bottoms cut off. Make sure there are no sharp edges. If there are, you can either tape the edges with duct tape or file/sand them off.

3. 2-liter Soda Bottles: cut bottom cut off and tape bottom edge if there are any sharp jagged edges.

4. Wire Coat Hangers: bend them and form them into different shapes. I bent the handle up at a 90 degree angle to make it easier to dip.

5. Pipe Cleaners: bend them into different shapes. These are a little messy to use, since the fibers pickup a lot of excess solution.

6. Kitchen Colanders and Sieves

7. Strawberry Baskets

8. Hula Hoop: for BIG-time fun, fill a wading pool with an inch or two of solution and use a hula hoop as a wand. An alternative to this is to have the child carefully step into the pool in the middle of the hula hoop. Very slowly lift the hula hoop up from the solution, until the child is in the middle of the bubble.

LINNELL’S NOTES
1. Safety first: bubble activities should always be supervised. Bubble solution is slick and slippery. If any bubble solution gets on the floor, make sure that it does not become a slipping hazard.

2. Make sure that any solution is rinsed off of children’s hands before they touch their face, particularly their eyes.

3. Check for any sharp edges on any homemade wands or kitchen gadgets.

4. The sky’s the limit when it comes to bubble fun. Use your imagination.

Homemade Bubble soultion and Bubble Wands

Have fun!

Read Full Post »

July 31, 2015 Edition Shapes, curves, and lines make up our world, but we often don’t notice or acknowledge them. Going through life on autopilot or in a state of distraction causes many of us to miss out on seeing some of the truth of what’s in front of our eyes. For example, this echeveria plant has an interesting ruffled appearance and a nice medium green color. But when using the power of black and white photography, the elements of the plant are stripped down to their essence. The dramatic shapes, curves, and lines of the plant now stand out and beg our eyes to take note. So, the next time you’re out and about, stop and look at something around you. In your mind, imagine what that item would look like if it were in black and white. You may discover that you appreciate it in a different way.

#1 – The Power of Black and White

100+ Awe-Inspiring Black & White Photographs

Berenger

The dramatic power of black and photography can be seen 100 times over in 100+ Awe Inspiring Black & White Photographs. Which photo is your favorite?

#2 – Display Those Photos
Creative Ways to Display Photos Taking photographs is one thing, but displaying them is another. If you store photographs in shoe boxes like me (bad, bad, bad idea!), get them out and and try using one of the creative ideas from Buzzfeed’s 27 Unique Photo Display Ideas That Will Bring Your Memories To Life.

#3 – Architectural Winners
The Coolest Buildings on the Planet, According to Architecture Fans Architects play with lines, shapes, and forms for structural and interesting effects. To see some incredible award-winning architectural designs from around the world check out, The Coolest New Buildings On The Planet, According to Architecture Fans.

#4 – Sweet Black and White
Chocolate Icebox Cakes Not everything in the world of black and white is austere. Take this icebox cake for instance. Layers of chocolate wafers and whipped cream, make for one sweet treat. Click here for the recipe.

#5 – Clothes or Souls?
“When you photograph people in color, you photograph their clothes. But when you photograph people in black and white, you photograph their souls!”
Ted Grant

Now go and spread joy!


Read Full Post »

July 10, 2015 Edition Buster dashes through the opened front door, runs past the kitchen filled with delicious aromas, and heads straight to the back door. He longingly stares through the glass panes of the door and then begins to bark loudly. Buster wants to go swimming. No gentle licks of hello or nudges to be petted; he is a dog on a mission. Playing fetch with his water bumper in the pool brings him so much joy. Dogs appreciate the simple things in life. We should take lessons from them.

#1 – Simply Genius
This cooking technique found on GoodHomeDIY is simply genius. The onion ring not only holds the egg in a round-shape while cooking, but it also imparts additional flavor. Round-Shaped Eggs

#2 – Must Read
Looking for some good books to read? It can be as simple as checking out Buzzfeed’s list of 53 Books You Won’t Be Able To Put Down. Must Read Reading List

#3 – Box Templates
Making your own boxes may not seem like a simple process, but it brings such a sense of accomplishment when you are finished and have a beautiful box perfectly suited for its contents. Take a look at the variety of box and bag templates offered for free on Template Maker. Template Maker

#4 – Look Me In The Thighs
Women's Thighs: One Word 25 brave women between the ages of 20 and 70 bared their thighs and then, using one word, described them. This is not a desirable or pleasant task for most women, but the descriptions by these women are simply honest and revealing. Read 25 Women Bare Their Gloriously Unretouched Thighs — And Describe Them In One Word and immediately start appreciating your thighs more.

#5 – The Simple Life
To find the universal elements enough; to find the air and the water exhilarating; to be refreshed by a morning walk or an evening saunter . . . to be thrilled by the stars at night; to be elated over a bird’s nest or a wildflower in spring — these are some of the rewards of the simple life. ~John Burroughs

Now go and spread joy!

Read Full Post »

DIY Pincushion: Repurposing Jars “What are you doing with all of the baby food jars, Mom?” my daughter asked as she eyed the boxes of empty jars. “Oh, I’m saving them for projects.” Catching the look that my daughter and husband exchanged, I added, “It won’t be long before Charlotte moves on from eating commercial baby food, so I have to collect the jars while the collecting is good.” I plan on repurposing the jars for group activity projects throughout the year, so I’ll need a lot of them. These cute little pincushions are just the beginning. Next, I’ll make clever photo jars and then some petite terrariums. Oh, and how about fall votive holders and winter snow globes and Valentine’s Day party favors . . . .

Baby Food Jar Pincushion
As seen on CraftPudding

SUPPLIES
DIY pin cushion supplies
1. Baby food jar
2. Hot glue gun
3. Needle and thread
4. Polyfill stuffing or batting
5. Fabric, cut into a 5-inch circle
6. Scissors
7. Ribbon, enough length to go around the perimeter of the jar lid and wide enough to cover both the lid and the bottom part of the pincushion

DIRECTIONS
1. Cut a length of thread, long enough to stitch around the outer edge of the fabric circle. Make a knot at the end of the thread. Make basting stitches (straight stitches, evenly spaced) around the entire perimeter of the fabric circle. At the end of the stitches, don’t knot the thread or cut it off. You will need to pull this thread to gather the fabric. To make it easier for you to see the stitching, I’ve flipped the fabric over to the wrong side.DIY PIn Cushion Stitch

2. Plug in your glue gun to heat it up.

3. Place the polyfill stuffing in the center of the fabric circle. Pull the thread to gather the fabric until very little of the filling can be seen and it looks like a “puff.”DIY Pin Cushion Poof

4. Adjust the filling in the puff, so that it is evenly distributed. If it is to your satisfaction, go ahead and tie a knot in the thread and snip off the extra length.

5. Apply glue to the top of the cap, making sure to apply some just inside the edge of the cap. If too much glue is applied directly to the edge, it will slop over onto the side (see the big mess I made in the photo). Place the fabric puff stitch-side down on the glue, making sure it is centered on the lid. Apply even pressure on the puff until the glue has hardened. DIY Pin Cushion Glue

6. Finally, working small sections at a time, apply small dots of hot glue around the lid and then press the ribbon onto the glue. The ribbon should be covering both the lid and the bottom of the puff. For a neat finish, cut the ribbon about 1/4-inch longer than necessary and fold this amount back towards the jar. Glue it down, overlapping the previously glue-downed ribbon. DIY Pin Cushion Empty

LINNELL’S NOTES
1. Although these small jars make cute little pin cushions, any size jar can be used for this project. Just remember to adjust the diameter of the fabric circle and the amount of stuffing to accommodate the change in the size of the lid.

2. I traced around a 5-inch-diameter bowl to get the correct circle size.

3. As mentioned before, these would make cute party favors. Fill the jars with anything you like.

Enjoy!

Read Full Post »

Planting succulents A centerpiece using teacups and terrarium-sized plants gives my dining room a light and whimsical feel. So, why stop there? Teacup Floral CenterpieceRecently, I came across some hand-painted rice bowls and teacups that belonged to my grandmother. Noticing that a rice bowl and a teacup each sported cracks, I decided they would make perfect containers for succulents, my new obsession. Sorry Grandma, but it’s a great way to repurpose unusable china. I think my new little planters are pretty darn cute, if I do say so myself. Planting Succulents in Vintage China

SUPPLIES
Containers: teacups, bowls, ceramic pots, etc.
Succulent cuttings or small potted succulents, proportionate to the size of the container.
Lightweight potting mix for cacti and succulents or a 1:1 ratio of high quality potting soil and Perlite
Aquarium gravel or small pebbles

DIRECTIONS
1. If the container you are using does not have drainage holes, pour a good layer of gravel in the bottom of it to enhance drainage.

2. Fill the container with potting soil to within 1/2″ from the top edge, allowing enough space to plant the cuttings without the soil overflowing.

3. Plant the largest specimen first and then working your way down size-wise, fill in the remaining areas. Remember to balance your arrangement by height, shape, texture, and color.

4. Top dress with aquarium gravel or pebbles. This prevents the Perlite from floating away, helps the cuttings stay in place, and keeps moisture away from the base of the plants.

Enjoy!

Read Full Post »

Water Drops on Succulent Cradled in the leaves of a succulent, drops of water shimmer like jewels. Throughout time, succulents have survived their arid conditions by adapting. They store water in their fleshy parts – leaves, stems, and roots. They evolved to survive. Will mankind evolve quickly enough to survive a potential megadrought? Will mankind learn to value water and treat it like the life-saving, shimmering jewel that it is?

#1 – What’s The Difference?
The Difference Between Cacti and Succulents Do you know the difference between a cactus and a succulent? Just in case you need to know, here is what U.C. Master Gardner Denise Levine wrote about the topic:

All cacti are succulents, but not all succulents are cacti. Succulents (from the Latin word “succulentus,” for juice or sap) are defined by their moisture-storing capacity and come from many botanical families. Medicinal aloe veras and familiar Chicks and Hens are two examples of succulents many of us are familiar with.

Cacti have small, round, cushion-like structures called areoles from which spines, branches, hair, leaves and even flowers grow. While many succulents may look like cacti in every other respect, if they don’t have these circular areoles, they are not in the cactus (Cactaceae) family.

Another distinction is that succulents are native to most parts of the world, but cacti are only indigenous from Alaska to Chile in the Western Hemisphere. Vermont, New Hampshire and Maine have never found a native cactus, but Canada has found several that have evolved to survive Canada’s freezing winters.

#2 – Oldest Living Things
The Oldest Living Things in the World With my birthday approaching next week, I started searching for other old living things. This search led me to Rachel Sussman’s photographs of “The Oldest Living Things In The World.” After viewing the photo of 12,000 year-old Mojave yucca plants, which are succulents, and her other incredible photos, I suddenly felt very young. Everything is relative.

#3 – Miniature Fairy Gardens
Miniature and Fairy GardeningHere’s a project for the young-at-heart. Check out Naturework’s photos of Miniature and Fairy Gardening. You’ll put transforming a broken clay pot into a fairy garden on your “Creative To Do” list.

#4 – Rock Cacti Garden
Cacti Made Of Painted Rocks This cute and clever idea suits people like me who have sparks of creativity, but also have brown thumbs. Be on the lookout for perfect rock formations, so that you can make your own Cactus Made of Painted Rocks.

#5 – Sit or Don’t Sit
“The world is full of cactus, but we don’t have to sit on it.”
Will Foley

Now go and spread joy!

Read Full Post »

Remembrance Box The woodworker stood back and looked at his project. While pouring his heart into the design and construction of it, his mind focused on only one thing – the purpose of it. At a recent meeting of local woodcrafters, a plea had been made for boxes. Keaton Raphael Memorial, a nonprofit organization that assists families with children with cancer, was in dire need of woodworkers to help make Remembrance Boxes. When a child being helped by Keaton Raphael Memorial passes away and becomes a special KRM angel, the organization gives the family a wooden box containing bereavement reading materials and oftentimes a grant to help with funeral expenses. The woodworker rose to the challenge and his expertly-crafted work reflects the beauty of fallen leaves, signifying, in my opinion, the short, but significant lives of young souls.

#1 – Land Art
Land Art Nature doesn’t need any embellishments. However, when man works with natural components, interesting art can result. You will be impressed by the scale of some of the projects in 21 Unforgettable Examples of Land Art.

#2 – Got Stuff?
Recycling Goods With children moving hither and yon, I am left with a garage full of “stuff.” All of it is useful – to somebody. Rather than toss everything into the garbage, I’d rather find new homes or new uses for them. If you are in the same situation of having stuff and not wanting to add to our landfills, go to earth911. Type in what you would like to recycle, add your zipcode, and a listing of local recycling centers should appear.

#3 – Easter Decorations
80 Fabulous Easter Decorations While scrolling through the ideas in 80 Fabulous Easter Decorations You Can Make Yourself, I went into creative overload. There are so many cute and clever ideas in it, I don’t which project to start first!

#4 – Fresh Eggs
How to Buy the Freshest Eggs PossibleWith Easter right around the corner, you’ll want to make sure you buy the freshest eggs possible. In How to Buy the Freshest Eggs Possible, learn how to read the Julian date on an egg carton. And here’s a tip from me: when selecting a carton of eggs in the grocery store, just don’t open the carton and look at the eggs. Always wiggle each egg. If an egg doesn’t move, there’s a good chance that its shell is cracked, causing it to stick to the carton.

#5 – In Every Falling Leaf
“In every change, in every falling leaf there is some pain, some beauty. And that’s the way new leaves grow.”
Amit Ray

Note: The beautiful Remembrance Box in the photo was made by Mr. Jim Hunt

Now go and spread joy!

Read Full Post »

Teacup Floral Centerpiece When looking for ways to decorate your home, look no further than your own collections. Whether your collections consist of books, copper molds, or vintage dolls, try incorporating them into your seasonal decorating. Two years ago, I wrote a post on Decorating With Egg Cups. Placing tiny sprigs of greenery and petite flowers into some of my favorite egg cups always brings a feeling of springtime into my home. Egg Cups As Mini Vases Having collected a lovely assortment of teacups, too, I decided to show them off by using some of them to create a floral centerpiece for my dining room table. My dining room table is long and wide, so I designed a centerpiece that is a little over 5-feet-long and about 18 inches at its widest point. After selecting a complementary assortment of teacups and a teapot to use as a center focal point, I went to a nearby nursery and looked for appropriate plants. Specimens grown for use in terrariums fit the bill; they come in many different plant varieties and are grown in small plastic pots that fit very nicely into teacups. Plus, at $2.95 each, they were relatively inexpensive. After tucking a little green moss here and there to hide the plastic pots, my easy teacup centerpiece provides a light and cheerful counterpoint to an otherwise formal room.

SUPPLIES
Teacup Centerpiece Table runner or piece of fabric
Small box
Assortment of teacups
Terrarium-sized plants, as many as the number of teacups you will be using
Bag of green moss
Teapot for focal point

DIRECTIONS
1. Arrange the fabric down the center of the table. I used a sheer fabric and made it appear billowy by tucking the edges under and creating soft folds. I tapered the ends of the fabric to within 13 inches of each end of the table.

2. Place a small box under the fabric in the center of the arrangement. Place teapot on top of fabric-draped box for height.

3. Do a preliminary arrangement of teacups and saucers, evenly distributing colors, shapes, and heights. I fashioned an alternating right-left-right or zigzag pattern.

4. Temporarily place the plants, while still in their containers, in the teacups, evenly distributing colors, textures, and heights.

5. Once the arrangement is to your liking, take the teacups (leave saucers behind as place markers) to an area for assembling.

6. Stick whole potted plant in teacup (do not remove the plant from its plastic pot). Do the same to the other plants.

7. Arrange moss in between the plastic pot and the teacup and also above the plastic pot to hide it. Do this with all the other potted plants in teacups. Teacup Floral Centerpiece

LINNELL’S NOTES
1. I used 14 sets of teacups and saucers; seven on each side of the teapot.

2. Please note that because I want to reuse the teacups for their original purpose, I did not permanently plant the plants in the cups.

3. Working with moss is messy. You can cover your dining room table with paper, if you want to work with it there. I found it easier to assemble the pots near my kitchen sink, where I could wipe any dirt, moss bits, and twigs into the sink.

4. Don’t forget to water the plants. Because they are potted in small containers, they will dry out quickly.

5. When the time comes to dismantle this centerpiece, I will plant the plants in a terrarium.

Teacup Centerpiece

Enjoy your springtime centerpiece!

Read Full Post »

March 13, 2015 Edition A sunny high-rise home with an ocean view and plenty of fresh air ventilation sounds like a perfect place to rest a spell and, perhaps, even raise a family. That’s what this seagull thought as it sat on a comfy nest on top of a roof. Roman author and naturalist Pliny the Elder once philosophized, “Home is where the heart is.” What is your heart telling you?

#1 – Unusual Homes For Sale
12 Strange and Unusual Homes for Sale For $1.1 million dollars the Mushroom House in New York can be yours. Check out photos of this unique home and eleven other homes in 12 Strange and Unusual Homes for Sale.

#2 – Going the Distance
Top Ten Amazing Migrations Did you know that the Arctic Tern has the longest migration of any animal? Read how far it travels and learn more about other animals who “go the distance” in the Top Ten Most Amazing Migrations.

#3 – Crafty Gift Ideas
35 Easy to Make DIY Gift Ideas Homesthetics presents a nice variety of ideas in its post 35 Easy to Make DIY Gift Ideas That You Would Actually Like to Receive. From bath and body products to photo pendants to stepping stones and more, you’ll feel creatively inspired to try out one of these ideas.

#4 – Helping Homeless Pets
Helping Homeless Pets Meet Duke, a part Corgi, part Dachshund, and part Jack Russell bundle of love. Duke is a rescue dog whose owners recently surrendered him, because they are expecting a baby. That action gives Duke two strikes on his rap sheet, not to mention a few behavioral issues born from insecurity. He is currently being fostered by my oldest son, until someone steps ups to love and adopt him. To learn of ways you can help Duke and other animals in his situation, read 10 Ways to Help Homeless Pets, Even If You Can’t Adopt.

#5 – Home
“It’s not the size of your house that makes a home . . . it’s the size of your heart!”
Jane Lee Logan

Now go and spread joy!

Read Full Post »

February 20, 2015 Edition Why do socks never stay on a baby’s feet? Here are a few of my observations. Being super flexible, babies can bring their feet all the way up to their faces. They then can pull off their socks and feast on their tasty little piggies, all the while giggling with delight. Remember when you could do that? Babies also squirm and kick and writhe and stretch a lot, so with no shoes to hold them in place, socks work their way down and eventually fall off completely. Another reason socks don’t stay on tiny baby feet is an anatomical one. My adorable infant granddaughter has “cankles.” For those of you who don’t know what cankles are, they are the areas where chubby calves abruptly converge with chubby ankles. The straight cut of most socks refuse to cooperate with the triangular shape of cankles. Why is any of this information important? None of it is. But I bet some part of it made you smile.

#1 – Your Inner Child
3 things Kids Can Do that Can Lead to Self-Love and Happiness Think back to the days when you were a child. Do those memories bring a smile to your face? What feelings do you have when you think of your childhood and when did those feelings change, if they did? Somewhere along the way, most of us lose our inner child, the part of of us that is joyful, open, and inquisitive. In her article 3 Things Kids Do That Can Lead to Self-Love & Happiness, life coach Theresa Ho reminds us of ways we can nurture our inner child and develop more self-love. I particularly like the Jean Shinoda Bolen quote in the introduction: “When you recover or discover something that nourishes your soul and brings joy, care enough about yourself to make room for it in your life.”

#2 – It’s A(Door)Able
A(Door)Able Game Here’s a mini game for you to play on your computer. Use the arrow keys on your keypad to pick up a key and stick it in a door on your screen. Sounds easy, right? Not so! To play this A(Door)Able “minute-long” game, you must have nimble fingers and act quickly. My husband got through the game and was able to see the cute surprise ending. Have fun playing!

#3 – Flower Power
Three Dimensional Photo Just in time for spring, here’s a clever way to capture the spirit of the moment and frame a photo. The vibe for Flower Embellished Photo Art is so happy and carefree. Think of all the different materials you could use alternatively to get the feel you want.

#4 – Paying It Forward
Looking for another way to pay it forward? Look at the thoughtful example that Rosa’s Fresh Pizza parlor in Philadelphia started. Other businesses should take note.

#5 – There’s No Outgrowing It
“A baby is born with a need to be loved – and never outgrows it.”
Frank A. Clark

Now go and spread joy!

Read Full Post »

Older Posts »