Feeds:
Posts
Comments

Archive for July, 2013

Salted Butter Breakups Food always tastes better when it’s shared. But here’s the dilemma: Would you actually want to share a super-sized butter cookie that contains the perfect balance of flavors – not too sweet and not too salty – and the perfect balance of textures – crispy on the outside and delightfully soft and chewy on the inside? Its name, Salted Butter Breakups, indicates that this big delicious cookie is meant to be broken up and shared. Bake one up to share with friends or succumb to temptation and eat the entire sweet glory all by yourself. You choose.

Salted Butter Breakups
Adapted from From Around My French Table, by Dorie Greenspan

INGREDIENTS
1¾ cups all-purpose flour
2/3 cup sugar
3/4 to 1 teaspoon sel gris or kosher salt
1 stick plus 1 tablespoon (9 tablespoons) cold unsalted butter, cut into 18 pieces
3 to 5 tablespoons cold water
1 egg yolk, for the glaze

DIRECTIONS
1. Put the flour, sugar and salt in the workbowl of a food processor and pulse to combine. Drop in the pieces of butter and pulse until the mixture looks like coarse meal – you’ll have big, pea-size pieces and small flakes. With the machine running, start adding the cold water gradually. Add just enough water to produce a dough that almost forms a ball. When you reach into the bowl to feel the dough, it should be very malleable.

2. Scrape the dough onto a work surface, form it into a square and pat the square down to flatten it a bit. Wrap the dough in plastic and chill it for about 1 hour (or as long as overnight).

3. When you’re ready to bake, center a rack in the oven and preheat the over to 350 degrees F. Line a baking sheet with a silicone mat or parchment paper.

4. Remove the dough from the fridge and, if it’s very hard, bash it a few times with your rolling pin to soften it. Put the dough between sheets of plastic film or wax paper and roll it – or pat it – into a rectangle that’s about 1/4-inch thick and about 5-x-11 inches; accuracy and neatness don’t count for a lot here. Transfer the dough to the lined baking sheet.

5. Beat the egg yolk with a few drops of cold water and, using a pastry brush, paint the top surface of the dough with the egg wash. Using the back of a table fork, decorate the cookie in a cross-hatch pattern.

6. Bake the cookie for 30 to 40 minutes, or until it is golden. It will be firm to the touch, but have a little spring when pressed in the center – the perfect breakup is crisp on the outside and still tender within. Transfer the baking sheet to a rack and allow the cookie to cool to room temperature.

Serving: If fun is what you’re after, bring the breakup to the table whole and let everyone break off pieces big and small; if order suits you better, break the cookie in the kitchen and serve the pieces on a plate.

Storing: The baked cookie will keep in a container for about 3 days. You can make the dough up to 3 days ahead and keep it in the refrigerator, or you can wrap it airtight and freeze it for up to 2 months. Don’t brush the dough with egg wash until you’re ready to bake it.

Makes 4 servings

LINNELL’S NOTES:
1. Sel gris means gray salt in French. It is a coarse-textured flavorful salt harvested in France.

2. My husband liked the salty bite this cookie had, so the next time I make this cookie, I will try adding 1 teaspoon of salt instead of the 3/4 teaspoon that I used.

3. I baked the cookie for about 30 minutes. Because I thought the edges were the tastiest part, next time I will bake it a little bit longer to get more of the crispy browned-butter flavor throughout.

4. Although the cookie can be stored in an airtight container for a few days, it loses its crispiness. It’s best when consumed within a couple of hours after baking.

5. This cookie alone makes an easy dessert, but if you accompany it with some fresh seasonal fruit, such as peaches or berries, it becomes a fabulous dessert treat.

ENJOY!

Read Full Post »

Ruca and Friends Herd Golden Retriever What happens when a group of Corgis meet for a play date in the park? They run around, they sniff each other, and they herd. One time they herded a Golden Retriever right to the top of a picnic table. As their owners called them back, I imagine these little mighty-mites thought to themselves, “Aw, come on, we were just doing what comes naturally!”

#1 – Extremely Unnatural
Trolltunga Rock Extreme kayaking at Victoria Falls? No, I don’t think so. Jumping on the Trolltunga Rock in Norway? Maybe. Honestly, high-adventure risk-taking doesn’t comes naturally to me, but I can certainly live vicariously through these 23 Photos That Will Make Your Stomach Drop.

#2 – Fold The Page
Folded Book Art by Luciana Frigerio I hold books in high regard, so folding back their pages wouldn’t be something I’d do. As a matter of fact, I often chastise my husband for folding back pages to mark his place, instead of using bookmarks. When I saw the Folded Book Art of Luciana Frigerio, my first thought was “She’s folding pages!” and my second thought was “How does she do that amazing work?”

#3 – Thinking Outside the Box
Clever Ideas For some people, thinking outside the box just comes naturally. Here are clever ideas from people who think like that. How about turning an old TV console into a dog bed? Or what about mixing Elmer’s glue with food coloring and painting it on glass to achieve the look of sea glass?

#4 – More Than Just a Rescued Dog
We’ve all heard stories about dogs rescuing people. This story, however, is made more heartwarming by the fact that a dog that nobody wanted because of his disabilities, proved his worth and rescued his family from a devastating fire. Watch the extraordinary story of A Handicapped Rescued Dog Returns the Favor. Be patient, this page takes time to load.

#5 – Life Is A Ride
Life is truly a ride. We’re all strapped in and no one can stop it. When the doctor slaps your behind, he’s ripping your ticket and away you go. As you make each passage from youth to adulthood to maturity, sometimes you put your arms up and scream, sometimes you just hang on to that bar in front of you. But the ride is the thing. I think the most you can hope for at the end of life is that your hair is messed, you’re out of breath, and you didn’t throw up.

Jerry Seinfeld

Have a wonderful weekend!

Read Full Post »

Pizza Hummus Pizza-flavored hummus? As a lover of hummus, this recipe caught my eye. I thought of all the wives and mothers out there who constantly battle to get their loved-ones to eat a more healthy diet. Why not be clever and sneak this healthy dip onto the table under the guise of a tasty “PIZZA” dip? It’s worth a try!

Pizza Hummus
Food Network Magazine

INGREDIENTS
1 tablespoon extra-virgin olive oil
1/4 cup tomato paste
2 teaspoons dried oregano
1 teaspoon dried basil
2 to 3 cloves garlic
3 cups canned chickpeas, drained and rinsed, 1/2 cup liquid reserved
1/4 cup tahini
1/4 cup fresh lemon juice
Kosher salt

DIRECTIONS
1. Heat the olive oil in a small skillet over medium-high heat.
2. Add the tomato paste, oregano and basil and cook until slightly toasted, about 2 minutes.
3. Transfer the tomato paste mixture to a food processor. Add the garlic, chickpeas, chickpeas liquid, tahini, lemon juice and 1 teaspoon salt.
4. Purée until smooth and creamy.

LINNELL’S NOTES
1. Tahini is a paste made from ground sesame seeds. To learn about the “Nutritional Facts for Roasted Sesame Tahini,” read this article from SFGate.

2. Two 15.5 oz. cans of chickpeas equaled 3 cups of drained and rinsed beans for me.

3. I used 2 cloves of garlic, but the next time I make this, I will try adding 3 cloves of garlic for a little bit more flavor.

4. Next time I will also add a little bit more basil and oregano. I may even try adding fresh basil and fresh oregano. The conversion for dried to fresh herbs is about 1 teaspoon of dried to 1 tablespoon of fresh.

5. I also will try sprinkling a little bit of diced sun-dried tomatoes (packed in olive oil) on top of the hummus before serving.

6. Obviously it is more nutritious to serve this dip with vegetables, but pita chips would be great with it, too.

ENJOY!

Read Full Post »

Shape the Hive Two is better than one, three is better than two, four is better than three, and so on. Being a part of something larger and grander, lends us support and strength and gives us a better perspective. No matter what each of us is experiencing, good or bad, life is just better when shared with others.

#1 – Shape The Hive
Shape The Hive Be part of a creative community and help SHAPE THE HIVE, a digital interactive art piece. The website states: “SHAPE THE HIVE, at its foundation, is a creative community. Members contribute pieces that, when combined with others, will form a whole far greater than the sum of its parts.” Participants create and add images to cells using their own photographs. The built in software allows participants to manipulate their images to give their cells different kaleidoscopic effects. This is so easy and fun to do!

#2 – Makes Me Think
A while back I posted a link to a site called Makes Me Think: Today’s Thought-Provoking Life Stories. People submit entries about occurrences and observations that made them think (MMT). Recently, I came across this site again and I remembered to bookmark it on my computer this time. Reading the entries always engulfs me in an array of emotions and often times renews my faith in my fellow man. Here is a sampling:

Today, I went for a run and decided to go thru my town’s cemetery. While I was looking around, I came across an older women in a lawn chair reading a book next to a grave. I began talking to her, assuming she’d lost her husband recently, but it turns out she has done this every week for the past five years. Her love and devotion MMT.

Today, I am 16-years-old. I learned CPR yesterday in health class. I had no idea I would have to perform CPR on someone this afternoon. And when the paramedics arrived, they told me I undoubtedly saved my mom’s life. MMT

Today, instead of calling the cops on the homeless man that was caught stealing canned soup from the grocery store where I work, the store manager bought the homeless man an entire case of the canned soup he was stealing and told the man he’d prefer never to catch him stealing again. MMT

#3 – A Word To The Wise
Dishwasher Fires We’ve all heard about clothes dryer fires, but how many of us have heard about dishwasher fires? I normally don’t write about these types of things, but a friend recently shared her dishwasher fire experience with me and I think it is information well worth sharing. The interior of her home is being completely gutted, because of the extensive fire, water, heat, smoke, and soot damage. In her words,” . . . the common culprit appears to be an electrical defect in the control panel that was used by many manufacturers in the late 90s up through 2005-2009. Many, many models by many manufacturers are under recall – but nobody knows! Like many people, I did not register my appliances because I didn’t want to be flooded with junk mail/e-mail. Most manufacturers have a place on their website where you can check which serial numbers are under recall. Encourage people to do it – and to register appliances. Also, do not run the dishwasher when leaving the house or going to bed.”

Here are a few links I found regarding dishwasher fires:
KitchenAidFire.com
General Electric Recalls 1.3 Million Dishwashers for Fire Hazzard
Maytag Recalls Dishwashers Due to Fire Hazzard
ABC Action News “Dishwasher Dangers”

#4 – When The Mind Says Goodbye
After listening to my friends tell me their stories of dealing with parents who have Alzheimer’s Disease and after watching this video, my eyes were opened to this sad and cruel disease.

#5 – Counting Hours
“Don’t count every hour in the day, make every hour in the day count.”
~Anonymous

Show someone you care this weekend and your weekend will become infinitely better!

Read Full Post »

Creamed summer Corn Ears of sweet summer corn require little embellishment to be fully enjoyed, but for a change of pace try this refreshing version of a traditional creamed corn dish. Just a little bit of lime zest, lime juice, and cayenne pepper transforms a normally predictable dish into a bright, surprisingly-sophisticated summer side dish.

Produce man Michael Marks gives this advice on selecting and storing fresh corn: When you’re picking your corn, make sure the husk is bright green and looks fresh. If it’s tanned and shriveling, it’s old or heat has gotten to it. Feel the top end. Fully mature ears of corn will have a rounded top. If the top feels pointy, it’s likely immature. Then pull down the husk and take a peek. There should be no cracks between those plump kernels. If you see any dimples in those kernels, step away from the corn. It’s old; the sugars will have turned to starch and it won’t be pleasant to eat. As soon as you get your corn home, refrigerate it and try to enjoy it within a couple of days.

Creamed Summer Corn
Torie Ritchie’s adaptation of a recipe from Ad Hoc at Home by Thomas Keller

INGREDIENTS
6 ears white or yellow corn, shucked
1 large lime
3 tablespoons unsalted butter
Kosher salt
3/4 to 1 cup heavy cream
Pinch cayenne
1-1/2 tablespoons snipped fresh chives

DIRECTIONS:
1. With a chef’s knife, cut down each ear of corn to remove kernels. Place kernels in a bowl. (To remove excess silk see note below.)

2. Holding one cob over the bowl at a time, use the back of a knife or a spoon to scrape any remaining corn and “milk” (corn juices) from the cob into the bowl. Repeat with remaining cobs.

3. Grate the zest from the lime onto a small plate and set aside. Cut lime in half. Juice lime into a ramekin and have a tablespoon measure handy.

4. Melt the butter in a large fry pan over medium heat. Add corn kernels and 1 tablespoon of lime juice. Season to taste with salt.

5. Reduce heat to medium-low and cook the corn, stirring occasionally, until the liquid evaporates and the corn starts to sizzle, about 12 minutes.

6. Stir in 3/4 cup of the cream, cayenne and lime zest. and bring to a boil. Adjust heat to medium and simmer until cream is thickened and almost absorbed, 6-8 minutes.

7. Taste and add more lime juice, salt, or cayenne as desired and stir in remaining cream for a creamier texture, if desired.

8. Remove from heat, stir in chives and serve.

Serves 4 to 6

LINNELL’S NOTES:
1. The easiest way to cut kernels off a corn cob is to stick the stem end into the hole of a Bundt pan. Holding the cob carefully, run your knife down the cob to remove the kernels. As you cut off the kernels, they will fall into the Bundt pan. Kitchen Tip: How to cut kernels off a corn cob

2. Here is Torie Ritchie’s note on removing corn silk: To remove any last bits of silk from the corn kernels in the bowl, set another bowl of water next to it. Swish your hands through the corn kernels in a circular motion to let your fingers pick up most of the remaining silk strands. Rinse your hands in the water bowl as you work to remove the silks. Repeat this a couple of times. I tried her technique and it worked for the most part — I still had to pick out a few strands of silk.

3. At step #7, I added a tiny bit more cayenne and the rest of the lime juice.

4. I keep an 8-ounce box of shelf stable whipping cream from Trader Joe’s in my pantry for convenience. No last minute dash out to the market to purchase whipping cream for me!

5. This recipe would go well with any tropical-type menu.

ENJOY!

Read Full Post »

First Kiss Rose Delicate porcelain-like petals unfurl into a creamy kiss of pink — First Kiss to be exact. All the qualities of a first kiss can be seen in its blossoms: blush, innocence, and joy. Admiring the beauty of this rose had me wondering about the person who named it. This person’s first kiss must have left an everlasting imprint. Do you remember your first kiss?

#1 – 96 Seconds of Joy
This video has been around for awhile, but it never fails to make me smile. The pure joy the dog exhibits is a reminder for all of us to live in the moment and to do what we love with gusto!

#2 – Amazing Product Designs

Bottle Opener Cell Phone Case

Bottle Opener Cell Phone Case

Loving clever and innovative designs, I always enjoy sharing them. Some of these designs, compiled by Glorious Mind, are Eco-friendly, some of them are extraordinarily clever, and some of them are just playful.

#3 – Homemade Hand Scrub
Black Sand Hand Scrub After a long day working in the garden or around the house, it’s nice to treat your hands to a moisturizing scrub. From the site StyleList comes this recipe for Black “Sand” Scrub, a scrub packed with good things:

1 cup leftover coffee grounds
2 tablespoons macadamia oil
1/4 cup of steel cut oats
Contents of 1 tea bag of high antioxidant tea

Combine coffee, oil, oats, and tea in a small disposable bowl until everything is well-blended in the oil. Scrub into skin using a circular motion.

#4 – Three Simple Materials

Art by Kumi Yamashita

By Kumi Yamashita

Last Friday I featured an artist who used thread and nails to create huge rainbow-like art installations. This week I’m featuring a talented Japanese artist named Kumi Yamashita who uses similar media to create portraits. Of her Constellation series, Yamashita says, “This body of work consists of three simple materials that, when combined, produce the portraits: a wooden panel painted a solid white, thousands of small galvanized nails, and a single, unbroken, common sewing thread.” While on her website view some of her other amazing portraits made from different media.

#5 – Dreamers and Doers
The world needs dreamers and the world needs doers. But above all, the world needs dreamers who do.
Sarah Ban Breathnach

Kiss someone you love this weekend!

Read Full Post »

Sugar Snap Peas with Sesame Seed Dressing Hot summer days evolve into lovely summer evenings. The sun mellows in the sky and temperatures drop to a comfortable warm. It’s the perfect time of day to dine al fresco and to entertain company. Keep the evening enjoyable and effortless, by preparing a simple menu that can be made ahead. Sugar Snap Peas with Sesame Seed Dressing is just such a recipe. It’s easy to prepare and it can be made earlier in the day. Plus, it’s delicious, visually appealing, and a great accompaniment to grilled meats.

Sugar Snap Peas with Sesame Seed Dressing
The Loaves and Fishes Party Cookbook by Anna Pump and Sybille Pump

INGREDIENTS
4 pounds sugar snap or snow peas
1/3 cup sesame seeds
1/2 cup sesame seed oil
2 teaspoons red pepper flakes
2 teaspoons coarse salt

DIRECTIONS
1. Blanch the peas in a large quantity of boiling water just until they turn bright green, about 1 minute. Drain and plunge the peas into very cold water to stop the cooking process. Drain again. Transfer the peas to a mixing bowl.

2. Place the sesame seeds in a large skillet over medium heat. Tossing lightly, toast until golden brown, and add to the sugar snap peas.

3. In the same skillet, heat the sesame oil until smoking hot. Remove from heat and add the red pepper flakes. Let stand for 5 minutes.

4. Pour the oil over the peas, add the salt, and toss to blend.

5. Transfer the peas to a deep bowl or platter and serve hot.

Serves 16

LINNELL’S NOTES
1. I purchase jars of pre-toasted sesame seeds at Asian markets and store them in my freezer. No need to defrost them. Just add them directly from the jar to whatever you are making. If you are toasting your own, keep an eye on them while they are in the skillet. Because they contain oil and because they are small, they can burn quickly.

2. Sesame seed oil is a thick and heavy oil. A little bit goes a long way. That being said, I felt the recipe called for too much of it. The next time I make this recipe, I will start with half the amount.

3. Stir the red pepper flakes into the hot oil and keep stirring. Some of my pepper flakes burned as they sat in the hot oil. Stirring them might have helped prevent burning.

4. Although the recipe says to serve this hot, it also says that it can be served cold. In my opinion, room temperature is best.

5. The recipe can be prepared without the red pepper flakes if you prefer, but I think the little added “kick” really makes the dish.

Enjoy!

Read Full Post »

Romeo Small tufts of hair sticking out over his eyes resemble the white bushy eyebrows of an old man. Only a thin isthmus of hair prevents two bald spots on his face from becoming one large one and deep wrinkles that were once hidden by hair are exposed and reveal his age. There is no doubt that radiation treatment for a cancerous nasal tumor has made my dog Romeo look older. Yet, despite his post-radiation appearance, my playful and mischievous dog of the past is slowly returning. As I watch him naughtily shred paper, I smile. Before, such an act would have been met with a frown, but now it brings me joy.

#1 – New Uses for Old Things

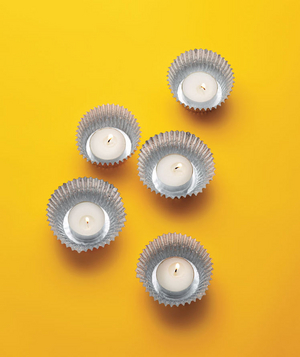
Foil Cupcake Liners as Candleholders

Foil cupcake liners as candleholders

I got excited when I found an article on Real Simple’s site called 700+ New Uses For Old Things. With the aid of photos, the article offers many unconventional ways to use everyday items. You can bet I’ll be taking notes as I check out all of these ideas!

#2 – Making Rainbows

Gabriel Dawe Art Installation

Plexus No. 5 by Gabriel Dawe

Gabriel Dawe Art Installation

Plexus No. 19 by Gabriel Dawe

Artist Gabriel Dawe installs rainbows. Using colorful thread, Mr. Dawe transforms large areas of space into rainbow-like art installations. Check out more of his work on his Facebook page.

#3 – Handwriting 101
Ever wonder what your handwriting reveals about your personality? Take a look at the infographic below to see what your handwriting says about you:

What Does Your Handwriting Say About You?

#4 – Summer Reading
If you or your kids are looking for interesting books to read this summer, NPR has you covered with their Summer 2013 Critics’ Lists. You’re bound to find a title that catches your fancy!

#5 – Dare to Be

When a new day begins, dare to smile gratefully.

When there is darkness, dare to be the first to shine a light.

When there is injustice, dare to be the first to condemn it.

When something seems difficult, dare to do it anyway.

When life seems to beat you down, dare to fight back.

When there seems to be no hope, dare to find some.

When you’re feeling tired, dare to keep going.

When times are tough, dare to be tougher.

When love hurts you, dare to love again.

When someone is hurting, dare to help them heal.

When another is lost, dare to help them find the way.

When a friend falls, dare to be the first to extend a hand.

When you cross paths with another, dare to make them smile.

When you feel great, dare to help someone else feel great too.

When the day has ended, dare to feel as you’ve done your best.

Dare to be the best you can –

At all times, Dare to be!

Steve Maraboli

Have a wonderful weekend!

Read Full Post »

Sonoma Chicken Salad Too hot to cook? Make this classic chicken salad from Whole Foods Market, but keep cool by using store-bought rotisserie chickens instead of baking your own. The description of this salad in the Whole Foods Market Cookbook says it all: “The tender chicken breast, crunchy pecans, and the juicy bursting of sweet grapes with each bite are hard to top. Poppy seeds help orchestrate flavors and textures into one of the best chicken salads you will ever find.” I “Whole-heartedly” agree!

Sonoma Chicken Salad
The Whole Foods Market Cookbook

INGREDIENTS
The Dressing:
1 cup mayonnaise
4 teaspoons cider vinegar
5 teaspoons honey
2 teaspoons poppy seeds
Salt and freshly ground white pepper to taste.

The Salad:
2 pounds boneless and skinless chicken breasts
3/4 cup pecan pieces, toasted
2 cups red seedless grapes
3 stalks celery, thinly sliced

DIRECTIONS
To Prepare the Dressing:
1. In a bowl, combine the mayonnaise, vinegar, honey, poppy seeds, and salt and pepper.
2. Reserve the dressing in the refrigerator.
3. This step may be done 2 days prior to preparing the salad.

To Prepare the Salad:
1. Preheat the oven to 375 degrees F.
2. Place the chicken breasts in one layer in a baking dish with 1/2 cup water. Cover the dish with foil, and bake the chicken breasts for 25 minutes, until cooked completely through.
3. Remove the chicken breasts from the pan, cool slightly at room temperature, and then completely chill, lightly covered with plastic wrap, in the refrigerator.
4. When the breasts are cold, dice them into bite-size pieces, and transfer the pieces to a large bowl.
5. Combine the chicken with the pecans, grapes, celery, and dressing.

Serves 6

LINNELL’S NOTES:
1. Toasting the pecans are a must to bring out their crunch and flavor. Avoid heating up the oven and the house just to toast small amount of nuts. I buy large bags of pecans, walnuts, and almonds at Costco and toast them in the oven all at the same time, each variety on its own tray. After they cool down, I put them in an air-tight containers and freeze them for future use.

2. I doubled the recipe and used the chicken breasts and thighs from two store-bought rotisserie chickens. Believe me, you’ll want to double the recipe, so that you don’t have to cook the next day. This salad makes tasty leftovers!

3. I served the salad on a bed of fresh lettuce greens, but according to the cookbook, it also “makes a great sandwich” and is “delicious when stuffed inside a melon half for brunch or dinner.”

ENJOY!

Read Full Post »