Feeds:
Posts
Comments

Posts Tagged ‘food’

IMG_0129 
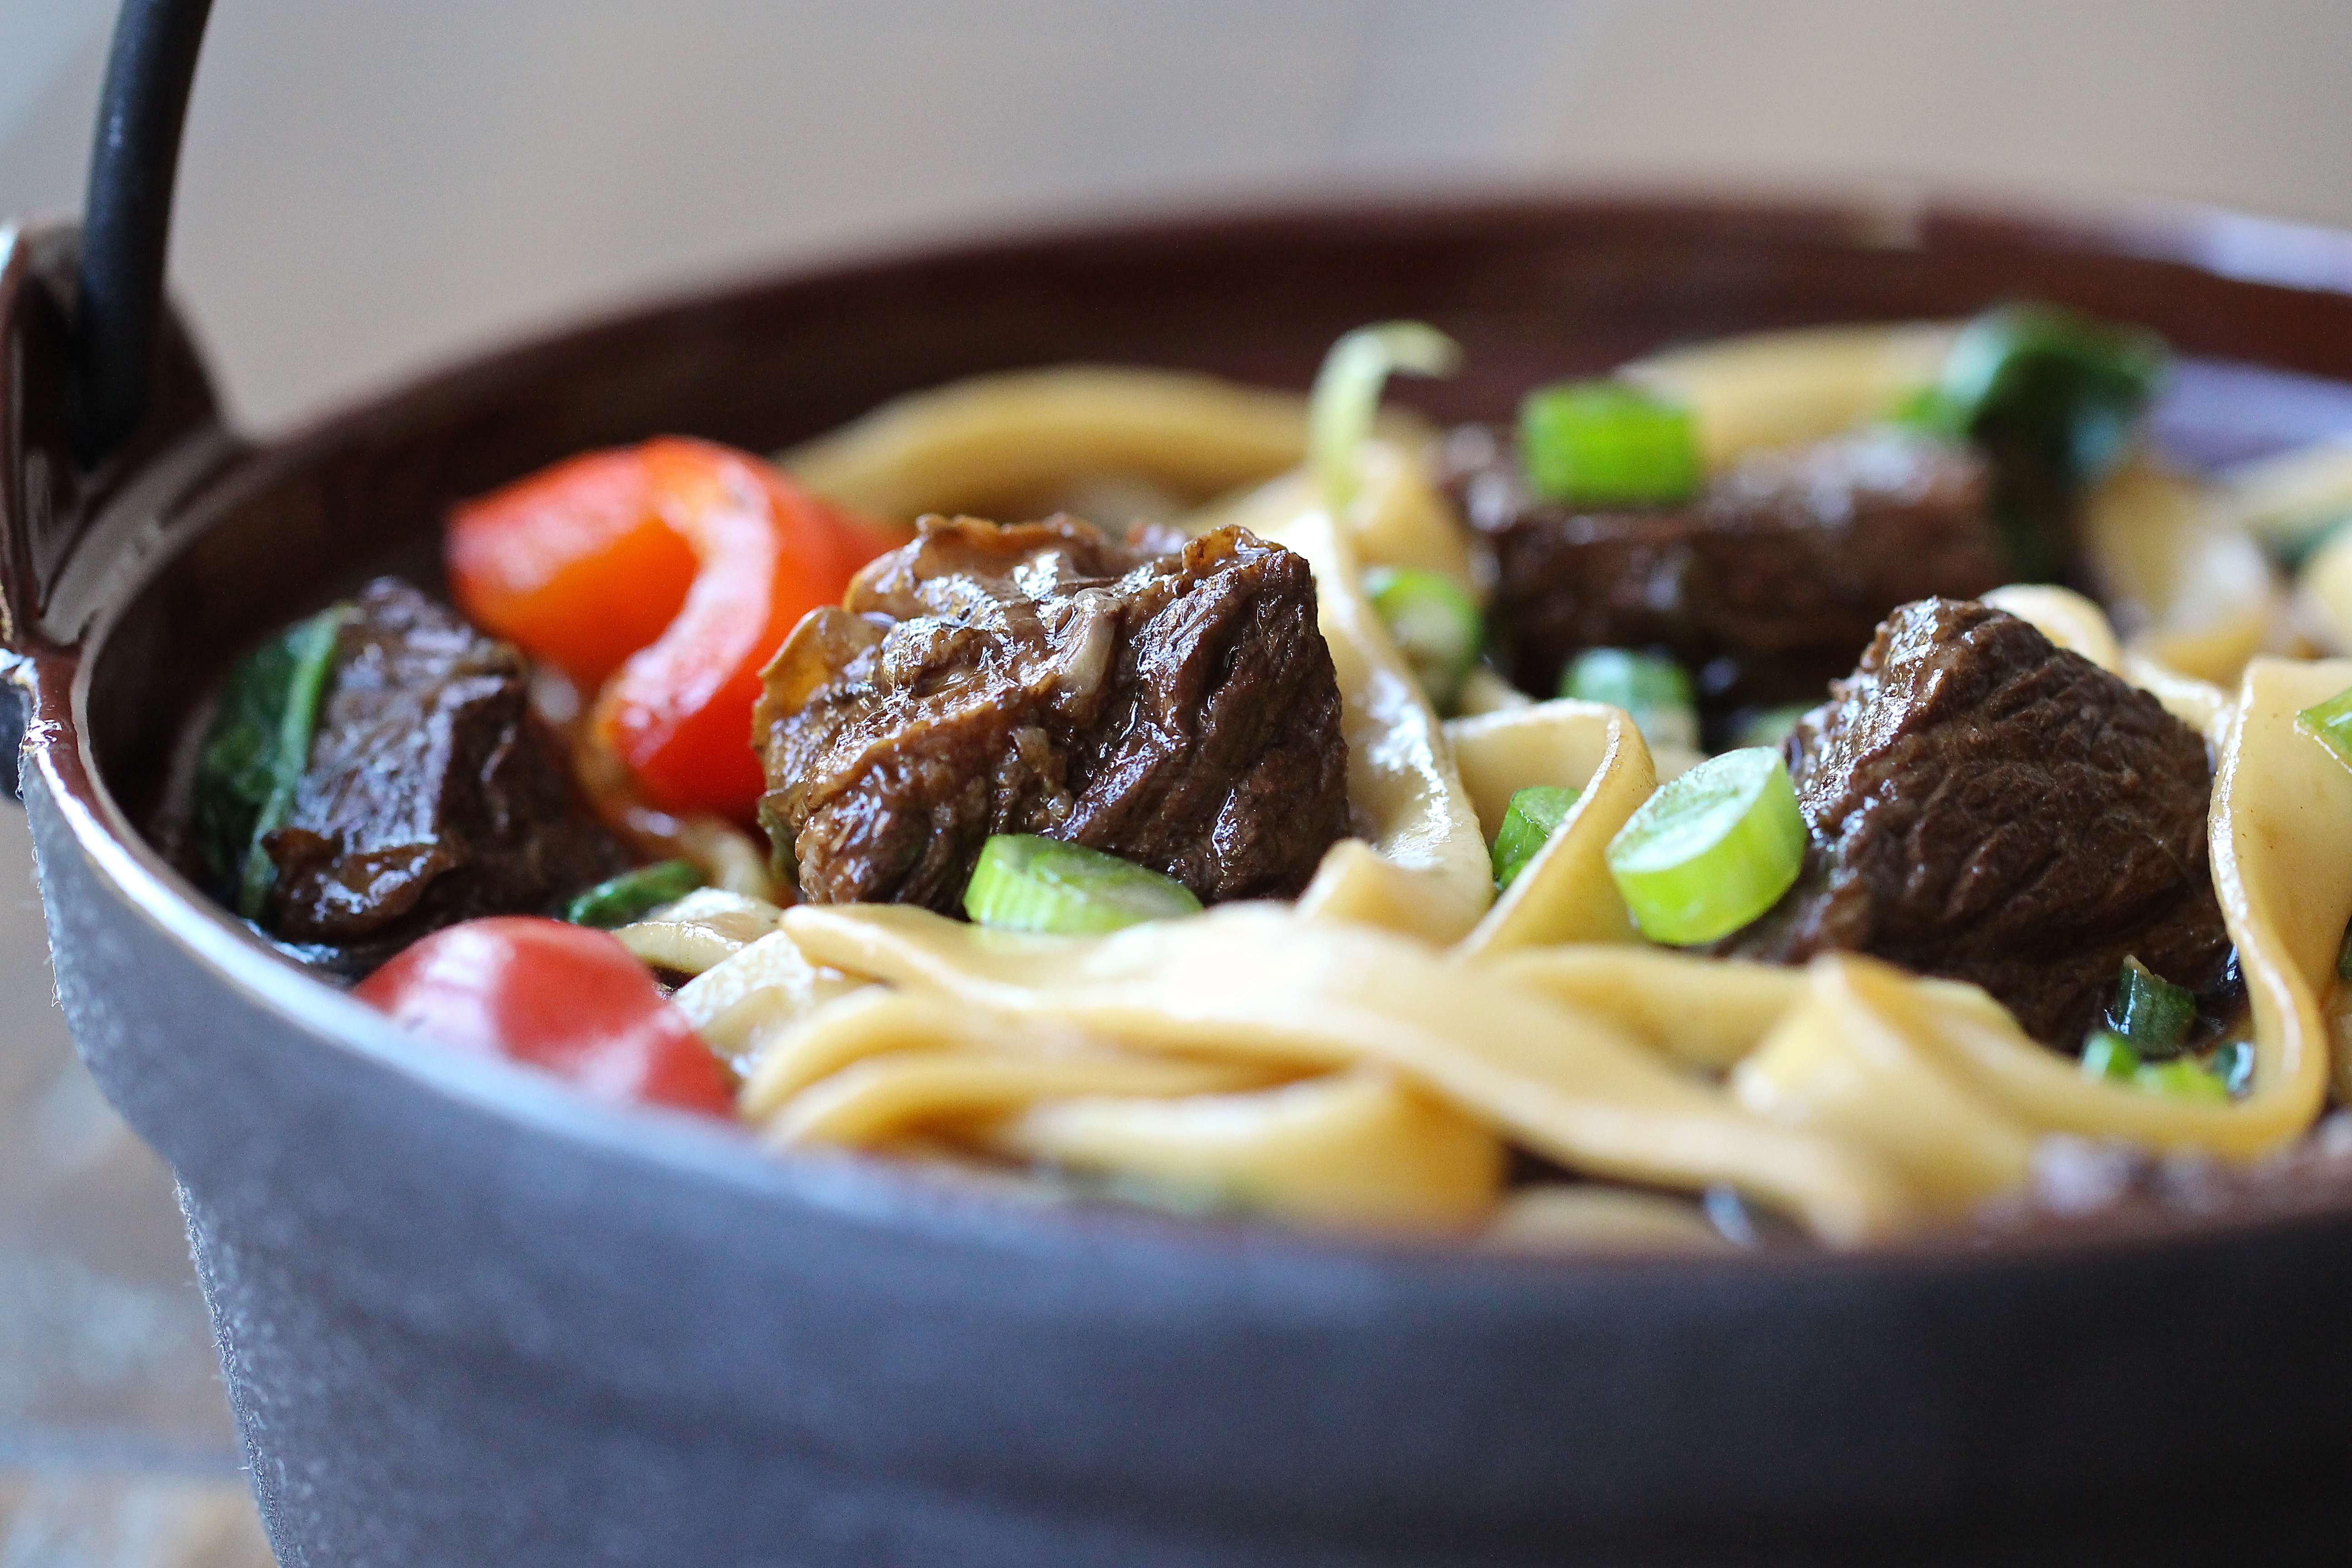
Frosty cold days and nights call for hearty stews. Saffron, cumin, ginger, and orange zest are among the ingredients that add a wonderful depth of flavor to this lamb stew. The list of ingredients may seem long, but your taste buds will be greatly rewarded as you eat this aromatic dish.

Moroccan Lamb Stew
Williams-Sonoma Soup & Stew

INGREDIENTS
4 tablespoons olive oil
2 yellow onions, finely chopped
3 carrots, peeled and chopped
3 lb cubed lamb for stewing
1/2 cup all-purpose flour
Salt and freshly ground pepper
3 cloves garlic, minced
1 teaspoon ground cumin
1/4 teaspoon saffron threads
1 tablespoon peeled and minced fresh ginger
2½ cups beef stock or prepared broth
1 cup canned crushed tomatoes
1 cup chopped dried dates
Grated zest and juice of 1 orange
2 tablespoons finely chopped fresh flat-leaf (Italian) parsley

DIRECTIONS
1. Preheat the oven to 350°F (180°C).

2. In a Dutch oven over medium heat, heat 1 tablespoon of the olive oil. Add the onions and sauté until softened, about 5 minutes. Add the carrots and cook until slightly softened, about 3 minutes longer. Transfer to a bowl and set aside.

3. Pat the lamb dry with paper towels. Place the flour in a large bowl or lock-top plastic bag and season with salt and pepper. Add the lamb in batches and stir or shake to coat thoroughly with the seasoned flour.

4. Add the remaining 3 tablespoons oil to the pot and heat over medium-high heat. Working in batches to avoid crowding, add the lamb and brown on all sides, 4-5 minutes for each batch. Transfer to a bowl and set aside.

5. Return the onion mixture and browned lamb along with any accumulated juices to the pot. Add the garlic, cumin, saffron, and ginger and stir to coat the meat and vegetables. Add the stock and bring to a boil, scraping up the browned bits on the bottom of the pan with a spoon. Add the tomatoes, dates, and orange zest and juice and bring to a boil over high heat.

6. Cover and bake in the oven until the meat is tender, 1½ – 2 hours. (If the sauce seems too thin, transfer the meat and vegetables to a bowl with a slotted spoon and boil the sauce on the stove top until thickened. Return the meat and vegetables to the pot.) Taste and adjust the seasoning.

7. Transfer the stew to a serving bowl and garnish with the parsley. Serve immediately.

Makes 6 servings.

LINNELL’S NOTES
1. A lamb shoulder or leg of lamb could be cut up for this stew.
2. I needed to use more oil than called for to brown all of the meat.
3. The sauce turned out perfectly. There was no need to reduce it on the stove top.

ENJOY!

Read Full Post »

Sugar and Spice Pecans Do more ingredients and more steps make a recipe better? Not necessarily. Last week my daughter and I attempted to make an elaborate pumpkin pie for Thanksgiving. The recipe involved more steps and more ingredients than a usual pumpkin pie recipe contains. In the end, the pie was good, but not incredibly better than other pumpkin pies of the past. However, one of the steps in the recipe required making sugar-coated pecans. Unlike other sugar-coated pecan recipes that incorporate one spice, this recipe’s winning combination of spice made these pecans stand out as the best part of the pie. Their ease of preparation make them a great snack for holiday parties or a crunchy salad topping. Put these crunchy bites of spicy-sweetness into cute jars, complete with a ribbon and tag, and you have a delectable gift to give to family, friends, and holiday party hostesses.

Sugar and Spice Pecans
Adapted from a recipe by BRIT & CO

INGREDIENTS
1 pound pecan halves
1 egg white
1 tablespoon water
1 cup sugar
1 teaspoon cinnamon
1/2 teaspoon ground ginger
1/4 teaspoon ground cloves
1 teaspoon salt

DIRECTIONS
1. Preheat oven to 250 degrees F.
2. Place egg white and water in a large bowl. Whisk mixture until egg whites are frothy. Add pecans and stir to coat.
3. In a separate bowl mix together sugar, cinnamon, ginger, cloves and salt. Add to pecan mixture and stir until well-coated.
4. Spread pecans onto a baking sheet and bake for one hour, stirring every 15 minutes.
5. Let pecans cool completely.
6. Store in an airtight container.

LINNELL’S NOTES
1. Toasting the pecans first brings out their flavor. Make sure they are completely cooled before using them in this recipe.
2. I love the recipe as it is, but just for fun, I’m going to try experimenting with other spices to see what variations I can come up with. Cayenne pepper, ancho chili powder, and espresso powder come immediately to mind.

ENJOY!

Read Full Post »

Whopper Cookies: Baking with Halloween Candy When Halloween has come and gone, but the Halloween candy has not, what do you do with the leftovers? Do you force yourself to eat them up one by one or do you spare yourself the calories and take them to your spouse’s office? Do you refrigerate them for future use or do you send them off in college care packages? In the past, I’ve done all of the above, but for the last several years, I’ve used the leftover candy for something better. Selecting Halloween candies suitable for baking, I use them to create delicious sweet treats, such as cookies, bars, cakes, and pies. Whoppers, chocolate-covered malted milk balls, turn average cookies into sweet, crunchy, and malted surprises. Trick or treat?

Whopper Cookies
Adapted from recipe by Cast Sugar 

INGREDIENTS
2¼ cup all-purpose flour
1 teaspoon baking soda
1/2 teaspoon baking powder
1/2 teaspoon salt
3/4 cup butter, room temperature
1 cup sugar
1/2 cup milk
1 teaspoon vanilla extract
1½ cup roughly chopped Whoppers

DIRECTIONS
1. Preheat oven to 350 °F and cover baking sheets with parchment paper.
2. In a medium bowl, whisk together flour, baking soda, baking powder, and salt. Set aside.
3. In a large bowl, cream together butter and sugar until light and fluffy.
4. Stir in milk and vanilla, then gradually blend in the flour mixture. Do not over mix; stir only until no streaks of flour remain.
5. Carefully stir in the chopped Whoppers.
6. Drop 1-inch balls onto prepared baking sheets and bake for 12 to 14 minutes, until lightly browned.
7. Let cool on baking sheet for 2 to 3 minutes, then transfer to a wire rack to cool completely.

Makes about 3 dozen cookies

LINNELL’S NOTES
1. I used unsalted butter and the cookies were perfect.
2. Wanting to have “nice chunks” of Whoppers, I cut each one individually, rather than doing a messy rough-chop on them. This took a little longer, but I liked the end result.
3. I barely had enough Whoppers, so I added some rough-chopped Butterfingers to the mix. These were fantastic!
4. I got 45 cookies out of this recipe.

ENJOY!

Read Full Post »

Hearty Lentil Soup “Can you stay for dinner?” an elementary schoolmate asked me decades ago. “We’re having lentil soup, she said. “What are lentils?” I asked. Being of Asian descent, lentils had never passed through my lips before. To my delight, I found her family’s lentil soup to be rich in flavor and texture and I will forever associate lentils with her.

Lentils, like other legumes, are high in fiber and protein and low in fat. But unlike other legumes, there’s no need to presoak lentils and they take less time to cook. The dominant flavors in this robust soup come from the earthiness of the lentils and the fresh vegetables, but the subtle undertones come from two surprising ingredients: Dijon mustard and vinegar. This soup is hostess-friendly, too, because it can be made a day in advance and it tastes even better when served the second day!

Hearty Lentil Soup
Recipe from the Sacramento Bee

INGREDIENTS
2 tablespoons olive oil
2 cups finely diced onion
3 large garlic cloves
Salt and freshly ground black pepper
3 tablespoons tomato paste
1/3 cup finely diced celery
1/3 cup finely diced carrot
2 bay leaves
1/2 cup chopped parsley
1½ cups French green or brown lentils, sorted and rinsed
1 tablespoon Dijon mustard
1 tablespoon sherry vinegar or red wine vinegar
Chopped celery leaves and parsley, for garnish

DIRECTIONS
1. Heat the oil in a soup pot over high heat. Add the onion and sauté until it begins to color around the edges, 5 to 7 minutes.

2. Meanwhile, mince or pound the garlic in a mortar with 1 teaspoon salt.

3. Work the tomato paste into the onion, then add the garlic, celery, carrot, bay leaves and parsley and cook for 3 minutes.

4. Add the lentils, 2 quarts of water, and 1/2 teaspoon salt; bring to a boil. Lower the heat and simmer, partially covered, until the lentils are tender, 24 to 35 minutes.

5. Stir in the mustard and vinegar. Taste and add more of either as needed.

6. Check the salt, season with plenty of pepper, remove the bay leaves and serve, garnished with the celery leaves and parsley.

7. The longer the soup sits before serving, the better it will taste.

Serves 4 to 6

LINNELL’S NOTES
1. I use Italian parsley when I make this soup.

2. Because I like the way French green lentils hold their shape, I prefer using them in this soup over brown lentils.

3. The second time I made this soup, I used vegetable broth in place of the water. I can honestly say that there was no noticeable improvement in flavor using the broth, so I don’t recommend spending extra money on vegetable broth. This is not to say, though, that homemade vegetable stock wouldn’t have added a richness to the soup.

ENJOY!

Read Full Post »

Bacon and Cheddar Macaroni & CheeseSometimes in life you have to color outside the lines, tell little white lies, or bend rules. It’s near impossible to toe the line all of the time. I experienced a moment like this, just the other day. Feeling cold and a little blue, I made Bacon and Cheddar Macaroni & Cheese for dinner. Without regret, I devoured a bowl of corkscrew pasta and crispy bits of bacon gliding in a sinfully rich and creamy cheese sauce. My house smelled incredible and my stomach bulged with happiness. So, yes, sometimes in life you have to choose comfort food over healthy food!

Bacon and Cheddar Macaroni & Cheese
Mother’s Best: Comfort Food That Takes You Home Again by Lisa Schroeder and Danielle Centoni

INGREDIENTS
1 teaspoon kosher salt, plus more for salting the pasta water
1 pound fusilli (corkscrew) or other pasta
3/4 pound bacon, diced (about 1 cup cooked)
3 cups heavy cream
2 cups firmly packed shredded sharp Cheddar cheese (about 1/2 pound)
1/4 teaspoon freshly ground black pepper
1/2 cup sour cream, for garnish
1/2 cup thinly sliced scallions, (white and green parts), for garnish

DIRECTIONS
1. Bring a medium pot of water to a boil. Salt it generously (it should taste like the sea). Stir in the pasta and cook according to the package directions. Drain (but don’t rinse, or you’ll rinse away starches that will help thicken the sauce) and return to the empty pot.

2. Meanwhile, place a large sauté pan over high heat for several minutes. When hot, add the bacon and sauté until browned and crispy (lower the heat to medium-high if necessary to prevent scorching), about 5 minutes. Remove the pan from the heat and, using a slotted spoon or spatula, remove the bacon from the pan and drain on paper towels.

3. Pour off the fat from the pan (into a metal can or heatproof cup) and return the pan to medium-high heat. Add the heavy cream and bring to a boil, scraping up any browned bits from the bottom of the pan. Lower the heat to medium and continue to simmer until the cream is reduced slightly, about 3 minutes.

4. Add the Cheddar cheese and bacon. Stir well and cook over medium-high heat, stirring now and then, until the cheese has melted and the mixture thickens, about 3 minutes. Season with the salt and pepper.

5. Stir the sauce into the cooked and drained pasta in the pot. Place over medium heat and simmer for 1 to 2 minutes to thicken the sauce and allow the pasta to absorb the flavors, stirring now and then.

6. Serve in individual bowls topped with a dollop of sour cream and a sprinkle of sliced scallions.

Serves 4 to 6 servings

LINNELL’S NOTES
1. I used Rotini pasta.

2. Although the bacon starts off crispy, it does not stay that way after soaking in the sauce. It does, however, lend a nice chewy texture to the dish.

3. I did not add the 1 teaspoon of salt as stated in the recipe. I waited until after the dish was completed, to see if any additional salt was necessary. Whether you add additional salt or not will depend on the saltiness of the bacon you use.

4. This dish did not fare well as a leftover, due to separation of the fat.

5. Thinking this recipe was plenty rich, I did not serve it with the optional sour cream garnish.

6. The authors of the cookbook offer this variation:
Lorraine Mac & Cheese
You can easily change up this recipe by using the classic flavors of a quiche Lorraine for inspiration. You just have to add caramelized onions and substitute Swiss cheese for the Cheddar.

Pour off all but 2 tablespoons grease from the cooked bacon. Add 2 cups of finely sliced yellow onions and sauté over medium heat until soft, brown and caramelized, about 20 minutes. Pour in 3 cups of cream and continue with the recipe (step 3), substituting firmly packed shredded Gruyère or Swiss cheese for the Cheddar.

If you have cooked, crumbled bacon and caramelized onions on hand, the recipe is even easier. When stirring the cheese into the reduced cream, just add 1 cup bacon crumbles and 1/2 cup caramelized onions, too. Then proceed with the recipe.

ENJOY!

Read Full Post »

Bread Pudding Muffins My husband has two sweet loves that drive him crazy. Both possess endearing qualities that he cannot resist. If ever they appeared together, he would be beside himself with indecision. Recognizing that his birthday highlights this conflict, I decided to alleviate his stress this year. I figured out a way he could have his cake and eat it too—a way he could enjoy one love in the morning and one love after dinner. For breakfast I made him custard-rich bread pudding muffins and in the evening he blew out birthday candles on a moist and spicy carrot cake. Problem solved.

Bread Pudding Muffins
The Grand Central Baking Cookbook

INGREDIENTS
1 pound crusty artisan white bread
1/2 teaspoon ground cinnamon
6 eggs
3/4 cup granulated sugar
1½ cups heavy cream
1½ cups milk
2 teaspoons vanilla extract
Confectioners’ sugar, for dusting

DIRECTIONS
1. Slice the bread and cut it into 1-inch cubes. Put it in a large bowl and toss it with the cinnamon.

2. Whisk the eggs, sugar, cream, milk, and vanilla together until well combined, then pour the custard over the bread. Cover and refrigerate for at least 4 hours and up to 24 hours.

3. Preheat the oven to 325 degrees F.

4. Line a standard-size 12-cup muffin tin with paper liners, or generously grease with butter.

5. Scoop a heaping 1/2 cup of the pudding mixture into each of the 12 muffin cups; each one should be nicely mounded. Top off each pudding with the remaining custard.

6. Bake for 45 minutes, rotating the tin halfway through the baking time. The puddings should be lightly golden brown on top. Dust them with confectioners’ sugar while they’re still warm.

Makes 12 Pudding Muffins

LINNELL’S NOTES
1. Because of the amount of soaking time involved, if you plan on serving these muffins in the morning, it is best to begin soaking the bread the evening before.

2. I was able to get 18 muffins out of the recipe.

3. Although these are categorized as muffins, these little bread puddings would make nice individual desserts.

ENJOY!

Read Full Post »

Cinnamon Beef Noodles Ribbons of fat noodles soak up a spicy and aromatic broth while tender chunks of beef and green spinach leaves float by. How’s that for comfort food on a cold night? The use of cinnamon in a beef and noodle recipe may leave some people wondering. Wonder no more. For without a doubt, the cinnamon, together with the ginger, aniseed, and hot chile paste, undeniably adds a lovely complexity to the flavors in this simple and appealing dish.

Cinnamon Beef Noodles
Nina Simonds Asian Noodles Cookbook

INGREDIENTS

1 teaspoon safflower or corn oil

Chile-Cinnamon Seasonings:
6 scallions, trimmed, cut into 1½-inch sections, and smashed lightly with the flat side of a knife

6 cloves garlic, peeled, smashed lightly with flat side of a cleaver, and thinly sliced

4 slices fresh ginger (about the size of a quarter), smashed lightly with the flat side of a knife

1½ teaspoons hot chile paste

2 cinnamon sticks

1 teaspoon aniseed

Remaining Ingredients:
8½ cups water

1/2 cup soy sauce

2 pounds chuck or beef stew meat, trimmed of fat and gristle, and cut into 1½-inch cubes

10-ounces spinach, trimmed, rinsed, and drained

1/2 pound flat Chinese wheat-flour noodles, udon, or other flat noodles, such as fettuccine, cooked until just tender, rinsed under warm water, and drained

3 tablespoons minced scallions

DIRECTIONS
1. Heat a large pot or casserole over medium-high heat. Add the oil and heat until hot, about 30 seconds. Add the chile-cinnamon seasonings and stir-fry until fragrant, about 15 seconds.

2. Add the water and the soy sauce and bring to a boil.

3. Add the beef and bring back to a boil.

4. Reduce the heat to low, cover, and simmer for 1½ hours, or until the beef is very tender. Skim the surface to remove any impurities or fat.

5. Remove the ginger slices and cinnamon sticks and discard.

6. Add the spinach and bring to a boil.

7. Divide the noodles among six soup bowls. Ladle the meat, spinach, and broth over the noodles and sprinkle with scallions. Serve.

6 Servings

LINNELL’S NOTES
1. I used half low-sodium soy and half regular soy, because I was concerned about the broth being too salty. It was just right. No additional salt was needed.

2. Because I had 3 pounds of meat, I added an additional stick of cinnamon to the pot.

3. Adding chunks of red pepper will contrast the spinach nicely and give the dish a little bit more color.

4. In her recipe Ms. Simonds states, “The flavor gets better and better every time you reheat it.” Don’t you love food that gets better with time!

ENJOY!

Read Full Post »

Jammers: Biscuits Topped with JamImagine the smell of homemade biscuits wafting throughout your home in the early hours of the morning. You wake up early, before everyone else, because you enjoy the peace and calm of your empty kitchen. The timer rings and you take a tray of jammers, large buttery biscuits topped with jam, out of the oven. You restrain yourself from taking a bite into one, because you know that they will reach perfection in about five minutes. That gives you just enough time to brew a mug of coffee or steep a cup of tea. You eye the clock as five minutes turns into an eternity. Finally, you sit down with your hot brew and stare at the plate of jammers. You carefully select the largest one that has the biggest glob of jam on top. And after only one bite, pure delight spreads across your face as the crunchy exterior yields to the soft flaky interior. Ah, there’s no better way to start the day than with a hot jammer!

Grand Central Bakery Jammers
The Grand Central Baking Cookbook

INGREDIENTS
4 cups (1 pound, 4 ounces) all-purpose flour
3 tablespoons granulated sugar
2 teaspoons baking powder
1½ teaspoons salt
1 teaspoon baking soda
1 cup (8 ounces, or 2 sticks) cold unsalted butter
1¼ to 1½ cups (10 to 12 fluid ounces) buttermilk
About 3/4 cup good quality preserves or jam

DIRECTIONS
1. Preheat the oven to 350 degrees F. Lightly grease a baking sheet or line it with parchment paper.

2. Measure the flour, sugar, baking powder, salt, and baking soda into a bowl with high sides or the bowl of a stand mixer and whisk to combine.

3. Dice the butter into 1/2-inch cubes. Use your hands or the paddle attachment of the stand mixer on low speed to blend the butter into the dry ingredients until the texture of the flour changes from silky to mealy. There should still be dime- to quarter-size pieces of butter remaining. If you’re preparing the dough the night before, cover the bowl with plastic wrap and chill overnight; otherwise proceed with the recipe.

4. Make a well in the flour mixture and pour 1 cup of the buttermilk in one addition. Gently mix the dough just until it comes together; it will look rough. Scrape the dough from the sides and bottom of the bowl, then add another 1/4 cup buttermilk and mix again to incorporate any floury scraps. The majority of the dough will come together, on the paddle if you are using a stand mixer. Stop mixing while there are still visible chunks of butter and floury patches. The dough should come out of the bowl in 2 to 3 large, messy clumps, leaving only some small scraps and flour around the sides of the bowl. If the dough is visibly dry and crumbly, add up to 1/4 cup more buttermilk, 1 tablespoon at a time, mixing no more than one rotation after each addition.

5. Turn the dough out onto a lightly floured surface. Use the heels and sides of your palms to gather the dough and gently pat it into an oblong shape 1½ to 2 inches thick. It won’t look smooth or particularly cohesive; that’s okay. Use a biscuit cutter to cut jammers into circles at least 2½ inches in diameter. Layer the leftover scraps on top of one another and gently pat them out to a thickness of 1½ to 2 inches and again cut into circles.

6. Use you thumb to make an indentation the size of a fifty-cent piece in the middle of each biscuit. While gently supporting the outside edge of the biscuit with your fingers, use your thumb to create a bulb-shaped hole that’s a bit wider at the bottom and that goes almost to the bottom of the biscuit (think pinch pot). Try to apply as little pressure as possible to the outside of the biscuit, to avoid smashing the layers, which are the key to flaky jammers.

7. Fill each indentation with 1 tablespoon of jam and put jammers on the prepared baking sheet with 1½ inches between them.

8. Bake for 35 to 40 minutes, rotating pan halfway through the baking time. The jammers should be a deep golden brown.

Makes 10 to 12 jammers

LINNELL’S NOTES
1. These are very large biscuits! I was only able to make 8 biscuits from the recipe.

2. The key to achieving a flaky biscuit is to keep the butter cold and to avoid overworking the dough.

3. I baked my jammers for 35 minutes in a convection oven and they were done perfectly.

ENJOY!

Read Full Post »

Quinoa and Apple Salad with Curry Dressing If you are looking for a salad that is a little bit sweet, a little bit spicy, a little bit crunchy, and quite a bit healthy, look no more. Serve this easy-to-make salad year-round. But with the abundance of freshly-harvested apples here in North America, the best time to serve this salad will be in the fall. With flavor powerhouses such as curry, honey, lemon, and mint you wouldn’t expect this salad to be so mild and delicately balanced. On the nutritional side, this salad’s no slouch either. Per serving, as provided on the recipe’s original site, it contains: 304 calories, 14 gr fat, 0 mg cholesterol, 38 g carbs, 154 mg sodium, 8 g protein, and 5 g fiber. Good for you and great tasting – that’s what I call a win-win recipe!

Quinoa and Apple Salad with Curry Dressing
Martha Stewart Living Cookbook, Volume 2

INGREDIENTS
1/4 cup raw whole almonds
1 cup white quinoa
1 teaspoon honey
1 tablespoon finely chopped shallot
1 teaspoon curry powder
1/4 teaspoon coarse salt
2 tablespoons fresh lemon juice
Freshly ground pepper
2 tablespoons extra-virgin olive oil
2 tablespoons dried currants
1 small McIntosh apple, cut into 1/8-inch-thick wedges.
1/4 cup loosely packed fresh mint leaves, coarsely chopped, plus more for garnish

DIRECTIONS
1. Preheat oven to 375 degrees F. Spread almonds on a rimmed baking sheet; toast in oven until lightly toasted and fragrant, about 7 minutes. Let cool; coarsely chop nuts.

2. Rinse quinoa thoroughly in a fine sieve; drain. Bring 2 cups of water to a boil in a medium saucepan. Add quinoa; return to a boil. Stir quinoa; cover, and reduce heat. Simmer until quinoa is tender but still chewy, about 15 minutes. Fluff quinoa with a fork; let cool.

3. Whisk together honey, shallot, curry powder, salt and lemon juice in a large bowl. Season with pepper. Whisking constantly, pour in oil in a slow, steady stream; whisk until dressing is emulsified. Add quinoa, currants, apple, mint, and nuts; toss well.

4. Garnish with mint.

Serves 4

LINNELL’S NOTES
1. Here’s a time-saving tip: I roast different varieties of nuts (almonds, walnuts, and pecans) in bulk and after they’ve cooled, I put them in separate airtight bags and store them in the freezer. When needed, I just reach into the freezer and remove the required amount. Except for chopping the nuts, I was all but done with step 1.

2. The amount of curry specified results in a very mild curry flavor. For those of you who prefer a more distinct curry flavor, more curry powder can be added in step 3.

3. I couldn’t find a McIntosh apple, so I used a Honey Crisp. I cut the apple into 1/8-inch thick slices and cut those slices in half crosswise. I felt the whole slices would be too large in proportion to the rest of the ingredients. Thanks to the lemon juice in the dressing, the apples do not turn brown in this salad, even when refrigerated overnight.

4. The recipe just doesn’t taste as good without the mint leaves. It makes a difference – the cool mint flavor balances the slight spiciness of the curry very well.

5. I served the quinoa salad on a bed of baby spinach and arugula leaves. Next time I think I will make a double batch of the dressing and toss a little bit of it with the greens just prior to plating. The dressing will help the other salad ingredients cling to the leaves better.

Enjoy!

Read Full Post »

Grilled Fish Tacos If you raise children to have adventurous taste buds and you give them an appreciation for well-prepared food, most likely they will grow up to be good cooks. This little bit of parental advice may not hold true for everyone, but I’ve been rewarded in spades. All my children enjoy cooking good food as much as they enjoy eating good food. Not only do my children enjoy good food, they also share it. I’ve been the lucky recipient of some really wonderful meals prepared by them. A couple of weeks ago, my middle child and his wife treated me to delicious homemade fish tacos. Because they were so good, I had big-time cravings for them and had to make them for myself. These fish tacos are easy to prepare, moist, flavorful, and healthy. No batter or deep-frying involved. Fish Taco Fridays may become a regular occurrence in this household!

Grilled Fish Tacos
Adapted from a Bobby Flay recipe

INGREDIENTS
Tacos:
1 pound white fish, such as mahi mahi, orata, tilapia, basa, etc.
1/4 cup canola oil
1 lime, juiced
1 tablespoon ancho chili powder
1 jalapeño, coarsely chopped
1/4 cup chopped fresh cilantro leaves
8 flour tortillas*

Garnish:
Shredded white cabbage
Hot sauce, tomato salsa, or pico de gallo
Crema or sour cream
Thinly sliced red onion
Thinly sliced green onion
Chopped cilantro leaves
Queso Fresco, crumbled

DIRECTIONS
1. Preheat grill to medium-high heat.

2. Place fish in a medium size dish. Whisk together the oil, lime juice, ancho, jalapeño, and cilantro and pour over the fish. Let marinade for 15 to 20 minutes.

3. Remove the fish from the marinade and place onto a hot grill. Grill the fish for 4 minutes on the first side and then flip for 30 seconds and remove. Let rest for 5 minutes.

4. Place the tortillas on the grill for 20 seconds.

Serves 4

LINNELL’S NOTES
1. *I use corn tortillas instead of flour tortillas. I think they are a better choice for tacos and they are slightly healthier to eat.

2. If you don’t want to grill the tortillas, you can warm them up in a frying pan on your cooktop.

3. The Kachumbari Salad I prepared last week goes wonderfully with these fish tacos.

Enjoy!

Read Full Post »

« Newer Posts - Older Posts »