Feeds:
Posts
Comments

Posts Tagged ‘vegetarian’

Sweet Potato Fries For Dogs Hold the ketchup! Hold the salt! These baked sweet potato fries are perfect just the way they are! Perfect for dogs, that is. If most people could adjust their palates to accept baked fries with no added sodium, these would be perfectly delicious for humans, too!

Sweet Potato Fries For Dogs
Adapted from a recipe from Food.com

INGREDIENTS
Uncooked sweet potatoes or yams

DIRECTIONS
1. Preheat oven to 250 degrees F.

2. Wash the skins of the sweet potatoes thoroughly and blot dry.

3. Cut the sweet potatoes in half lengthwise.

4. Cut the halves in lengthwise slices.*

5. Place the slices on a cookie sheet in a single layer.

6. Bake in the oven for about 3 hours.

7. After the fries cool down, it’s time for a taste test! Romeo keeps his eyes on the prize and he lifts his paw to a begging position . . . sniff, sniff . . . yes, he likes it! Romeo's Taste Test

LINNELL’S NOTES
1. I experimented with two varieties of sweet potatoes. My dog liked them both, but obviously the orange variety is more attractive-looking.

2. Try cutting the sweet potatoes as uniformly as possible for consistent baking. Leave the skin on for added fiber and micronutrients.

3. I set my oven to 280 degrees F. and baked the fries for 3 hours. Some of the fries were crunchy and some were chewy at this point. If your dog likes them crunchier, remove the crunchy ones from the sheet and continue to bake the chewy ones a little longer.

4. *As the slices bake and lose moisture, they will shrink. Take this into account when you are slicing the sweet potatoes and make the slices the appropriate size for your dog.

5. Sweet potatoes will release a sticky syrup as they bake, so I covered my baking sheets with parchment paper.

WOOF! WOOF! ENJOY!

Read Full Post »

Pizza Hummus Pizza-flavored hummus? As a lover of hummus, this recipe caught my eye. I thought of all the wives and mothers out there who constantly battle to get their loved-ones to eat a more healthy diet. Why not be clever and sneak this healthy dip onto the table under the guise of a tasty “PIZZA” dip? It’s worth a try!

Pizza Hummus
Food Network Magazine

INGREDIENTS
1 tablespoon extra-virgin olive oil
1/4 cup tomato paste
2 teaspoons dried oregano
1 teaspoon dried basil
2 to 3 cloves garlic
3 cups canned chickpeas, drained and rinsed, 1/2 cup liquid reserved
1/4 cup tahini
1/4 cup fresh lemon juice
Kosher salt

DIRECTIONS
1. Heat the olive oil in a small skillet over medium-high heat.
2. Add the tomato paste, oregano and basil and cook until slightly toasted, about 2 minutes.
3. Transfer the tomato paste mixture to a food processor. Add the garlic, chickpeas, chickpeas liquid, tahini, lemon juice and 1 teaspoon salt.
4. Purée until smooth and creamy.

LINNELL’S NOTES
1. Tahini is a paste made from ground sesame seeds. To learn about the “Nutritional Facts for Roasted Sesame Tahini,” read this article from SFGate.

2. Two 15.5 oz. cans of chickpeas equaled 3 cups of drained and rinsed beans for me.

3. I used 2 cloves of garlic, but the next time I make this, I will try adding 3 cloves of garlic for a little bit more flavor.

4. Next time I will also add a little bit more basil and oregano. I may even try adding fresh basil and fresh oregano. The conversion for dried to fresh herbs is about 1 teaspoon of dried to 1 tablespoon of fresh.

5. I also will try sprinkling a little bit of diced sun-dried tomatoes (packed in olive oil) on top of the hummus before serving.

6. Obviously it is more nutritious to serve this dip with vegetables, but pita chips would be great with it, too.

ENJOY!

Read Full Post »

Creamed summer Corn 
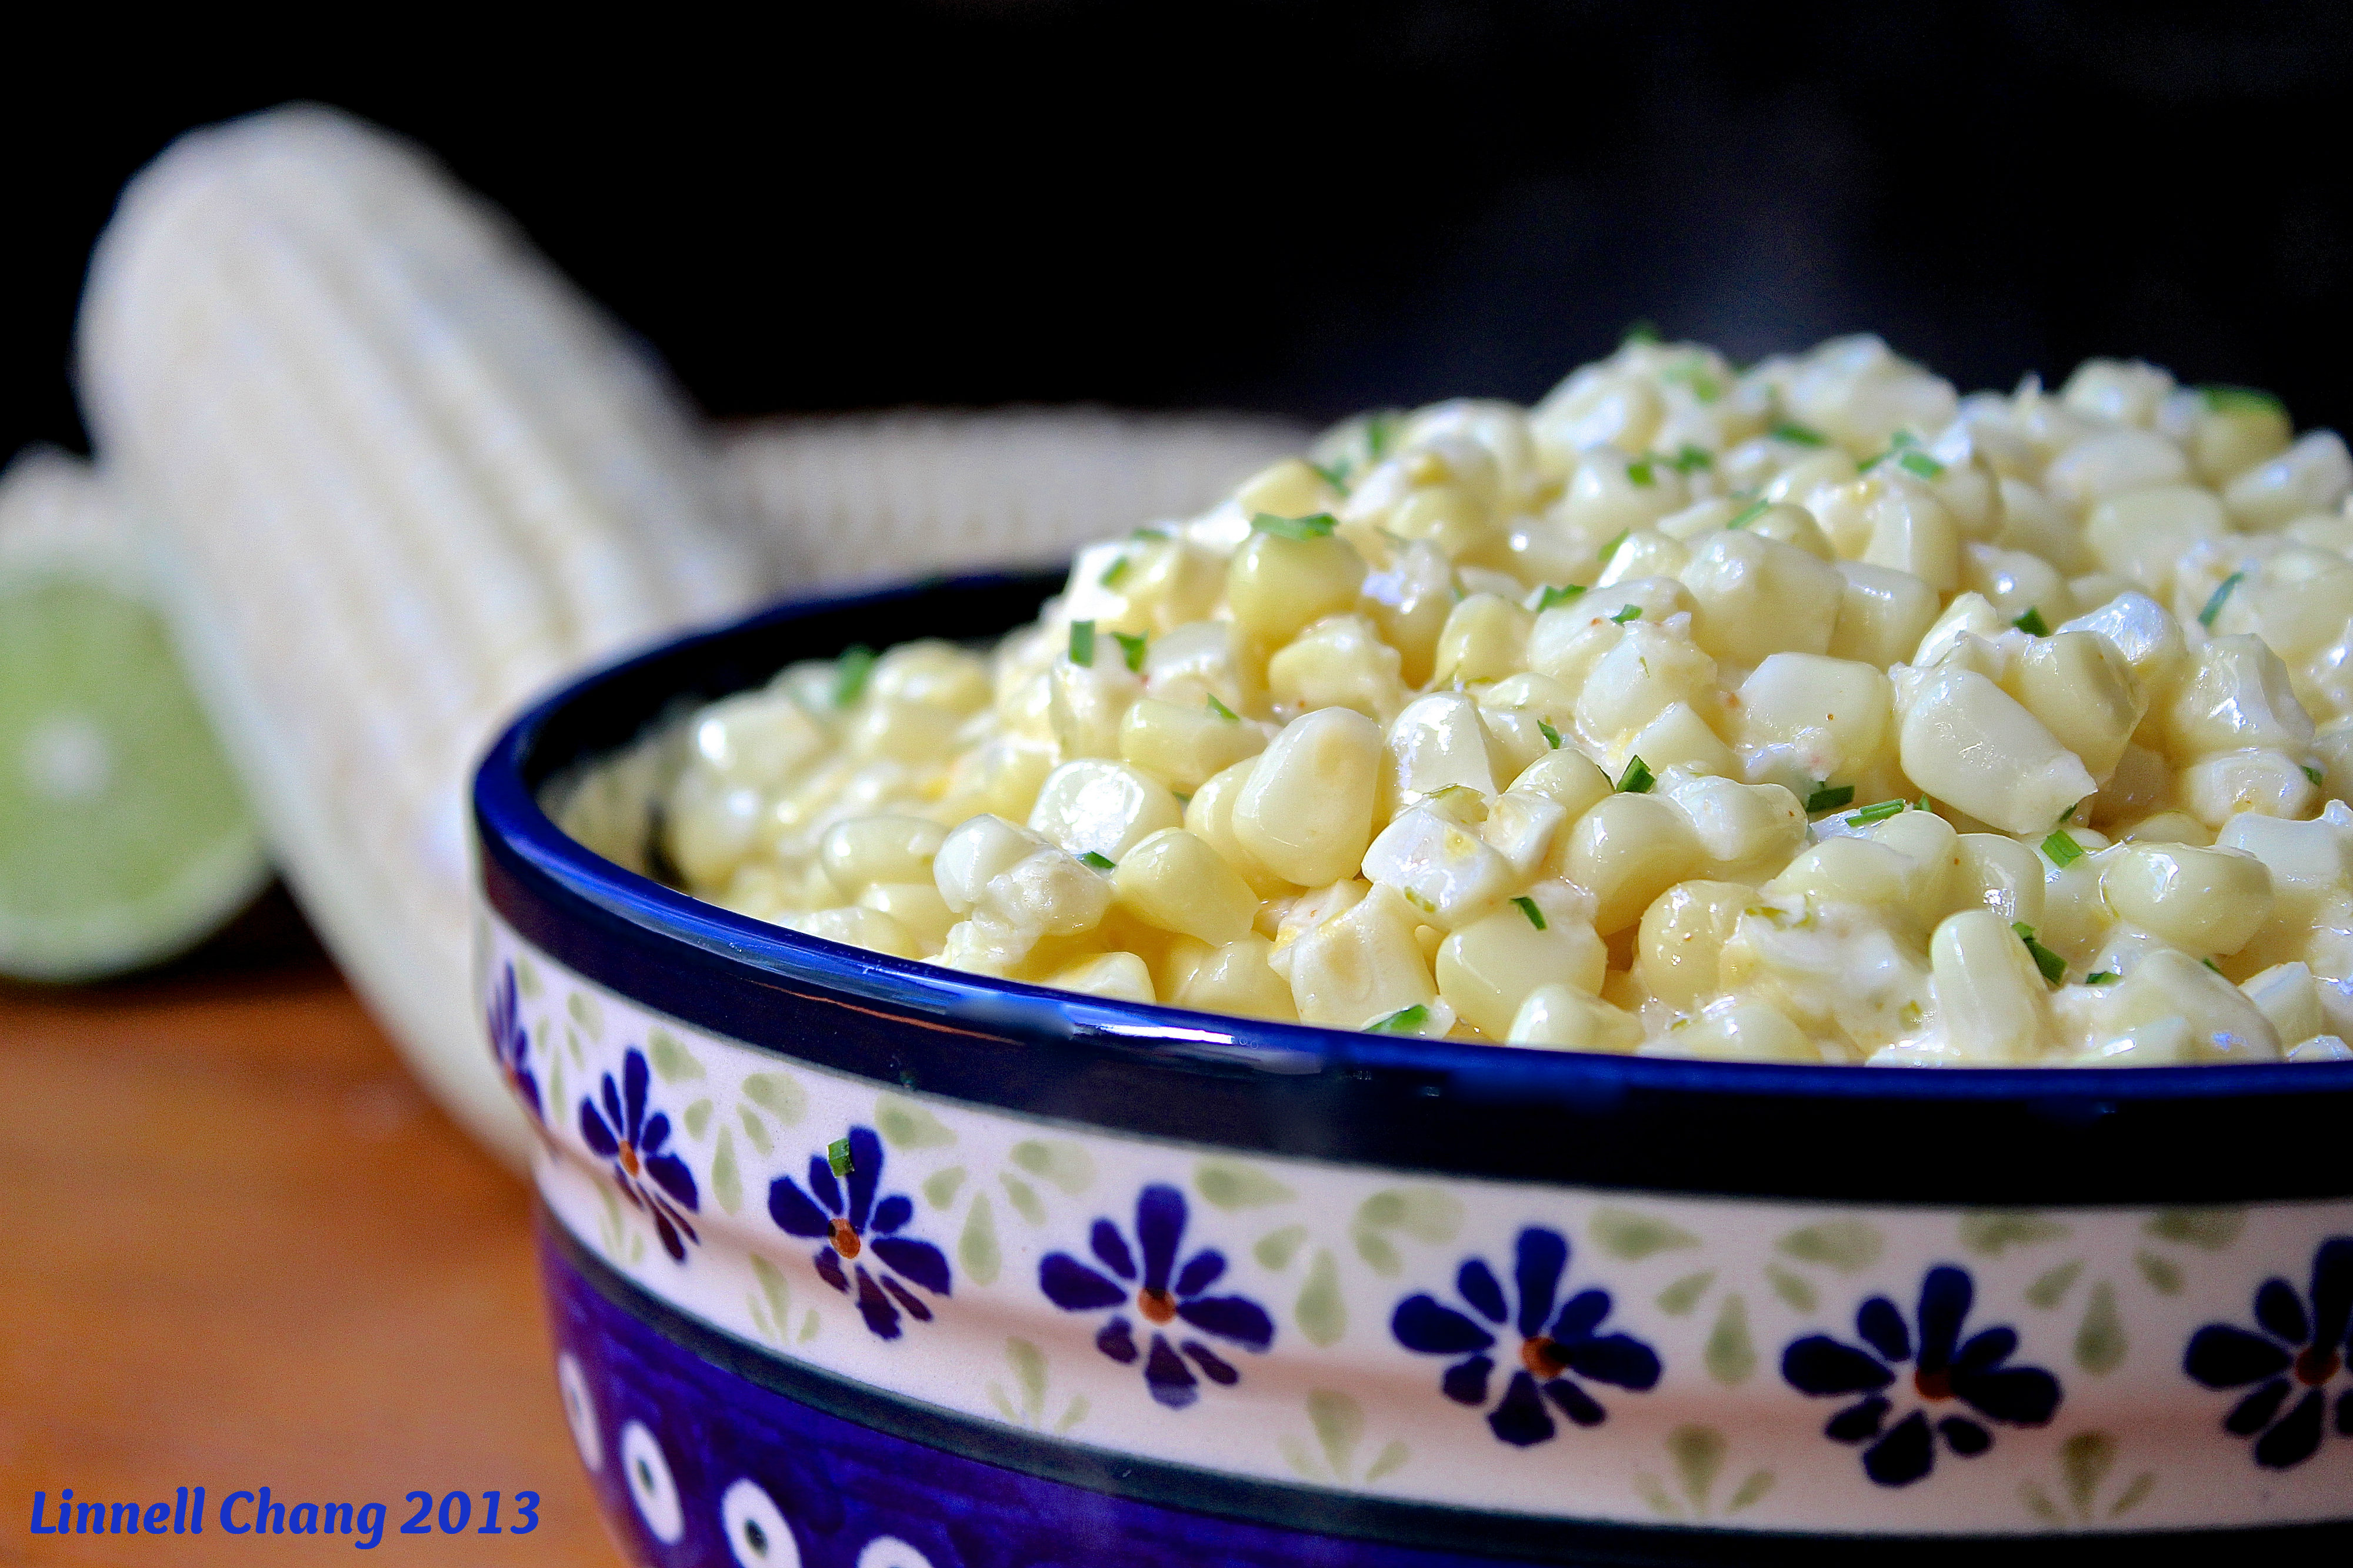
Ears of sweet summer corn require little embellishment to be fully enjoyed, but for a change of pace try this refreshing version of a traditional creamed corn dish. Just a little bit of lime zest, lime juice, and cayenne pepper transforms a normally predictable dish into a bright, surprisingly-sophisticated summer side dish.

Produce man Michael Marks gives this advice on selecting and storing fresh corn: When you’re picking your corn, make sure the husk is bright green and looks fresh. If it’s tanned and shriveling, it’s old or heat has gotten to it. Feel the top end. Fully mature ears of corn will have a rounded top. If the top feels pointy, it’s likely immature. Then pull down the husk and take a peek. There should be no cracks between those plump kernels. If you see any dimples in those kernels, step away from the corn. It’s old; the sugars will have turned to starch and it won’t be pleasant to eat. As soon as you get your corn home, refrigerate it and try to enjoy it within a couple of days.

Creamed Summer Corn
Torie Ritchie’s adaptation of a recipe from Ad Hoc at Home by Thomas Keller

INGREDIENTS
6 ears white or yellow corn, shucked
1 large lime
3 tablespoons unsalted butter
Kosher salt
3/4 to 1 cup heavy cream
Pinch cayenne
1-1/2 tablespoons snipped fresh chives

DIRECTIONS:
1. With a chef’s knife, cut down each ear of corn to remove kernels. Place kernels in a bowl. (To remove excess silk see note below.)

2. Holding one cob over the bowl at a time, use the back of a knife or a spoon to scrape any remaining corn and “milk” (corn juices) from the cob into the bowl. Repeat with remaining cobs.

3. Grate the zest from the lime onto a small plate and set aside. Cut lime in half. Juice lime into a ramekin and have a tablespoon measure handy.

4. Melt the butter in a large fry pan over medium heat. Add corn kernels and 1 tablespoon of lime juice. Season to taste with salt.

5. Reduce heat to medium-low and cook the corn, stirring occasionally, until the liquid evaporates and the corn starts to sizzle, about 12 minutes.

6. Stir in 3/4 cup of the cream, cayenne and lime zest. and bring to a boil. Adjust heat to medium and simmer until cream is thickened and almost absorbed, 6-8 minutes.

7. Taste and add more lime juice, salt, or cayenne as desired and stir in remaining cream for a creamier texture, if desired.

8. Remove from heat, stir in chives and serve.

Serves 4 to 6

LINNELL’S NOTES:
1. The easiest way to cut kernels off a corn cob is to stick the stem end into the hole of a Bundt pan. Holding the cob carefully, run your knife down the cob to remove the kernels. As you cut off the kernels, they will fall into the Bundt pan. Kitchen Tip: How to cut kernels off a corn cob

2. Here is Torie Ritchie’s note on removing corn silk: To remove any last bits of silk from the corn kernels in the bowl, set another bowl of water next to it. Swish your hands through the corn kernels in a circular motion to let your fingers pick up most of the remaining silk strands. Rinse your hands in the water bowl as you work to remove the silks. Repeat this a couple of times. I tried her technique and it worked for the most part — I still had to pick out a few strands of silk.

3. At step #7, I added a tiny bit more cayenne and the rest of the lime juice.

4. I keep an 8-ounce box of shelf stable whipping cream from Trader Joe’s in my pantry for convenience. No last minute dash out to the market to purchase whipping cream for me!

5. This recipe would go well with any tropical-type menu.

ENJOY!

Read Full Post »

Sugar Snap Peas with Sesame Seed Dressing Hot summer days evolve into lovely summer evenings. The sun mellows in the sky and temperatures drop to a comfortable warm. It’s the perfect time of day to dine al fresco and to entertain company. Keep the evening enjoyable and effortless, by preparing a simple menu that can be made ahead. Sugar Snap Peas with Sesame Seed Dressing is just such a recipe. It’s easy to prepare and it can be made earlier in the day. Plus, it’s delicious, visually appealing, and a great accompaniment to grilled meats.

Sugar Snap Peas with Sesame Seed Dressing
The Loaves and Fishes Party Cookbook by Anna Pump and Sybille Pump

INGREDIENTS
4 pounds sugar snap or snow peas
1/3 cup sesame seeds
1/2 cup sesame seed oil
2 teaspoons red pepper flakes
2 teaspoons coarse salt

DIRECTIONS
1. Blanch the peas in a large quantity of boiling water just until they turn bright green, about 1 minute. Drain and plunge the peas into very cold water to stop the cooking process. Drain again. Transfer the peas to a mixing bowl.

2. Place the sesame seeds in a large skillet over medium heat. Tossing lightly, toast until golden brown, and add to the sugar snap peas.

3. In the same skillet, heat the sesame oil until smoking hot. Remove from heat and add the red pepper flakes. Let stand for 5 minutes.

4. Pour the oil over the peas, add the salt, and toss to blend.

5. Transfer the peas to a deep bowl or platter and serve hot.

Serves 16

LINNELL’S NOTES
1. I purchase jars of pre-toasted sesame seeds at Asian markets and store them in my freezer. No need to defrost them. Just add them directly from the jar to whatever you are making. If you are toasting your own, keep an eye on them while they are in the skillet. Because they contain oil and because they are small, they can burn quickly.

2. Sesame seed oil is a thick and heavy oil. A little bit goes a long way. That being said, I felt the recipe called for too much of it. The next time I make this recipe, I will start with half the amount.

3. Stir the red pepper flakes into the hot oil and keep stirring. Some of my pepper flakes burned as they sat in the hot oil. Stirring them might have helped prevent burning.

4. Although the recipe says to serve this hot, it also says that it can be served cold. In my opinion, room temperature is best.

5. The recipe can be prepared without the red pepper flakes if you prefer, but I think the little added “kick” really makes the dish.

Enjoy!

Read Full Post »

Cavatappi withSpinach, Beans, and Asiago Cheese

Part green salad and part pasta salad, but all parts delicious and fresh! Pair this Italian-influenced salad with rustic artisan bread for a quick and healthy meatless supper or throw it together for easy entertaining. With only nine simple ingredients, this salad is big on taste and big on convenience.

Cavatappi With Spinach, Beans, and Asiago Cheese
The Best of Cooking Light

Ingredients:
8 cups coarsely chopped spinach
4 cups hot cooked cavatappi (about 6 ounces uncooked spiral-shaped pasta)
2 tablespoons olive oil
1/4 teaspoon salt
1/4 teaspoon black pepper
1 can cannellini beans or other white beans, drained
2 garlic cloves, crushed
1/2 cup (2 ounces) shredded Asiago cheese
Freshly ground black pepper (optional)

Directions:
Combine first 8 ingredients in a large bowl, and toss well. Sprinkle with freshly ground black pepper, if desired.

Yield: 4 servings.

Linnell’s Notes:
1. Cavatappi is also known as cellentani, spirali or tortiglione.
2. Maybe I packed too much chopped spinach into each cup while measuring it out, but this made much more than 4 servings.
3. I thinly shaved the Asiago instead of shredding it.
4. In a side note, the recipe states, “The warm cavatappi slightly wilts the spinach and softens the cheese during tossing.”

Enjoy!

Update (6/24/13): I made this salad again, but with some substitutions and additions.  I used cavatelli instead of cavatappi and replaced the regular olive oil with Meyer lemon infused olive oil. Cherry tomatoes, fresh off the vine, were sliced in half and added to the salad along with some toasted pine nuts. Very nice!

Read Full Post »

Java-Style Cauliflower Salad Like an artist’s blank canvas, cauliflower’s subtle flavor provides the perfect background to let dynamic flavors shine. Cauliflower is rich in nutrients, low in calories, and high in fiber, so by adding the bright and zesty flavors of coconut, lime, cilantro, and cayenne pepper, you’ve got a winning combination. In addition, this cauliflower salad can be served hot or at room temperature which makes it a great make-ahead dish.

Java-Style Cauliflower Salad
Adapted from Living Low-Carb by Fran McCollough

Salad Ingredients:
1 medium head cauliflower, cut into small florets
Half a small red bell pepper, cored, seeded, and diced
2 tablespoons chopped fresh cilantro
2 tablespoons shredded coconut

Dressing Ingredients:
1 garlic clove, chopped
4 teaspoons fresh lime juice
1 teaspoon dark brown sugar
1/4 teaspoon cayenne pepper
1/4 teaspoon salt
3/4 cup coconut cream

Directions:
1. Drop cauliflower florets into a large pot of well-salted boiling water. Boil just a few minutes, until barely tender. Drain and dry on a kitchen towel.
2. Dice the red pepper and set aside.
3. Wash and chop the cilantro and set aside.
4. Chop garlic and put in blender.
5. Add lime juice, brown sugar, cayenne pepper, salt and coconut cream to blender. Pulse until well-blended.
6. Pour dressing over the hot cauliflower. Toss well and transfer to a serving bowl, scattering the red pepper, cilantro, and coconut on top.
7. Toss before serving.

Serves 4

Linnell’s Notes:
1. Make sure the cauliflower florets are well-drained and reasonably dry before adding the dressing. If they still contain a lot of moisture, the dressing will become diluted and runny.
2. I had to rework the dressing recipe. The original recipe called for 1 cup of freshly-grated coconut and 4 tsp lime juice. There was just not enough liquid to make a dressing. I added some coconut cream I had in my pantry to make the dressing “flow.” The grated coconut became a topping, rather than part of the dressing.
3. Because of time constraints, I substituted shredded coconut in a bag instead of grating fresh coconut. Also, toasting the coconut first can bring out its flavor and give it more “crunch.” I will do this the next time I make this salad.
4. Adjust the seasonings to taste – more or less lime juice, sugar, cayenne pepper, and salt.
5. The cookbook author says, “Don’t be tempted to skip the tiny amount of brown sugar; it’s a secret ingredient that pulls everything together.”
6. The addition of coconut cream does not significantly raise the amount of carbohydrates in the recipe. The coconut cream has only 3 grams of carbohydrate per 1/3 cup.

Enjoy!

Read Full Post »

IMG_0145

When is a recipe more than just a recipe? If the mere thought of a particular recipe opens a floodgate of memories, then it transcends its written words. For me, this recipe for Pizza Spread falls into that category. This recipe, with only a few ingredients and very brief instructions, has been in my family for quite some time. No one in the family can remember the original source, but all can remember coming home from school and munching on mini pizzas made from Pizza Spread and English muffins. During my happy-but-poor years of marriage, I presented almost everyone I knew with jars of homemade Pizza Spread for Christmas. Fast forwarding to another decade, I remember the excitement in my children’s faces, when I’d make Pizza Spread for them. Later, when they left home for college, they did not leave empty-handed. One hand held a jar of Pizza Spread and the other held a bag of English muffins. Now my children make Pizza Spread on their own and I see mini pizzas in their children’s futures. One thing all Pizza Spread lovers agree on is the number of mini pizzas that are eaten: tasting just one mini pizza is impossible; nibbling on two is highly unlikely; eating a mere three is more probable, and devouring four to six is most likely!

Pizza Spread
Recipe from Linnell’s mom
pizza spread

Ingredients:
1 two-pound block of Velveeta Cheese
2 cubes of butter, room temperature
2 – 6 ounce cans of tomato paste
2 teaspoons of dried oregano
8 stalks of green onions, sliced into thin rings
Salt
English muffins

Directions:
1. Cut Velveeta into small cubes and then put into a large mixing bowl, food processor bowl, or electric mixer bowl.
2. Cut butter into small cubes and add to mixing bowl.
3. Add the two cans of tomato paste and dried oregano.
4. Wash and slice the green onions and add to the cheese mixture.
5. Blend all ingredients thoroughly together.

To Serve:
1. Turn on oven broiler.
2. Cut English muffins in half.
3. Spread English muffin halves with Pizza Spread and place them on a cookie sheet.
4. Broil until spread is melted and bubbling slightly.

Linnell’s Notes
1. Although any type of bread can be used, English muffins work particularly well with this recipe. The melted Pizza Spread flows into all the nooks and crannies of the muffins!

2. I do not add any additional salt. The Velveeta is plenty salty for me. In addition, I use unsalted butter.

3. Keep a watchful eye on the muffins when they are under the broiler, because they can burn quickly!

4. Store in an airtight container in the refrigerator.

ENJOY!

Read Full Post »

crudities  with dip 
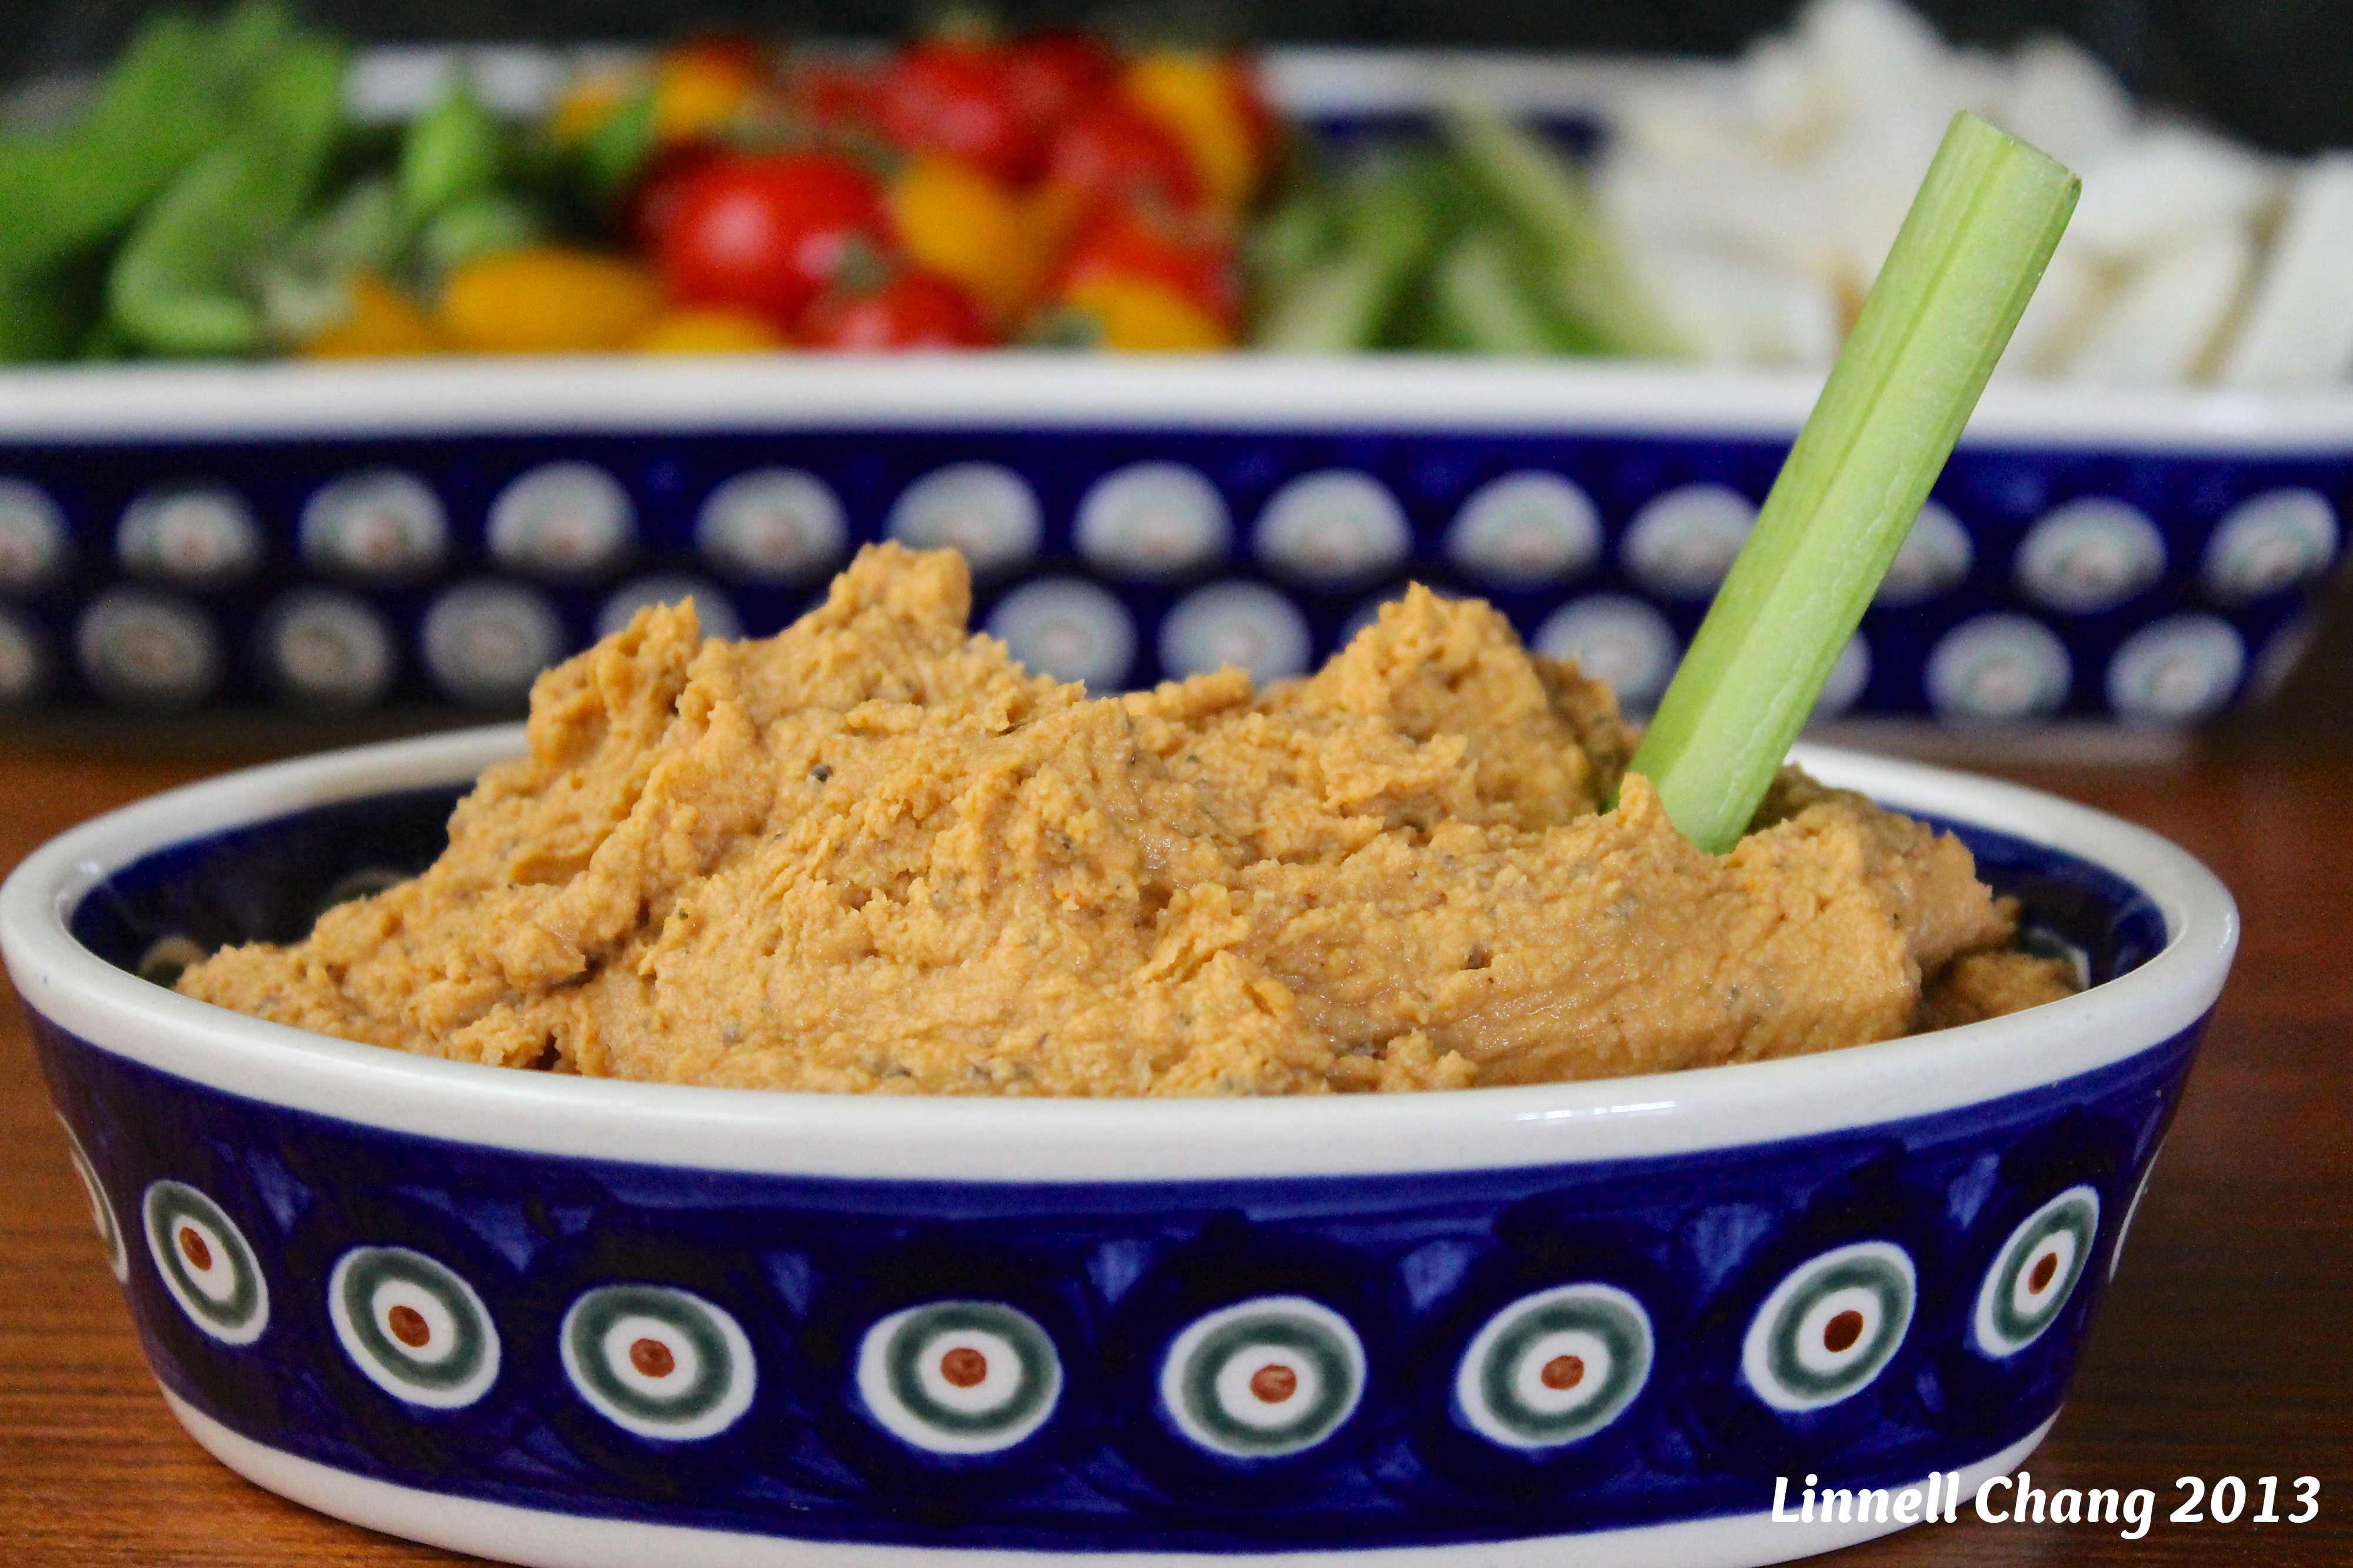
Instead of serving a tray of high-calorie appetizers at your next party, how about presenting a beautiful platter of fresh crudités? Boring, you say? Not if you serve the crudités with a variety of interesting dips! Don’t be fooled by the simple list of ingredients in the Herb Dip; the fresh herbs really shine in this easy and delicious recipe. Tempt your guests with the cooling flavor of lime juxtaposed against the heat of chilies in the Chili-Lime Sour Cream Dip. Last, but certainly not least, the Peanut Sauce is sure to be a crowd favorite – what’s not to like about peanut butter with a little attitude?

Herb Dip
Recipe by Ina Garten

Ingredients:
8 ounces cream cheese, at room temperature
1/2 cup sour cream
1/2 cup mayonnaise
4 scallions, white and green parts, minced
2 tablespoons fresh parsley leaves, minced
1 tablespoon fresh dill, minced
1 teaspoon kosher salt
3/4 teaspoon freshly ground black pepper

Directions:
Place the cream cheese, sour cream, mayonnaise, scallions, parsley, dill, salt, and pepper in the bowl of an electric mixer fitted with the paddle attachment and blend. Serve at room temperature.

Makes 2 cups

Linnell’s Notes:
Due to the cream cheese, this recipe produces a thick dip. To further cut calories, you could experiment with low-fat versions of the cream cheese, sour cream and mayonnaise. For best flavor, though, you’re going to have to leave some fat in the recipe!

Chili-Lime Sour Cream Dip
Recipe from Better Homes and Garden

Ingredients:
One 16-ounce carton of sour cream
Two 7-ounce cans of diced green chilies, drained
1/4 cup snipped fresh cilantro
1/4 cup jarred salsa
2 cloves garlic, minced
1 teaspoon mild or hot chili powder
2 teaspoons finely shredded lime peel
1/2 teaspoon salt
Bottled hot pepper sauce to taste

Directions:
In a large bowl combine sour cream, chilies, cilantro, salsa, garlic, chili powder, lime peel, salt and bottled hot pepper sauce. Cover and chill overnight.

Makes 3¾ cups

Linnell’s Notes:
The level of preferred heat can be adjusted by increasing or decreasing the amounts of chili powder and hot pepper sauce. Also, the type of salsa you use, will affect the heat of the dip. Chilling the dip overnight allows the flavors to meld.

Peanut Sauce
Recipe originally from Sunset Hors D’oeuvres Cookbook

Ingredients:
1/3 cup crunchy peanut butter
3 tablespoons firmly packed brown sugar
1/2 teaspoon crushed red pepper
1/4 cup lemon juice
2 tablespoons chili sauce or ketchup
1/2 – 1 teaspoon soy sauce, to taste

Directions:
Mix ingredients until well-blended. Serve with raw vegetables (cucumber, jicama, bell pepper, carrot and celery)

Makes 3/4 cup

Linnell’s Notes:
After tasting this at one of her parties, I begged my friend Tina for this recipe. Because it’s a crowd-pleaser, I double or quadruple this recipe when I make it!

Enjoy!

Read Full Post »

Fall Fruit Salad

“Healthy” and “holiday” are words rarely used together, especially when describing food. Trying to plan healthy meals during the holidays can be quite a struggle, right? Well, not necessarily. This past Thanksgiving, I served my family a visually appealing, texturally satisfying, and heart-healthy salad. Not only did this salad splendidly highlight fall fruit, such as persimmons, Asian pears, pomegranates, and ruby grapefruit, it was served with a delicate, FAT-FREE, slightly sweet and slightly tart salad dressing! This salad has it all: gorgeous to look at, easy to prepare, and a delight to eat!

Fall Fruit Salad
Recipe from November 1995 issue of Sunset Magazine

Ingredients:
1 to 2 tablespoons pine nuts
2 firm-ripe Fuyu persimmons (1/2 lb. each)
2 ruby grapefruit (1 lb. each)
1 Asian pear (about 3/4 lb.)
3 tablespoons lime juice
3 tablespoons rice vinegar
2 tablespoons honey
2 to 3 cups frisée, rinsed and drained
3/4 cup pomegranate seed
Salt

Directions:
1. In a 6- to 8-inch frying pan over medium heat, frequently stir pine nuts until pale gold, 2 to 3 minutes. Pour from pan.

2. Rinse persimmons, then trim off and discard leaf tops. Slice persimmons crosswise into thin rounds.

3. With a knife, cut peel and white membrane from grapefruit. Holding fruit over a bowl, cut between segments and inner membrane to release fruit into bowl. Also squeeze juice from membrane into bowl, then discard membrane.

4. Rinse pear and discard stem. Cut fruit crosswise into thin rounds, right through center seeds. Coat pear slices with grapefruit juice.

5. Mix 3 tablespoons grapefruit juice (reserve remainder for other uses) with lime juice, rice vinegar, and honey.

6. Line a salad bowl or individual plates with the frisée. Arrange pieces of persimmon, pear, grapefruit on the greens; sprinkle fruit with pomegranate seed and pine nuts, then moisten with the grapefruit-lime dressing. Add salt to taste.

Serves 6

Linnell’s Notes:
1. Fuyu persimmons are the round, squat persimmons that can be eaten while they are firm, unlike the elongated and pointed Hachiya persimmons, which must be eaten only after the fruit has ripened to a soft and somewhat squishy state.

2. Besides a light sprinkling of salt, I also sprinkled some fresh ground pepper on each plated salad.

3. Keep an eye on the pine nuts while toasting them. They contain a high level of oil, so they will burn quickly!

4. My family is not a big fan of frisée, so I substituted fresh green curly-leafed lettuce.

5. It is easier to peel the grapefruit, if you first cut off the top and the bottom peel. This will give you a flat surface when you stand the grapefruit on the cutting board.

ENJOY!

Read Full Post »

split pea and spinach soup

A sip of hearty soup and a bite of freshly baked cornbread takes the chill out of a chilly evening. But better than that, when this thick and flavorful soup is paired up with cornbread, which is a complimentary protein, a complete protein is formed. How comforting to know that the comfort food you’re eating is not only delicious, but good for you, too!

Split Pea and Spinach Soup
Recipe from Linnell’s old recipe box, original source unknown

Ingredients:
2 cups chopped onions (about 2 large ones)
2 tablespoons vegetable oil
1 lb. or 2 cups yellow or green split peas, picked over and rinsed
2 quarts water
2 bay leaves, crumbled
1 teaspoon dried basil
1 10 oz. package frozen chopped spinach
2 teaspoons salt
1/2 teaspoon pepper
1/8 teaspoon ground cloves
1/4 cup Parmesan cheese, grated

Directions:
1. Heat oil in a Dutch oven and add onions. Sauté the onions (and the pork, if using*) in oil until tender.
2. Add peas, water, bay leaves, and basil.
3. Cover and simmer for approximately one hour or until the peas are tender.
4. Add the spinach, cover, and simmer, while stirring occasionally, about 8 minutes longer.
5. Season with salt, pepper, and cloves.
6. Serve sprinkled with grated Parmesan cheese and a crusty loaf of pumpernickel bread.

Serves 4 or makes 10 cups.

Linnell’s Notes:
1. *I add either diced salt pork, ham, or 2 smoked ham hocks for additional flavor. Obviously if you’d like to make this a vegetarian soup, you will omit the meat.
2. Taste soup before adding the salt, especially if you’re adding a cured meat.
3. As the recipe suggests, pumpernickel bread is a good accompaniment, but my family would revolt if I did not serve this with cornbread.

ENJOY!

Read Full Post »

« Newer Posts - Older Posts »