Feeds:
Posts
Comments

Posts Tagged ‘Recipes’

Strawberry Agua Fresca

Luscious in color and bright in flavor, this refreshing strawberry agua fresca makes the perfect summer drink. Agua fresca is Spanish for “fresh water” and this beverage is just that — light and fresh! With its ease of preparation and its ability to be made ahead, this beverage invokes effortless summer entertaining. Try adding a splash of tequila to make an easy strawberry margarita or try experimenting with other flavors, such as watermelon, cantaloupe, honeydew, or cucumber. This agua fresca will make you long for the hot days of summer!

Strawberry Agua Fresca
Cooking Light, May 2005

Ingredients:
4 cups water
1/3 cup sugar
6 cups hulled fresh strawberries
1/4 cup fresh lime juice (about 2 limes)

Directions:
1. Combine water and sugar, stirring until sugar dissolves.
2. Place strawberries in a blender, and process until smooth.
3. Combine the sugar mixture, strawberry puree, and juice; stir well.

Yield: 8 cups (serving size 1-1/3 cups)

Linnell’s Notes:
1. I used Splenda in place of sugar with great results. Because the strawberries I had were farm-ripe sweet, I used less sweetener than the recipe called for. The original recipe states that there are 71 calories per serving, so by substituting Splenda, there will be even fewer calories!

2. Because the two limes I had yielded only 1/8 cup juice, I added 1/8 cup fresh lemon juice to the mix.

3. This beverage should be served well-chilled.

Enjoy!

Read Full Post »

coco's Special Cheese Dressing Feeling very proud of the heads of lettuce growing in two small planters in my backyard, I announced to my husband that we were having a very fresh salad for dinner. With lettuce that fresh, I wanted to serve it with a good homemade salad dressing instead of a bottled dressing. Coincidentally, earlier in the day, while flipping through the pages of a book, I found a newspaper clipping containing a recipe for a requested salad dressing from the Coco’s restaurant chain. Finding the recipe and having all the ingredients on hand, I felt destined to make it. Sometimes the moon and the stars align and everything works out perfectly!

Coco’s Special Cheese Dressing
Recipe from Kathy Shepard

Ingredients:
1/4 to 3/4 cup milk
3/4 cup mayonnaise
1/2 cup sour cream
1/4 cup buttermilk
4½ teaspoons cider vinegar
1½ teaspoons garlic salt
1/2 teaspoon fresh ground pepper
2 tablespoons grated Parmesan cheese

Directions:
1. Combine milk, mayonnaise, sour cream, and buttermilk. Whisk until blended.
2. Place vinegar in cup and stir in garlic salt and pepper.
3. Add to mayonnaise mixture and blend in cheese.
4. Store in the refrigerator.

Makes about 2 cups

Linnell’s Notes:
To keep this salad dressing on the healthier side, I substituted Greek yogurt for the sour cream.

Enjoy!

Read Full Post »

Korean Barbecued Hamburgers

Instead of eating ordinary hamburgers on a bun, take your hamburger dining experience to a whole new gastronomical level. By creatively substituting and adding different elements, you can successfully fuse together the flavors of different cultures. Last weekend I created Korean Barbecued Hamburgers for a weekend backyard barbecue. Soy sauce, sesame seeds, brown sugar, and chopped green onions flavored the hamburger meat. After grilling the patties, the fun began! Spicy kimchi topped the burgers instead of traditional pickles and a small handful of fresh pea shoots, instead of alfalfa sprouts, added a nice crunchy texture. And, in lieu of ketchup, I substituted Korean Ssamjang sauce. Ssamjang sauce is a thick spicy condiment normally made from doenjang (Korean soybean paste), gochujang (Korean chili pepper paste), sesame oil, onion, garlic and green onions. With everyone asking for MORE, these tasty burgers were deemed a huge hit!

Korean Hamburger Elements
Ingredients:
Korean barbecued hamburger patties (recipe below)
Hamburger buns
Lettuce leaves
Tomato slices
Kimchi
Pea shoots (AKA pea sprouts)
Ssamjang-Mayo sauce (recipe below)

Korean Barbecued Hamburgers
Meat recipe revised from the Favorite Island Cookery: Book II

Ingredients:
1 lb. ground beef
2 stalks green onion, chopped
1-2 cloves of garlic, minced
1½ T. soy sauce
Dash pepper
1 egg
2 tsp. brown sugar
1/2-inch piece of ginger root, minced
1 tsp. sesame seed, toasted
1 tsp. sesame seed oil

Directions:
Combine ingredients and form into patties. Broil 3 to 5 minutes on each side, pan fry or grill them on the barbecue.

Yields 3 to 4 servings

My Ssamjang-Mayo Sauce:
2 T. mayonnaise
1-2 T. Ssamjang sauce, depending on desired level of spiciness

Mix both ingredients together in a small bowl.

Assembly:
1. Spread Ssamjang-Mayo sauce on buns.
2. Add lettuce leaf to bottom portion of bun.
3. Place hamburger patty on lettuce leaf.
4. Place tomato slice on top of hamburger patty.
5. Put a few slices of kimchi on top of tomato.
6. Place a small handful of pea shoots on top of the tomato.
7. Place top portion of bun on top of shoots.

Linnell’s Notes:
1. I always double the meat recipe when serving 5 people.
2. Kimchi, Ssamjang sauce, and pea shoots can be purchased at most Asian markets. Kimchi and pea shoots can often be found at Trader Joe’s and I’ve purchased pea shoots at farmers’ markets, although they’re more expensive there.
3. If you can’t find Ssanjamg sauce, any chile garlic sauce like Sriracha can be used.
4. Recipes for two great side dishes to accompany these Korean Barbecued Hamburgers can also be found on this blog:
Asian Coleslaw
Asian Cucumber Salad

Enjoy these flavorful burgers and make sure to have plenty of napkins on hand!

Read Full Post »

Lemon-Rosemary Crumb Cake

The strong flavors of rosemary and lemon can oftentimes dominate a recipe. Not so, in this case. From the crunchy lemon crumb on top to the tender cake speckled with bits of rosemary, this cake is delightful from top to bottom. With its perfect blend of flavors and its ease of preparation, it will quickly become one of your “go to” cakes. Serve it for breakfast, brunch, lunch, snack, or dessert!

Lemon-Rosemary Crumb Cake
Cooking Light Magazine, May 1998

Ingredients:
1¼ cups all-purpose flour
2/3 cup sugar
1/8 teaspoon salt
1/4 cup chilled stick margarine or butter, cut into small pieces
3/4 teaspoon minced fresh or 1/4 teaspoon dried rosemary
1/2 teaspoon baking powder
1/4 teaspoon baking soda
1/3 cup low-fat buttermilk
2 tablespoons fresh lemon juice
1 large egg
Cooking spray
2 teaspoons grated lemon rind
3/4 teaspoon water
Rosemary sprigs (optional)
Lemon slices (optional)

Directions:
1. Preheat oven to 350 degrees F.

2. Lightly spoon flour into dry measuring cups; level with a knife. Combine flour, sugar, and salt in a bowl; cut in butter with a pastry blender or 2 knives until mixture resembles coarse meal. Reserve 1/2 cup flour mixture for topping; set aside.

3. Combine remaining flour mixture, rosemary, baking powder, and baking soda; add buttermilk, lemon juice, and egg. Beat at medium speed of a mixer until blended. Spoon batter into and 8-inch round cake pan coated with cooking spray. Combine reserved 1/2 cup flour mixture, lemon rind, and water; stir with a fork. Sprinkle crumb mixture over batter. Bake at 350 degrees for 30 minutes. Cool on a wire rack. Garnish with rosemary sprigs and lemon slices, if desired.

Yield: 8 servings or 8 wedges

Linnell’s Notes:
1. I used butter instead of margarine. Why not splurge on flavor since the recipe only calls for a 1/4 cup of it?

2. I only have a 9-inch cake pan, so the cake would have been taller if I had used an 8-inch cake pan.

3. Using the larger pan, I was careful to check the cake after 20 minutes. It was baked by 25 minutes.

4. To test the cake to see if it is done, gently press on the top of it with your fingers. If it springs back completely when lightly touched in the center, the cake is done.

Enjoy!

Read Full Post »

Breakfast Pizza

Pizza for breakfast? Sure, what kid or hungry adult hasn’t eaten leftover pizza for breakfast? But here’s a recipe for a pizza that is covered with ingredients more appropriate for breakfast and is also just as delicious eaten the morning after! This is an easy and wonderful dish to serve at breakfast or brunch, but could be served anytime of the day. The only hard part about this recipe is remembering to defrost the frozen pizza dough in the refrigerator the night before!

Breakfast Pizza
Recipe adapted from DHC Fine Foods catalogue

Ingredients:
2 tablespoons extra virgin olive oil
1 pound purchased pizza dough, room temperature
Flour for rolling the dough
4 ounces ham, thinly sliced
6 asparagus spears, blanched and cut into 1/2-inch pieces
4 large eggs
1/2 cup Fontina cheese, grated
1/4 Parmesan cheese, grated
2 teaspoons parsley, chopped, optional

Directions:
1. Preheat oven to 450 degrees.
2. Coat the bottom of a rimmed baking pan with the olive oil.
3. Roll out the dough to a rectangle about 9 x 13 inches. Transfer to the baking pan.
4. Arrange the ham slices evenly over the dough, leaving about a 1-inch border.
5. Scatter the asparagus pieces over the ham.
6. Carefully break the eggs on top of the pizza. (The asparagus will “trap” the eggs and keep them from rolling.)
7. Sprinkle the fontina and parmesan cheeses over all.
8. Bake the pizza for 15 minutes or until browned and bubbling.
9. Sprinkle with the chopped parsley for garnish.

Serves 4

Linnell’s Notes:
1. The next time I make this, I will roll the dough out a little larger and bake it on a shallow rimmed baking sheet instead of a 9 x 13 inch pan. The crust was a little too thick for me when baked as specified.

2. To make it easier to cut the pizza, I cut the pieces of ham into 1/2-inch pieces instead of laying whole pieces of it.

3. An extra egg could have been cracked in the center and would have given more people more egg to eat.

4. Arugula or chopped cilantro would add more dimension to the flavors if sprinkled on top compared to the specified chopped parsley.

Enjoy!

Read Full Post »

Fresh Banana Sorbet

“Can I throw these away?” my husband inquires. I look at the bunch of dark bananas in his hand and scream, “Noooooooooooo!” Guilt washes over me at the thought of wasting food. I come from a long line of “savers.” Nothing gets wasted, everything is saved. So when my husband sees a bunch of ugly and disgusting bananas, I see something with potential. Normally, if I’m on top of my game and I see brown bananas with freckles sitting on the kitchen counter, I’ll put them in the freezer for future baking projects. But occasionally, I’m too preoccupied to notice their demise and I end up sending them to the compost bin instead. When I came across this recipe for banana sorbet, I was thrilled. The only ingredient in this recipe are very ripe bananas! You’ll need a blender or a food processor – no ice cream maker is required. This frozen treat couldn’t be easier, healthier, and less wasteful!

Fresh Banana Sorbet
Recipe from Chocolate and Zucchini

Ingredients:
Very ripe bananas

Directions:
1. The day before, peel the bananas, slice them, and place them in a freezer-safe container in the freezer.

2. Remove the frozen banana slices from the freezer and process them in a sturdy food processor or blender. At first it will look like a mess, but if you press on, it will soon come together and become smooth.

3. At this point, you could choose to add mix-ins, such as candied nuts, chopped chocolate, dried coconut flakes, caramel sauce or melted chcolate to create swirls, etc.

4. Serve immediately or return to the freezer for later consumption.

Yields: A single medium banana will yield two small scoops or one large scoop.

Linnell’s Notes:
1. My husband likes to eat ice cream while watching television at night. I think this sorbet would be a healthier alternative for him. For the initial taste test, I presented him with a bowl of banana sorbet with chopped candied pecans sprinkled over the top. He gave it a thumbs up.

2. Because this sorbet does not contain anything artificial, it would make a great frozen treat for babies and young children. You could make a large batch and freeze it in small paper cups to make mini fruit pops for the kids.

ENJOY!

Read Full Post »

Irish Cream Bundt Cake

Stout? Liqueur? Guinness? Baileys? Stout? Liqueur? Guinness? Baileys? The debate went back and forth as I tried to decide which Irish beverage to highlight in a recipe for St. Patrick’s Day. The moment I found this recipe, for a cake that has Irish cream in the cake batter and the glaze, the decision was made. Want a better visual of this culinary delight? Click on the photo above and you’ll get a tempting close-up of a moist cake soaked with a buttery glaze that glistens over toasted pecans. It’s so rich, the leprechauns in your home will surely think they found a pot of gold!

Irish Cream Bundt Cake
Recipe by RecipeNut on Food.com

Ingredients for the Cake:
1 cup chopped pecans
1 (18½ ounce) package yellow cake mix
1 (3½ ounce) package vanilla instant pudding mix
4 eggs
1/4 cup water
1/2 cup vegetable oil
3/4 cup Irish cream

Ingredients for the Glaze:
1/2 cup butter
1/4 cup water
1 cup white sugar
1/4 cup Irish cream

Directions:
1. Preheat oven to 325 degrees F (165 degrees C).
2. Grease and flour a 10-inch bundt pan.
3. Sprinkle chopped nuts evenly over bottom of pan.
4. In a large bowl, combine cake mix and pudding mix.
5. Mix in eggs, 1/4 cup water, 1/2 cup oil, and 3/4 cup Irish cream liqueur.
6. Beat for 5 minutes at high speed.
7. Pour batter over nuts in pan.
8. Bake in preheated oven for 60 minutes, or until a toothpick inserted into the cake comes out clean.
9. Cool for 10 minutes in the pan, then invert onto a serving platter.
10. Prick top and sides of cake.
11. Spoon glaze over top and brush onto sides of cake.
12. Allow to absorb glaze. Repeat until all glaze is used up.

To Make Glaze:
1. In a saucepan, combine butter, 1/4 cup water, and 1 cup sugar.
2. Bring to a boil and continue boiling for 5 minutes, stirring constantly.
3. Remove from heat and stir in 1/4 cup Irish cream.

Serves 8

Linnell’s Notes:
1. To bring out the flavor of the pecans, toast them in the oven first.

2. Thanks to deceptive shrinking packaging, both the cake mix and the instant pudding did not contain the specified number of ounces required in the recipe. The cake mix had only 16.5 ounces and the instant pudding box contained only 3.4 ounces. I used these down-sized portions with good results, though.

3. Instead of using butter and flour separately to grease the pan, I sprayed the pan with a cooking spray that contains flour – so fast and easy!

4. My cake was done at the end of 50 minutes, so you may want to set your oven timer to check the cake after 45-50 minutes.

5. Temporarily place strips of waxed paper under the cake/on top of the serving platter to catch dripping glaze and to help keep the serving platter clean.

6. This cake serves way more than the 8 servings the recipe states!

Enjoy!

Read Full Post »

whitebean, shrimp, and arugula salad

In my best “Fretalian,” my own blend of French and Italian, I asked my waiter “Scuzi, qu’est-ce que c’est?” as I pointed to the menu. He obviously did not understand “Fretalian,” because he looked at me questioningly. While traveling through Italy, I noticed an oft-appearing item on menus and I wanted to find out what it was. I tried again, this time in English. “What is rocket?” The young Italian waiter continued to give me a puzzling look, so I tried gesturing. I pointed to the menu and then shrugged my shoulders with my palms facing up to the ceiling. “Ah,” he said and motioned for me to wait and then ran off to the kitchen. A minute later he came out with a green leaf in his hand. I looked at the leaf and smiled as I nodded my head in recognition. “Rocket,” the mysterious menu item, was none other than arugula. “Grazie,” I said to him as I placed my dinner order. This little story came to my mind, while I was preparing this low fat and impressively nutritious salad. The arugula or “rocket” adds a nice peppery punch to the salad and it texturally balances the other ingredients.

White Bean, Shrimp, and Arugula Salad
From the Essential Low Fat Cookbook by Antony Worrall Thompson

1 (14 oz) can cannellini beans, drained
1 Tbsp extra-virgin olive oil
Juice and zest of one lemon
1 tsp honey
1/2 tsp black pepper
1 mild long red chili, seeded and finely chopped
1 garlic clove, mashed to a paste with a little sea salt
1 red onion, thinly sliced
1 stick celery, thinly sliced
6 button mushrooms, thinly sliced
16 cooked jumbo shrimp, peeled
2 handfuls of arugula leaves

Directions:
1. Heat beans with a little salted water for 3 minutes. Drain and then tip into a bowl.

2. While they are still warm, combine beans with olive oil, lemon juice and zest, honey, pepper, and chili.

3. Allow to cool and then combine with remaining ingredients.

Serves 4

Linnell’s Notes:
1. Instead of using a mild long red chili, I chopped up half a red jalapeno to give the recipe a little kick.

2. Not being a big fan of raw onions, I used less than half of a red onion and found this amount to be perfect for my taste.

3. I used large shrimp that came de-veined.  I cooked them in water and Old Bay seasoning, drained them, and then peeled off their shells. Do not overcook the shrimp or else they will be dry and tough.

4. You might have noticed in the photograph, that there are no mushrooms. I had a mental “blip” and totally forgot to add them. It’s too bad because the mushrooms would have been delicious in this salad, not to mention the added nutrients they would have supplied!

Enjoy!

Read Full Post »

Daphne

Daphne by Linnell Chang

If you walk up to my front door right now, there’s a gift waiting for you. For, at this very moment, the sweet fragrance of Daphne flowers infuse the air. Such a delightful way to be greeted, but how will you reply? Will you bask in the moment or will you move on?

#1 – Tolkien’s Ents?

Methuselah tree

Photo by Rick Goldwasser

From a flower-strewn bush of Daphnes to the sky-high tops of trees, nature’s gifts always impress. Mother Nature Network assembled this photo series of “The World’s 10 Oldest Living Trees.” Looking at these photos of ancient trees, one has to wonder if any of them were the inspiration for Tolkien’s wise Ents?

#2 – A Bright Idea
DIY project: Aluminum Lanterns Here’s a really clever decorating idea that was inspired by a creative person’s shopping trip to Home Depot. These lanterns are made from aluminum sheets and require minimal supplies to construct them. Looks like a fun project for the weekend!

#3 – The Skinny on Salad Dressings
Eating a salad for lunch or dinner is a nutritious and low-calorie meal, right? Well, that all depends on the salad dressing you’re pouring over those fresh greens. Not only do many salad dressings contain fat, many of them are also high in sodium. Here’s registered dietician Joy Bauer’s recipe for a low calorie (59 calories per 2 tablespoons) and low sodium (40 mg per 2 tablespoons) salad dressing:

Joy’s Skinny Balsamic Vinaigrette
Ingredients:
1/2 cup balsamic vinegar
3 Tbsp olive oil
1/4 cup water
1 Tbsp mustard
1 tsp honey
1 tsp garlic powder

Directions:
In a jar, combine all ingredients. Shake until everything is well combined. It’ll stay fresh in the fridge for five days.

Makes eight 2-Tbsp servings

#4 – Made Me Smile
Made Me Smile Just looking at this graphic made me smile, but I loved the introduction to Marc and Angel Hack Life‘s post “7 Things Happy People Say Every Day.” The introduction reads, “You have the right words within you to make every day a happy one.” Words have power – say the right ones!

#5 – Flowery Thoughts
Couldn’t decide, so here are two:

“The earth laughs in flowers. ”
e.e. cummings

“Every flower is a soul blossoming in Nature. ”
Gerard De Nerval

Get out and smell the flowers this weekend!

Read Full Post »

spiced chocolate krinkle cookies

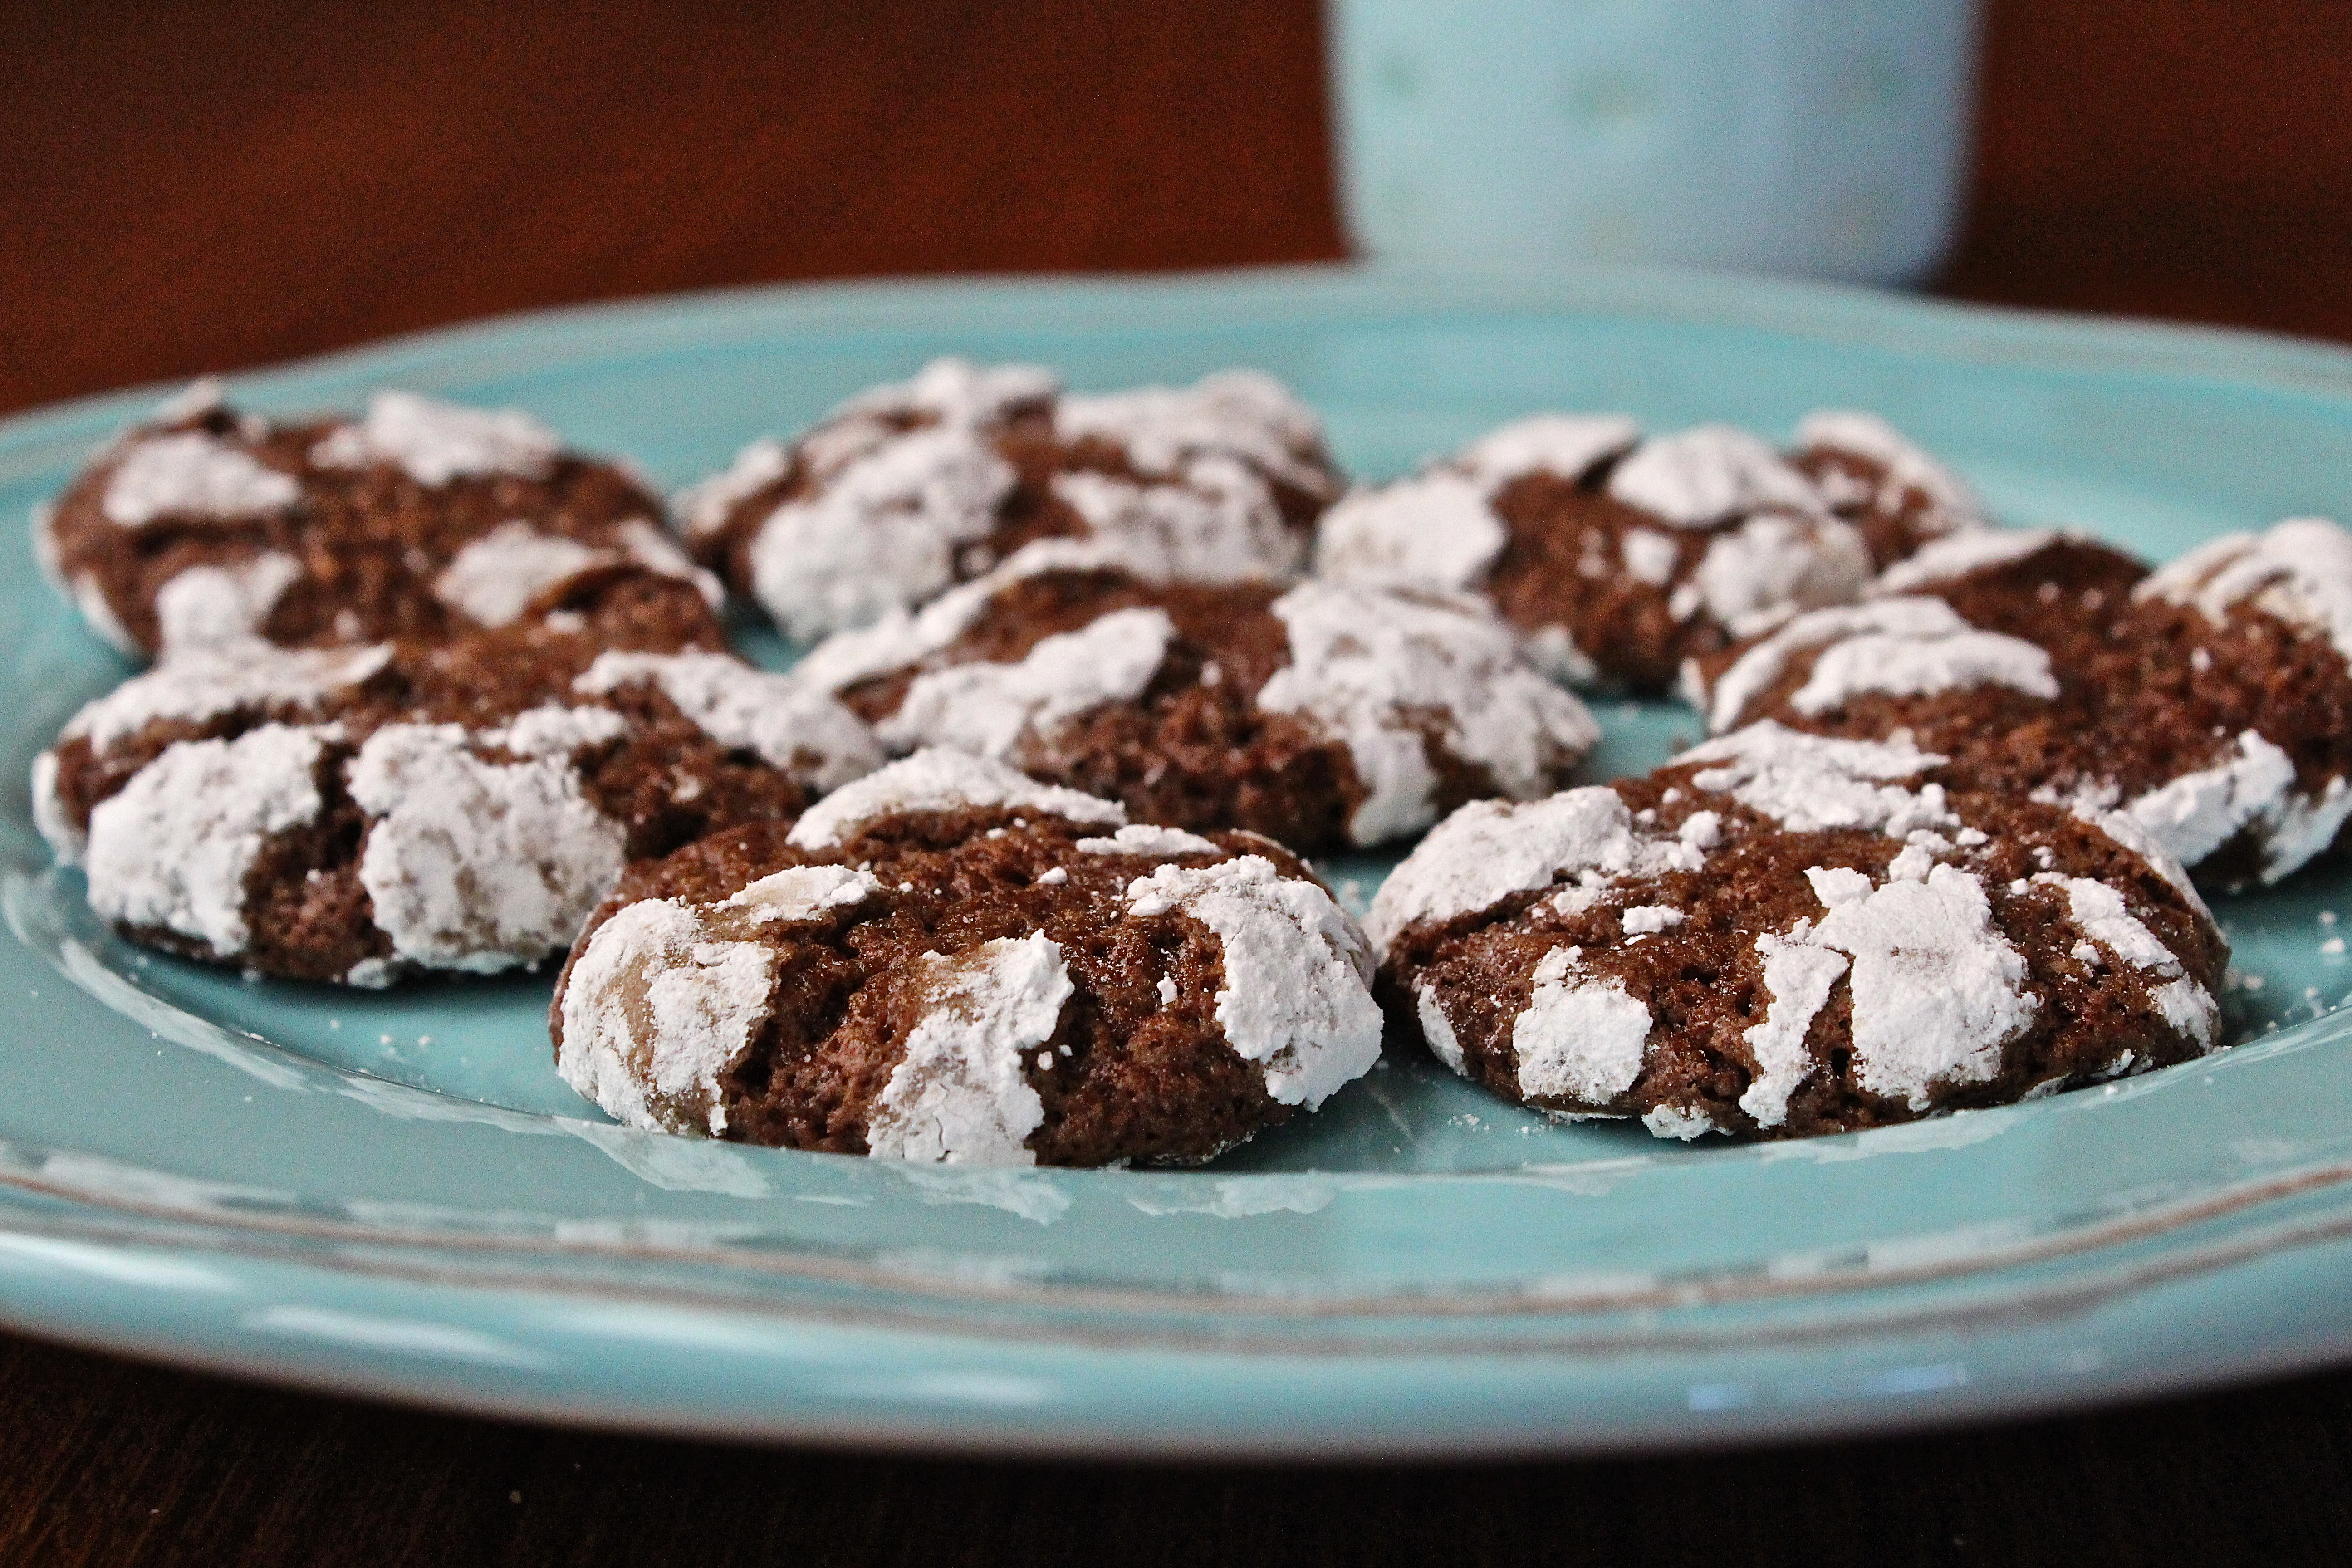
Add a little spice to your life and tantalize your taste buds with one of these cookies. At first bite, you’ll discover a rich chocolate flavor with a touch of sweetness, but then, as you’re about to swallow this little bit of naughtiness, a warm and spicy sensation floods your mouth. Ground ginger, freshly-grated ginger, and cayenne pepper provide the cookie with a surprising “afterglow.” A perfect treat anytime, but especially on a cold and rainy day like today!

Spiced Chocolate Krinkles
From The Sweet Spot by Pichet Ong

Ingredients:
2 tablespoons canola, vegetable, or other neutral oil
1 ounce (28 grams) bittersweet chocolate, chopped
1 teaspoon grated fresh ginger
1/4 teaspoon ground ginger
1/4 teaspoon ground cardamom
1/8 teaspoon cayenne pepper
1/8 teaspoon salt
1/3 cup (2 ounces/54 grams) all-purpose flour
2 tablespoons almond flour or coconut powder
2 tablespoons unsweetened cocoa powder
1/2 teaspoon baking powder
1 large egg
1/2 cup (3¾ ounces/106 grams) sugar
1/2 teaspoon vanilla extract
1/2 cup (2 ounces/55 grams) confectioners’ sugar

Directions:
1. Put the oil, chocolate, both gingers, the cardamom, cayenne, and salt in a double boiler or in a heatproof bowl set over a saucepan of gently simmering water and melt the chocolate, stirring occasionally. Remove from the heat, transfer to a bowl if necessary, and cool completely.

2. Sift together the flours, cocoa powder, and baking powder and set aside.

3. When the chocolate mixture has cooled to room temperature, add the egg, sugar, and vanilla extract and stir just until combined. Gently fold in the flour mixture until well incorporated. Transfer the dough to a large sheet of plastic wrap, flatten into a 1-inch-thick disk, and wrap tightly in the plastic. Chill until hard, at least 2 hours or up to 5 days.

4. When ready to bake, preheat the oven to 375 degrees F. Line two baking sheets with parchment paper.

5. Put the confectioners’ sugar in a small bowl. Pinch off a piece of dough, form it into a 1/2-inch ball, roll in the confectioners’ sugar until well coated, and place on a prepared baking sheet. Repeat with the remaining dough, putting the coated balls 1 inch apart on the baking sheets.

6. Bake the cookies until the tops look cracked and are dry to the touch, about 10 minutes. Transfer to a cooling rack to cool completely. The cookies can be stored in an airtight container for up to 2 days.

Makes 3 dozen cookies

Linnell’s Notes:
1. An easy way to peel fresh ginger is to scrap off the “skin” with a teaspoon.

2. The cookbook author noted, “Don’t be tempted to make these cookies bigger. They look more appealing when small and the flavors and texture are best enjoyed in a single bite.”

3. My cookie dough turned out to be more loosely formed than a dough. I attribute this to using an extra large egg. The dough did firm up a bit after chilling it for a couple of hours.

4. To prevent the dough from sticking to my hands while rolling it into balls, I repeatedly wet the palms of my hands with water. Keep a small bowl of water nearby.

ENJOY!

Read Full Post »

« Newer Posts - Older Posts »