Feeds:
Posts
Comments

Archive for the ‘Recipes’ Category

Pineapple-Lemon Iced Tea What? O.C.D. iced tea? I need that! After putting on my reading glasses, I realize that it is not O.C.D. iced tea, but rather O.C.C. iced tea. O.C.C. stands for the Oahu Country Club in Honolulu, Hawaii. With a pedigree like that, one would expect a thirst-quenching tropical-flavored drink. This recipe does not disappoint: the fruity sweetness of the pineapple juice balances the crisp tartness of the lemon juice, while the subtle hint of mint refreshes and brightens the beverage. Whatever acronym floats your boat, you’ll enjoy sipping this super easy-to-make iced tea on a warm and sunny day!

O.C.C. (Pineapple-Lemon) Iced Tea
A Taste of Aloha Cookbook

INGREDIENTS
1/2 gallon water
12 tea bags
3 sprigs fresh mint
1 and 2/3 cups sugar
12 ounces pineapple juice
6 ounces fresh lemon juice
Additional mint sprigs, for garnish
Pineapple spears, for garnish

DIRECTIONS
1. Bring water to a boil and steep tea bags and mint. Remove mint after 3 minutes.
2. Continue to steep tea until it is very dark. Remove tea bags.
3. While tea is still warm, add sugar and juices, stirring to dissolve sugar.
4. Pour into a gallon container, adding enough water to fill to the gallon level.
5. Chill.
6. Serve iced with mint sprigs and pineapple spears.

Makes 1 gallon

LINNELL’S NOTES
1. I used a good brand of regular-sized English Breakfast (decaf) tea bags.
2. The next time I make this, I will try using a sugar substitute.

Enjoy!

Read Full Post »

Savory Brunch Muffins 12 – 1 = 11. But in the world of muffins, 12 muffins – 1 muffin = 1 very happy tummy. Combine traditional brunch ingredients – eggs, smoked salmon, and fresh dill – and present them in a delightful and portable manner. These muffins, topped with crunchy and salty potato chips, make for one fabulous brunch-to-go, or serve them hot at your next brunch gathering.

Savory Brunch Muffins
Better Homes and Gardens

INGREDIENTS
2 cups all-purpose flour
1 Tbsp. sugar
1½ tsp. baking powder
1/2 tsp. baking soda
1/4 tsp. salt
1/2 cup buttermilk
1/2 cup sour cream
2 eggs
3 Tbsp. butter, melted
2 Tbsp. snipped fresh dill
2 oz. lox-style smoked salmon, chopped
2 hard-cooked eggs, peeled and chopped
1 cup wavy potato chips, crushed

DIRECTIONS
1. Preheat oven to 400°F. Grease twelve 2½-inch muffin cups or line with parchment paper squares; set aside.

2. In a large bowl stir together flour, sugar, baking powder, baking soda, and salt. Make a well in center of flour mixture; set aside.

3. In a 2-cup measure whisk together buttermilk, sour cream, eggs, butter, and dill; add to flour mixture. Stir just until moistened (batter should be lumpy). Gently fold in salmon and chopped eggs.

4. Spoon batter into prepared muffin cups, filling each three-fourths full. Sprinkle crushed potato chips over batter in cups.

5. Bake 15 minutes or until golden-brown. Cool in cups on wire rack 5 minutes.

Makes 12 servings

LINNELL’S NOTES
1. I cut parchment paper into roughly 5-inch by 5-inch squares. Try not to get any batter on the paper when filling the cups. After baking, any batter stuck to the paper will appear as dark brown spots. This is not the worst thing in the world, but it will look a little messy.

2. Place the potato chips in a plastic bag and crush with your fingers. Some of the potato chips should be slightly pressed into the batter or else they will all fall off after baking.

3. Don’t overbake these muffins or they will be dry.

4. The next time I make these I will add a pinch of black pepper and some snipped chives or chopped green onions to the batter to enhance their flavor.

5. Because of the salty potato chips and smoked salmon, there is not a lot of additional salt added to the batter. If you like your food saltier, cautiously add more salt only after you have determined the degree of saltiness of the salmon and potato chips you are using. Not all smoked salmon or potato chips have the same amount of sodium.

Enjoy!

Read Full Post »

Coconut Curry Chili He wanted curry. I wanted chili. Lucky for him, I compromised by making a chili dish with an interesting flavor twist. Coconut Curry Chili looks like a typical chili and packs the heat of a chili, but sports an Asian-inspired flavor combination. It’s a snap to throw together, but don’t hurry this curry. The flavors need time to meld. A bowl of this hot spicy chili fills you up and fires up your taste buds.

Coconut Curry Chili
Adapted from an Allrecipes.com submission

INGREDIENTS
1/2 pound ground turkey
2 (10.75-ounce) cans tomato soup*
1¼ cups water
1 tablespoon minced garlic
1 (15-ounce) can chickpeas/garbanzo beans, drained and rinsed**
1 (15-ounce) can red kidney beans, drained and rinsed**
1/2 cup chopped carrot
1/4 cup mango chutney
3 tablespoons curry powder
1 teaspoon onion powder
Salt and pepper, to taste
1/2 cup coconut milk, divided use
Chopped cilantro, optional for garnish
Light sour cream or plain Greek yogurt, optional

DIRECTIONS
1. Cook the ground turkey in a skillet over medium heat. With a spatula or spoon, break it up into small pieces. Cook until completely browned, about 5 to 7 minutes. Drain off as much grease as possible.

2. Combine tomato soup, water, and minced garlic in a large pot and bring to a boil.

3. Add the turkey to the pot and return the mixture to a boil and reduce heat to medium-low.

4. Stir chickpeas, red kidney beans, carrot, chutney, curry powder, onion powder, salt and pepper into the turkey mixture; bring to a simmer; place cover on the pot and cook until the chickpeas are tender, about 15 minutes.

5. Stir in 1/4 cup coconut milk into the chili, return cover to the pot and simmer another 15 minutes. Pour the remaining 1/4 cup coconut milk into the chili, stir, and simmer 30 minutes more.

Serves 6

LINNELL’S NOTES
1. I used ground beef, because that’s what I had on hand.

2. *In order to make this recipe lower in sodium and more flavorful, I substituted a 32-ounce box of low-sodium roasted red pepper and tomato soup for the two cans of tomato soup and the 1¼ cups of water.

3. I added a whole carrot, chopped. The more veggies, the better!

4. **To make this chili more substantial, I would add one more can of garbanzo beans or one more can of red kidney beans.

5. To make this a vegetarian dish, replace the ground meat with firm tofu, cubed. Add it towards the end.

6. This chili is great over freshly-cooked brown rice. Top with chopped cilantro and light sour cream or plain Greek yogurt, if desired.

Enjoy!

Read Full Post »

Poppies and Oaks Take a walk through this photo with me. What do you see? Trees? Yes, what kind of trees? Flowers? How many different colored flowers are there? Looking at the shadows, from what direction is the sun shining? How observant are you when you are out and about? When you go for a walk, do you take in the sights, the sounds, and the smells that bombard your senses or do you push the sensory inputs away? Although it’s nice to chat with friends or listen to a book or music while walking, every now and then try being fully present during a walk and be grateful for the wondrous world around you.

#1 – The Gift of the Present
20 Calming or Invigorating Mini Meditations You Can Practice Every Day Do you feel as if you operate on autopilot most of the time? The hustle and bustle of our days can carry us million of miles away from the present moment and distract us from reveling in the only moment we have for sure. Margarita Tartakovsky, M.S. wrote an article called, 20 Calming or Invigorating Mini Meditations You Can Practice Every Day. Whether you practice meditation or not, read through her list and select one of the entries to try today. You might find that, as a result, you are a kinder, more patient, and more focused person. I appreciated the entire list, but these five entries resonated with me:

Think of your mind as a swinging door. “Thoughts and feelings come in and out, like people. Be the door, not the doorman.”

When you turn on the faucet, focus on the bigger picture. “See the water flowing down from the glaciers and mountains, running deep into the earth, sustaining you and all life.”

Visualize a mountain lake with a smooth, glassy surface. A breeze sends ripples across the water. As the breeze quiets down, so do the ripples, and the water returns to being smooth. When something ruffles you, return to this visualization. “Feel the ripples and then let them settle.”

When you get home from work, every day, stand in front of your door and appreciate the moment. Rejoice in it. “Breathe in and out three times.”

As you’re trying to fall asleep, “imagine that with each breath you are melting into an ocean of light and space.”

#2 – The Bottom of the Jar
Whole Foods Condiments Do you throw away bottles or jars of ketchup, mustard, or mayonnaise when just a little bit remains in the container? The next time you’re in that situation, don’t throw it away. Try creating something new by using one of these recipes from Whole Foods. For example, did you know that you could make Caesar Dressing or Honey Mustard Marinade with just the tablespoon or two that’s normally left at the bottom?

# 3 – Discard Art
Hey, how many times do I have to tell you not to throw stuff away? Instead, use your imagination and let your inner artist come out. You could create:

Giant Fish Sculptures from Discarded Plastic Bottles
Fish Sculpture From Discarded Bottles

Dresses From Recycled Materials Money Dress: Dress ,made from recycled materials


Stacked Book Sculptures
Used Book Sculptures


Watch Part Sculptures

Junk Part Portraits Junk Parts Portraits

#4 – A Letter From Dad
A Letter From a Father to His Daughter Dr. Kelly Flanigan, a therapist, wrote a inspirational and thought-provoking letter to his young daughter about relationships. Every person, not just women, should read it. Relationships are two-way streets and both parties must know their worth and must recognize the value in themselves.

#5 – Just A Moment
“Dance. Smile. Giggle. Marvel. TRUST. HOPE. LOVE. WISH. BELIEVE. Most of all, enjoy every moment of the journey, and appreciate where you are at this moment instead of always focusing on how far you have to go.”
― Mandy Hale, The Single Woman: Life, Love, and a Dash of Sass

Be in the present. Now go and spread joy!

Read Full Post »

Crispy Roasted Chickpeas Crunch a munch or is it munch a crunch? Either way, roasted chickpeas, also known as garbanzo beans, make for a crunchy and healthy snack when you have the munchies. Chickpeas roasted in olive oil, salt, and pepper become a simple and satisfying treat – or kick up the flavors by using your own favorite combination of spices or by adding one of the spice mixtures included below. According SELF Nutrition Data: This food is very low in Saturated Fat and Cholesterol. It is also a good source of Dietary Fiber, Vitamin B6 and Folate, and a very good source of Manganese.

Crispy Roasted Chickpeas
Adapted from a Rachael Ray Recipe

BASIC INGREDIENTS
1 15.5 ounce can chickpeas (garbanzo beans)
1/2 T to 1 T olive oil
Salt to taste (approximately 1/4 teaspoon)
Pepper to taste, optional
Spice or spice mixture of your choice, to taste (approximately 1/2 to 1 tsp)

DIRECTIONS
1. Preheat oven to 400°F.

2. Open can of garbanzo beans and pour into a colander, wire-mesh sieve, or salad spinner.

3. Drain, rinse well with cold water, and drain again for about 10 minutes.

4. Pour onto towels (paper or kitchen) on a flat surface and cover with another towel. Roll the chickpeas between the towels to dry. This also helps to remove any loose skin from the chickpeas. Discard skin.

5. Combine the chickpeas with oil in a large bowl. Add selected spices or spice mixture. Stir to evenly distribute spice mixture.

6. Pour the seasoned chickpeas out onto a parchment paper-lined baking tray and bake until crunchy, about 35 to 45 minutes.

Moroccan-Style Spice Mix:
Fine Cooking Magazine
2 tsp ground cumin
1 tsp ground coriander
1/2 tsp chile powder
1/2 tsp sweet paprika, preferably Hungarian
1/2 tsp ground cinnamon
1/4 tsp ground allspice
1/4 tsp ground ginger
1/8 tsp cayenne pepper
Pinch of ground cloves

In a small bowl, mix all of the spices. Store in an airtight container.

Cajun Spice
Whole Foods Cookbook
1/4 cup plus 1 tablespoon paprika
1/8 cup dried thyme
1/8 cup dried oregano
1 T cumin powder
1 T onion powder
1/8 cup garlic powder
1/8 cup dried sweet basil
1 T freshly ground black pepper
1 T freshly ground white pepper
1 T cayenne pepper
1/8 cup salt

Combine all ingredients. Keep stored in a covered jar in a cool dark place for up to 6 months. Makes 1¼ cups.

Mexican Spice Mixture
Whole Foods Cookbook
1 T chili powder
2 tsp cumin
1 tsp dried oregano
2 tsp unsweetened cocoa powder

Combine all ingredients. Keep stored in a covered jar in a cool dark place for up to 6 months.

Homemade Ranch Dressing Seasoning Mix
$5 Dinners
2 Tbsp dried parsley
1 tsp dried dill
1 tsp garlic powder
1 tsp onion powder
1/2 tsp dried basil
1/2 tsp pepper

Add each of the dried spices to a bowl and gently stir. Store in a resealable plastic baggie or small ball canning jar with tight fitting lid in your spice cabinet.

LINNELL’S NOTES
1. Canned chickpeas have a fair amount of sodium. To control sodium levels and to have more flavorful chickpeas, it is best to soak and cook chickpeas yourself. Check out this link on How to Soak and Cook Chickpeas. At the very least, to keep this a healthy snack, use low sodium canned chickpeas.

2. Keep in mind that the chickpeas dehydrate while roasting, so one can does not yield a lot of the finished product. You’ll probably want to double the recipe.

3. Bake the chickpeas until they are Corn-Nut-crunchy, unless you prefer them chewy in the center.

4.  About halfway through the baking time, I took the tray out of the oven, stirred the chickpeas around, and then put the tray back into the oven to finish baking.

5. I roasted chickpeas with the Moroccan-Style Spice Mix for the photo.

Enjoy!

Read Full Post »

Corned Beef Potato Salad Take the usual St. Patrick’s Day fare and serve it up with a new twist. Toss corned beef, cabbage, and potatoes together with a few other ingredients and a homemade dressing and you have a potato salad good enough to catch a leprechaun. Every now and then, while searching for a recipe, I come across two similar recipes and can’t decide which one to try. This recently happened with two corned beef potato salad recipes, so I decided to do a head-to-head taste test. The recipes are much the same, but with a few interesting differences. One recipe uses horseradish and mustard for kick and the other recipe gets additional flavor boosts from celery and mustard seeds. One recipe uses sauerkraut and the other uses freshly shredded cabbage. Subtle, but distinct differences. I liked them both. I say po-tay-to and you say po-tah-to. You choose.

Dublin Potato Salad (Top Photo)
Taste of Home

INGREDIENTS
3 large white potatoes (about 1½ pounds)
2 tablespoons white vinegar
2 teaspoons sugar
1 teaspoon celery seed
1 teaspoon mustard seed
3/4 teaspoon salt, divided use
2 cups finely shredded cabbage
12 ounces cooked or canned corned beef, cubed
1/4 chopped dill pickle
1/4 cup sliced green onion
1 cup mayonnaise
1/4 cup milk

DIRECTIONS
1. Cover potatoes in lightly salted water and boil until tender. Drain, peel and cube.
2. Combine vinegar, sugar, celery seed, mustard seed, and 1/2 teaspoon salt; drizzle over still-warm potatoes. Cover and chill.
3. Just before serving, gently fold in cabbage, corned beef, pickle and onion.
4. Combine mayonnaise, milk and remaining 1/4 teaspoon salt; pour over salad. Gently toss. Serve in cabbage-lined bowl.

Serves 8

LINNELL’S NOTES
1. The evening before, I placed a five-pound piece of corned beef into a crock pot, so that it would be cooked and ready to use by morning.
2. I used shredded cabbage purchased in bags at my local grocery store.
3. This recipe seemed slightly easier to make than the next recipe, because it had fewer ingredients and required less preparation.
4. Of the two recipes, this one yielded a slightly sweeter and creamier potato salad.
5. For my taste buds, this salad required no additional salt. The corned beef brings plenty of sodium to it.
6. This salad tastes better the next day.

Corned Beef Potato Salad (Bottom Photo)
Razzle Dazzle Recipes

INGREDIENTS
Salad Ingredients:
1 can corned beef (the kind you have to open with the attached key) chilled, fat scraped off, and cut into 1/2-inch cubes
3 large potatoes, any kind, about 1½ lbs
4 green onions, minced
1 can (about 1½ C) sauerkraut, drained, rinsed and chopped
3 stalks celery, chopped/diced
1/3 C minced dill pickles
1 small jar diced pimentos (optional, for color)

Dressing Ingredients:
1/2 C low-fat mayo or salad dressing
1 C low-fat sour cream
2 to 4 T spicy brown prepared mustard
1 to 2 T horseradish
1/4 C milk, broth or pickle juice
1/8 tsp black pepper
1/4 tsp salt

DIRECTIONS
1. Combine dressing ingredients in a large bowl.
2. Boil whole potatoes in skins until barely tender.
3. Peel and cut into large pieces (2-inches by 2-inches), and place in dressing mixture while still warm. Toss to coat thoroughly.
4. Stir in other ingredients.
5. Refrigerate. Taste and adjust for salt several hours later.
6. Serve cold lettuce. Garnish with cherry tomatoes, sliced

Serves 4 to 6 servings as a main dish

LINNELL’S NOTES
1. I used the same five-pound piece of corned beef that I placed into a crock pot the evening before. I don’t know how the recipe would have tasted with canned corned beef.
2. The 2-inch by 2-inch chunks of potatoes seemed too large, so I cut them smaller.
3. Tasting the salad after adding the minimum amounts of horseradish and mustard, I decided to put in the full amounts.
4. I used the pickle juice from the dill pickle jar.
5. Again, for my taste buds, this salad required no additional salt. The corned beef adds plenty of sodium to it.
6. This salad has a little more crunch, kick, and flavor than the other one. The horseradish and mustard bring out the flavor of the corned beef. It is a less creamy potato salad, though.
7. This salad also tastes better the next day.
8. Finally, did you know that sauerkraut is considered a “belly blaster?” According to Dr. Oz’s website: Why it’s a superfood: Directly translated from German as “sour cabbage,” this traditional fermented food delivers gut-friendly flora that boost digestion and can reduce belly inflammation. Sauerkraut’s signature sour taste comes as the added bacteria ferment the naturally occurring sugars in the cabbage into lactic acid; it should keep for months.

Dr. Oz’s Prescription: Check the label carefully and buy only traditional fermented sauerkraut and not one of the more commercially heat-treated brands (which many are), as that will destroy the beneficial bacteria.

Enjoy!

Read Full Post »

Curry-Coconut Shrimp Want curry in a hurry? If that’s the case, try this recipe. With its ease of preparation and subtle coconut and curry flavors, this dish will become a favorite for quick dinners and easy entertaining.

Curry-Coconut Shrimp
Epicurious, courtesy of Ying Chang, Cooking with an Asian Accent

INGREDIENTS
1/4 cup unsweetened coconut milk
1½ tablespoons fish sauce
1 tablespoon fresh lemon juice
3 tablespoons seeded and finely chopped red bell pepper
1 tablespoon minced fresh cilantro leaves
1 teaspoon sugar
1 teaspoon curry powder
1½ pounds shrimp, peeled and deveined
2 cups cooked brown rice
4 lemon wedges, for serving
Fresh cilantro sprigs, for garnish, optional

DIRECTIONS
1. Combine the coconut milk, fish sauce, lemon juice, bell pepper, minced cilantro, sugar, and curry powder in a 10-inch glass pie plate. Add the shrimp, cover, and marinate in the refrigerator for 30 minutes.

2. Bring water to a boil over high heat in a covered steamer or pot large enough to hold the pie plate. Wearing oven mitts, carefully place the pie plate into the steamer. Cover, lower the heat to medium, and steam for 4 to 6 minutes, or until the shrimp are just cooked through.

3. Using oven mitts, carefully lift the lid of the steamer away from you, and remove the pie plate from the steamer. Serve the shrimp over brown rice. Garnish with the lemon wedges and cilantro sprigs, if using.

Makes 4 servings

LINNELL’S NOTES
1. I buy shrimp that are already deveined. I peel them and they are ready to go. Peeled and deveined shrimp are also available, but I save the shells to enrich the flavor of soup stock.

2. Start the rice before you prepare the rest of the ingredients. This allows the rice enough time to steam.

3. How long the shrimp take to cook is dependent on what size shrimp you’re using. You do not want to overcook the shrimp, so I would check the shrimp after 4 minutes. If they still appear translucent and have not curled, let them cook one more minute. Continue to check after every minute. Once they are removed from the heat they will continue to cook a little more.

ENJOY!

Read Full Post »

Jjim-Dak: Korean Vegetable Chicken Stew Whether it’s a pot-au-feu from France, a goulash from Hungary, or a moqueca from Brazil, stews from around the world warm the tummy and soothe the soul. From a cookbook that contains recipes from the best Korean restaurants in Los Angeles, comes this easy to make Korean stew. This fiery and fragrant stew will definitely spice up your stew repertoire!

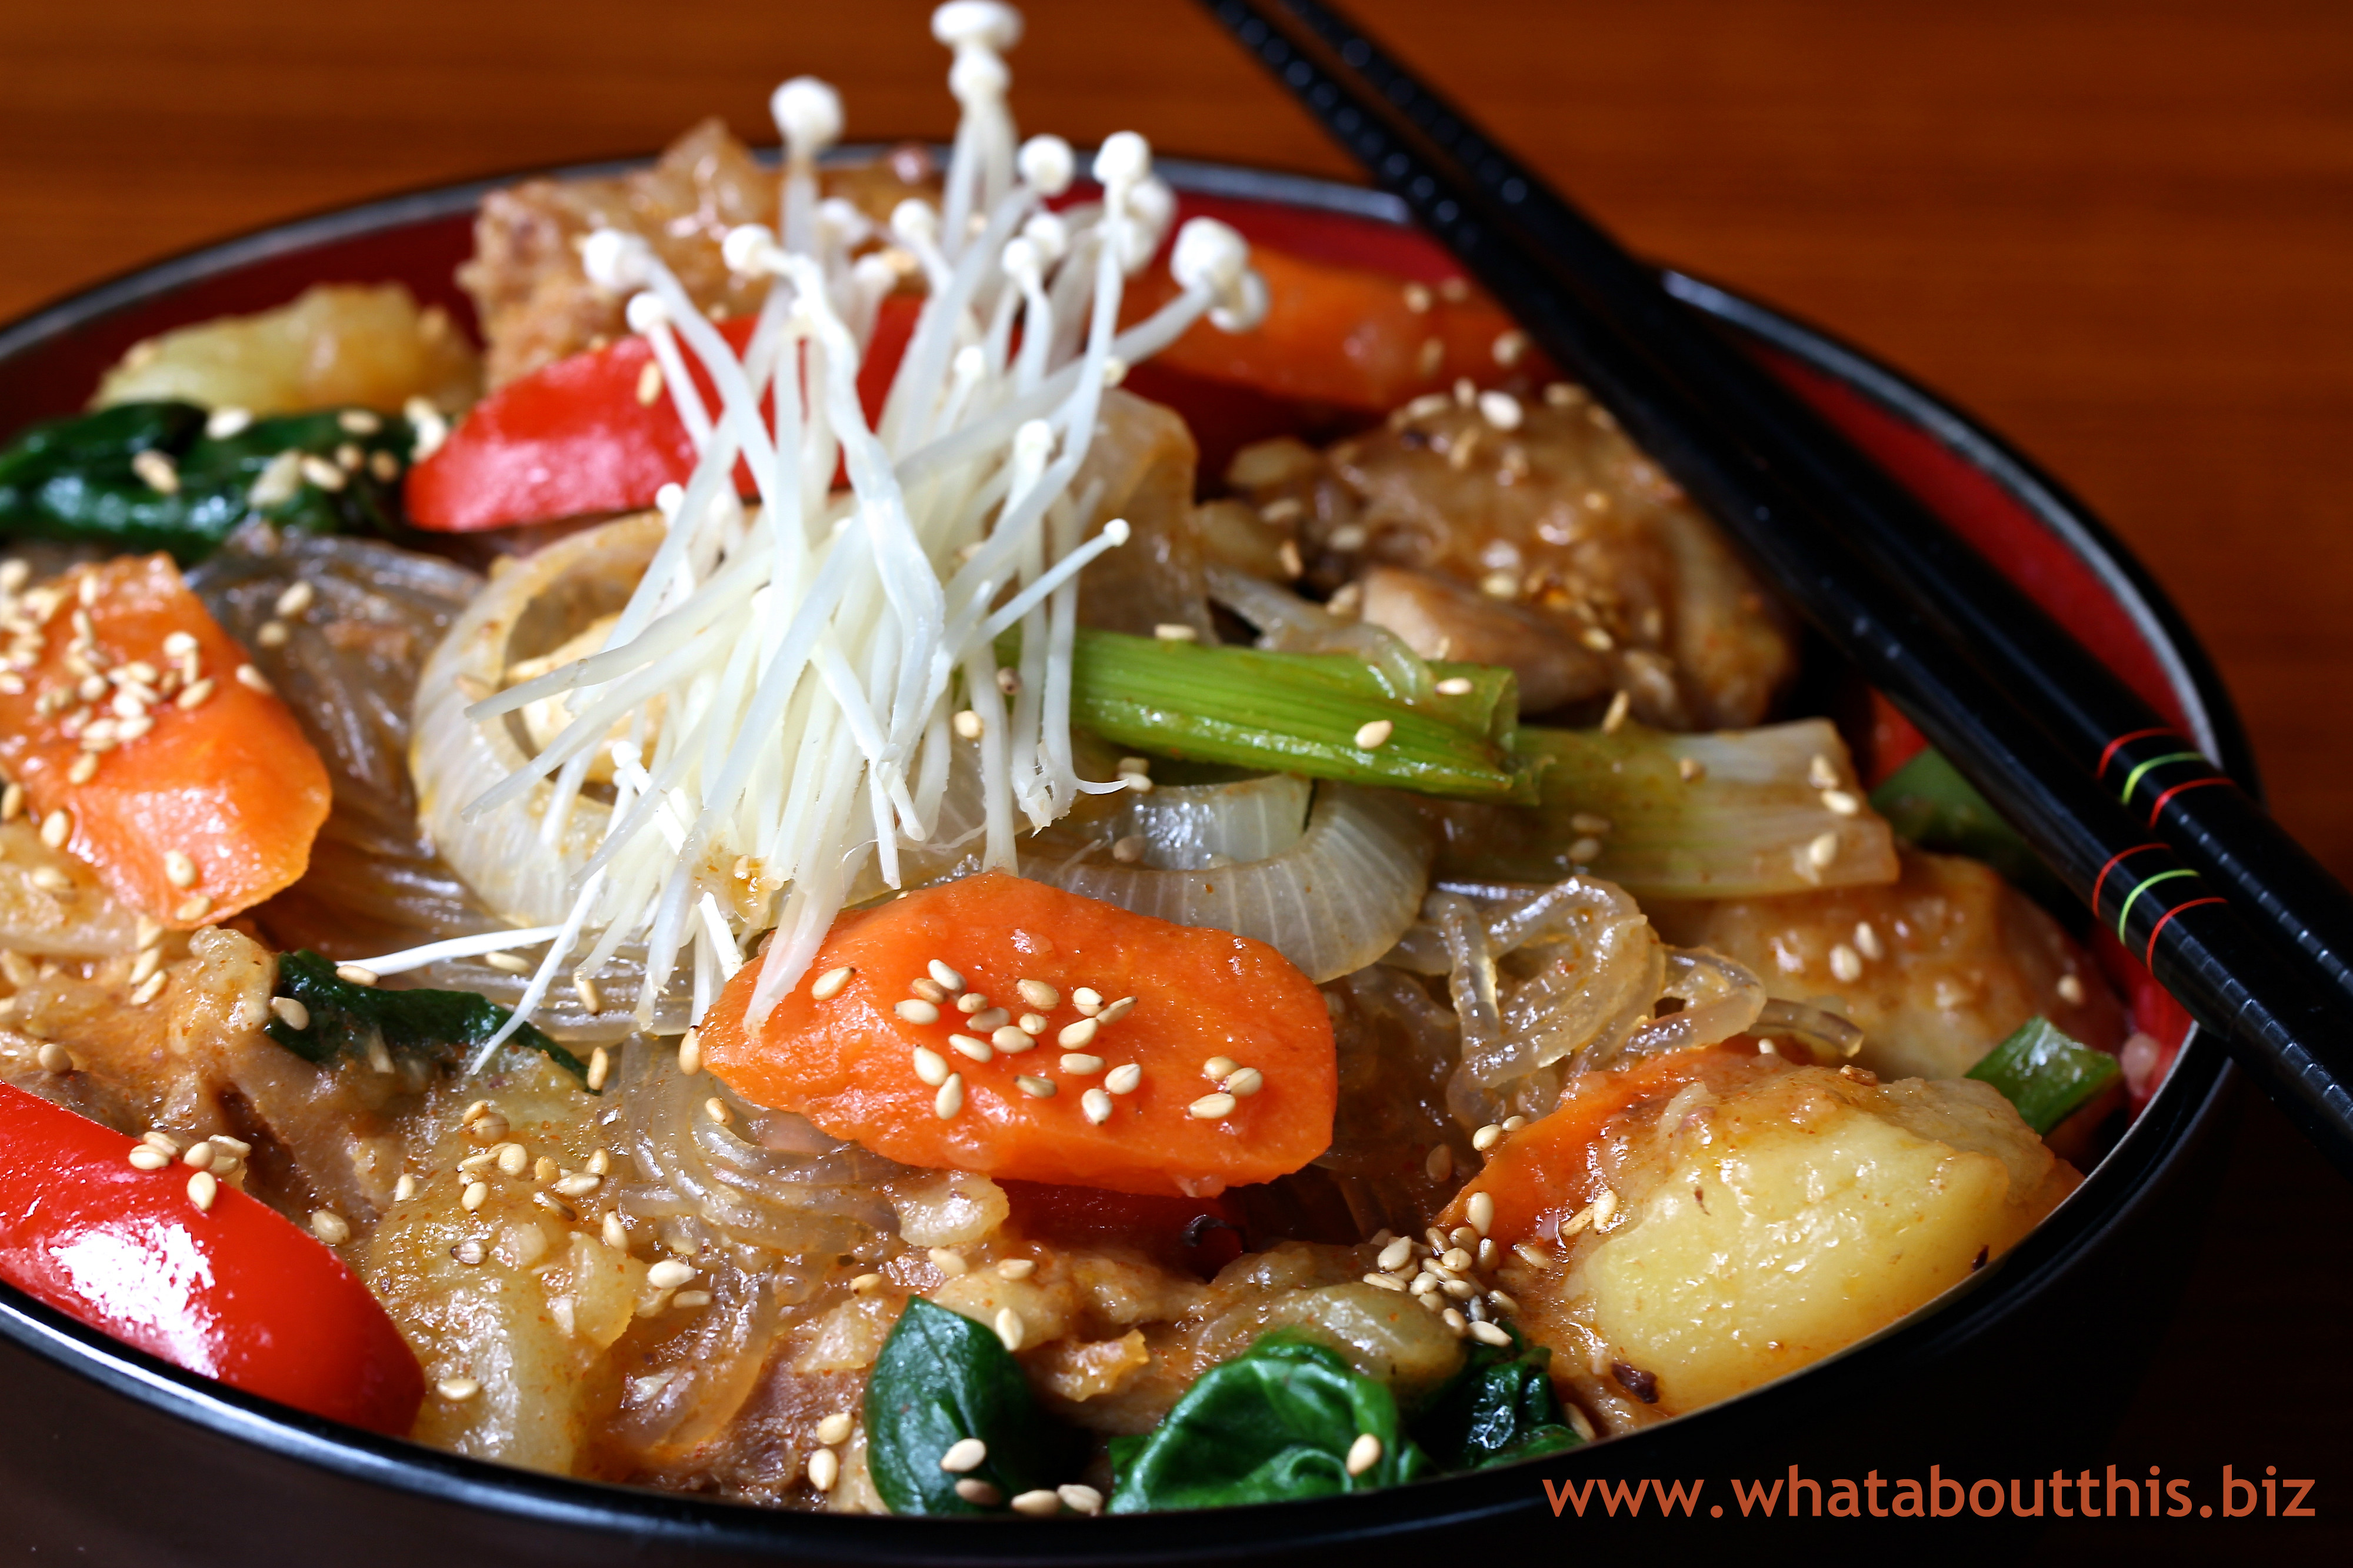
Jjim-Dak – Korean Vegetable Chicken Stew
Discovering Korean Cuisine, edited by Allisa Park

INGREDIENTS
1½ pounds chicken, cleaned and chopped into 2-inch pieces
1 potato, cut into 1-inch slices crosswise
3½ cups water
5 scallions, halved lengthwise and then cut into 4-inch pieces
1/2 large onion, cut into 1/4-inch thick slices
1/4 carrot, peeled and cut diagonally into 1/4-inch pieces
1 jalapeño chile, cut into 1/4-inch rounds
1/4 red bell pepper, seeded, cut into 1/4-inch strips
5  leaves spinach, cut into 2-inch pieces
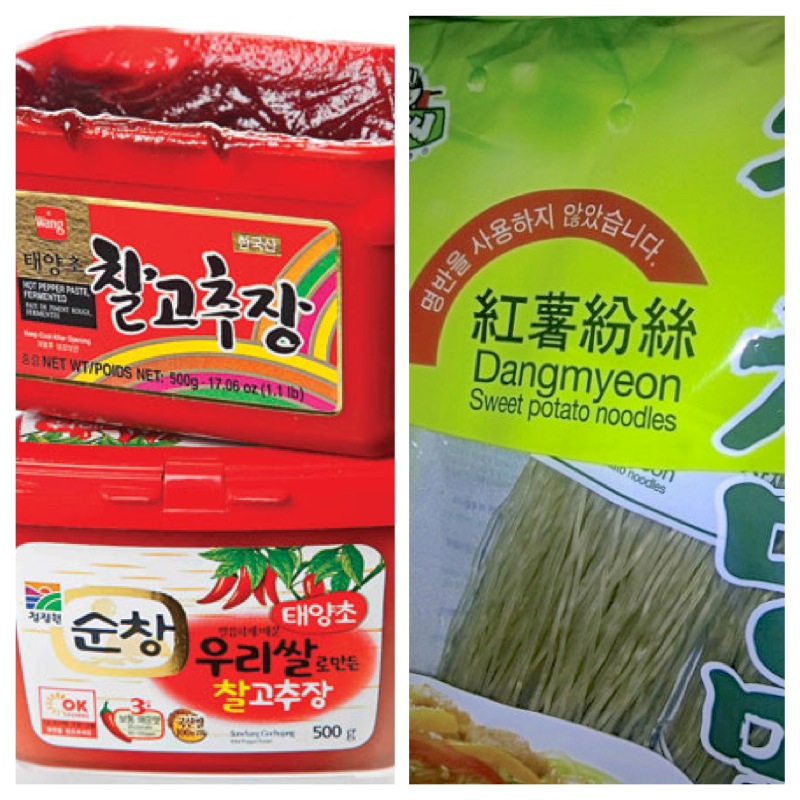
3 ounces Korean sweet potato vermicelli (dang myun), soaked in warm water for 1 hour
1 tablespoon minced garlic
2 tablespoons soy sauce
1 tablespoon red pepper powder
1 tablespoon Korean hot pepper paste (gochujang)
1 tablespoon granulated sugar
1 tablespoon mirin
2 tablespoons corn syrup
1/4 pack enoki mushrooms, roots trimmed
1 tablespoon sesame seeds, toasted

DIRECTIONS
1. Soak sweet potato vermicelli in warm water.

2. In a large pot (or wok), combine chicken, potato, water, minced garlic, soy sauce, red pepper powder, hot pepper paste, sugar and mirin.

3. Boil over high heat for about 20 minutes with the lid on (or until chicken is fully cooked).

4. Remove the lid and add corn syrup, scallions, onion, carrot, jalapeño chile, and red bell pepper. Quickly mix together and continue cooking for another 5 minutes.

5. Add spinach and prepared sweet potato vermicelli on top and put the lid on (do not mix in). Heat for an additional 2 minutes and then remove from heat.

6. Open the lid and gently mix, then transfer to a serving plate.

7. Put the enoki mushrooms on top and sprinkle on sesame seeds to garnish.

Serving size: 2

LINNELL’S NOTES
1. Korean Ingredients Sweet potato vermicelli and the Korean hot pepper paste (gochujang) can be purchased at most Asian markets or ordered online. Here’s a link to a listing of online stores that carry Korean ingredients.

2. Because it didn’t make sense to use just a quarter of a carrot and because I like a lot of vegetables in my stews, I used a whole carrot.

3. I had baby spinach leaves on hand, so I didn’t need to cut them into 2-inch pieces. I used a large handful.

4. In step 3 of the directions, I turned the temperature down to medium, because it had reached a rapid boil. I wanted more time for the flavors to mingle and I didn’t want to overcook the chicken.

5. Not having authentic Korean red pepper powder, I substituted ground red pepper (cayenne pepper). 1 tablespoon of cayenne pepper seemed like a lot of heat to me (along with the jalapeño chile and the Korean hot pepper paste), so I cut it back to 1/2 tablespoon. The recipe still had quite a bit of kick. I’m not sure what the heat difference or flavor difference is between cayenne pepper and Korean red pepper powder, but I’ll try it with the authentic red pepper powder the next time I make it. I’d also recommend adding any heat element to taste.

6. I researched enoki mushrooms and found differing opinions on their preparation. Mushroom growers said to just cut off the root end, but some online “experts” said to run it under water and then cut off the root end. The Korean cookbook said, “Sold in plastic bag. Chop off the roots without removing the bag and discard,” so I ultimately followed the cookbook’s instructions.

7. I buy pre-toasted sesame seeds that I keep in my freezer. Before using, I quickly re-toast the needed amount. Toasting sesame seeds brings out their flavor. To toast sesame seeds, put them in a small sauté/frying pan over medium to medium-high heat. Stir constantly until they are a light golden brown. Pour them on a plate to cool.

8. Although this dish contains sweet potato noodles, I served it with rice. I wanted the rice to soak up every last bit of the delicious sauce!

ENJOY!

Read Full Post »

Silken Tofu Chocolate Mousse Want to serve your sweetheart a killer dessert for Valentine’s Day that won’t kill him? Instead, present him with this cool and creamy mousse that’s rich in flavor, but not heavy in saturated fats, cholesterol, and calories. Don’t mention to him that the base of this luscious chocolate-orange treat is silken tofu—he’ll never guess. Before some of you utter, “Eww . . . tofu,” make this dessert for yourself and then recognize that silken tofu, with its smooth texture and neutral taste, makes the perfect base for a healthy mousse. Plus, after you check the nutritional data below and see that this dessert has no cholesterol, only 40 calories from fat, and a mere 1.5 G of saturated fat, it might just become your favorite dessert.

Silken Tofu Chocolate Mousse
The Whole Foods Market Cookbook by Steve Petusevsky

INGREDIENTS
12 ounces silken-style tofu, drained well
1/4 cup plus 3 tablespoons unsweetened cocoa powder
1/3 cup maple syrup (barley malt or rice syrup may be substituted)
1 tablespoon orange zest
1 tablespoon instant coffee granules (decaf or regular)
1 tablespoon vanilla extract
Pinch of salt
1 ounce almond liqueur (optional)

DIRECTIONS
1. Process the tofu, cocoa powder, maple syrup, orange zest, coffee granules, vanilla, salt, and optional liqueur in the bowl of a food processor or in a blender for 1½ minutes, until smooth.

2. Pour the mousse into wine or champagne glasses or dessert-type serving dishes, and chill overnight.

3. Serve the mousse with fresh orange sections, toasted almonds, or shaved chocolate garnish over the top.

Serves 4

Per Serving:
Calories 240
Calories from fat 40
Calories from saturated fat 15
Protein 13 G
Carbohydrate 35 G
Total Fat 4.5 G
Saturated Fat 1.5 G
Cholesterol 0 MG
Sodium 70 MG

LINNELL’S NOTES
1. In general, but depending on brands, tofu is a good source of calcium. Look for brands in which the tofu has been set with calcium sulfate.

2. Because a rich chocolate flavor is critical to this dessert, use a good quality cocoa powder. I used Sharffen Berger Unsweetened Natural Cocoa Powder.

3. Amaretto is the almond liqueur I used. Rather than add the full amount of liqueur at first, I would add it to taste.

4. Adapt this recipe using other flavors. Raspberry, mint, or coffee liqueur would be interesting variations to the recipe.

5. I filled 3 champagne glasses to the brim with one recipe’s worth of mousse. If I had not filled them to the top, I probably could have gotten 4 servings out of the recipe.

ENJOY!!

Read Full Post »

Grilled Pork Kebabs with ginger Molasses Barbecue Sauce“How do I love thee? Let me count the ways.” Elizabeth Barret Browning did not pen those words while reflecting on food, but for some reason, her words danced through my head as I ate the Grilled Pork Kebabs with Ginger Molasses Barbecue Sauce. Let me count the reasons why I love this recipe. Made from lean pork tenderloin, these kebabs are lower in fat. In fact, in an article written by Jeff Volek, Ph.D, R.D. for Men’s Health, he states, “Pork really is the other white meat. Ounce for ounce, pork tenderloin has less fat than a chicken breast.” In addition, as the complex flavors of the sauce swirled in my mouth, I thought about its versatility and how fabulous it would taste on other grilled meat, particularly salmon, prawns, or chicken. The final reason why I love this kebab recipe focuses on its ease of preparation and its make-ahead convenience. Serve these kebabs with rice pilaf for Valentine’s Day and experience love at first taste.

Grilled Pork Kebabs with Ginger Molasses Barbecue Sauce
Gourmet, August 2003

INGREDIENTS
For Barbecue Sauce:
6 tablespoons cider vinegar
2 tablespoons sugar
2 tablespoons ketchup
1½ tablespoons molasses (regular or robust, not blackstrap)
1 tablespoon minced garlic
1 tablespoon minced fresh serrano or other small hot green chile (1 or 2), including seeds
1/2 tablespoon minced peeled fresh ginger
1/2 teaspoon salt

For Pork:
1 (1-lb) pork tenderloin, trimmed
1/4 teaspoon salt

Special Equipment:
About 30 (8-inch) wooden skewers, soaked in water for 30 minutes

DIRECTIONS
1. To make barbecue sauce: Stir together all sauce ingredients in a 1- to 1½-quart heavy saucepan and briskly simmer, uncovered, stirring occasionally, until thickened and reduced to about 1/2 cup, about 3 minutes. Transfer sauce to a medium bowl and cool to room temperature.

2. Put tenderloin on a cutting board. Starting about 5 inches from narrow end of tenderloin and holding a large sharp knife at a 30-degree angle to cutting board, cut a thin slice (1/8 to 1/4 inch thick) from tenderloin, slicing diagonally toward narrow end and cutting through to cutting board. Continue to cut thin slices from tenderloin following same diagonal, starting each consecutive slice closer to wide end. (You will have about 12 slices. Cut any slices more than 2 inches wide in half lengthwise.)

3. Thread 2 skewers, 1 at a time and 1/2 to 1 inch apart, lengthwise through each slice of pork and transfer to a tray lined with plastic wrap.

4. If using a charcoal grill, open vents on bottom of grill, then light charcoal. Charcoal fire is hot when you can hold your hand 5 inches above rack for 1 to 2 seconds. If using a gas grill, preheat burners on high, covered, 10 minutes.

5. Sprinkle pork slices with salt and brush both sides with barbecue sauce, then grill on oiled grill rack, uncovered, turning over once, until just cooked through, 2 to 3 minutes total. Discard any leftover sauce.*

6. Cooks’ notes: Barbecue sauce can be made 6 hours ahead and chilled, covered. Kebabs can be prepared 6 hours before grilling (without salt or sauce) and chilled, covered with plastic wrap. If you aren’t able to grill outdoors, cook kebabs in a hot oiled well-seasoned ridged grill pan over moderately high heat.

LINNELL’S NOTES
1. For even cooking, try to cut pork in uniformly thick slices.

2. The spiciness of the sauce can be adjusted by reducing or increasing the amount of minced chile.

3. *I make double the amount of sauce and pour about half of it into a separate bowl to serve alongside the meat or to slather it on the grilled meat prior to serving. Discard the remaining half that was brushed onto the raw meat.

4. These kebabs make hearty appetizers and taste just as good when served at room temperature.

5. I sprinkled toasted sesame seeds on the kebabs and cilantro leaves on the serving plate prior to serving.

ENJOY!

Read Full Post »

« Newer Posts - Older Posts »